To upload a CSV file to Google Drive, go to drive.google.com on a computer, click New > File upload, and choose the CSV. To work with the data, right-click the uploaded file and choose Open with > Google Sheets, or skip Drive and bring the file straight into a spreadsheet with File > Import in Google Sheets.
These steps cover Google Drive and Google Sheets in a web browser on Windows, Mac, and Chromebook computers, plus the Google Drive app on iPhone, iPad, and Android. They follow Google’s help pages on uploading files to Google Drive, importing data sets and spreadsheets, and opening files in Drive. If you’d rather work offline on your computer, you can also open CSV files in Excel by default.
You Need a Google Account
- A Google account. Drive and Sheets are free with any Google account. Uploaded files count toward your Drive storage, even when you upload them into a folder someone else owns.
- A real .csv file. CSV stands for comma-separated values. It’s a plain text file where each line is a row and a separator character, usually a comma, splits the columns. Check that the file name ends in .csv, not .xlsx or .txt.
- A file that isn’t password-protected. Google’s import steps only work with files that have no password.
- A copy of the original. Keep the untouched CSV somewhere safe. If an import goes wrong, you can start over from it.
Which Method Should You Use?
| You want to | Use this method |
|---|---|
| Store the CSV in Drive and open it as a spreadsheet | Upload to Drive, then Open with Google Sheets |
| Add the data to a spreadsheet you already have | File > Import in Google Sheets |
| Control the separator or where the data lands | File > Import in Google Sheets |
| Upload from your phone | The Google Drive app |
| Pull a CSV from a public web address that updates | The IMPORTDATA function |
How to Upload a CSV File to Google Drive and Open It

- On your computer, go to drive.google.com and sign in. To put the file in a specific folder, open that folder first.
- At the top left, click New, then click File upload.
- Find the CSV on your computer and select it. A progress box appears at the bottom right of the screen and shows a check mark when the upload is done.
- Right-click the CSV file in your Drive list.
- Point to Open with, then choose Google Sheets.
The data opens in a new Google Sheets spreadsheet, with each value in its own cell, ready to sort, filter, and edit. Sheets saves this as a separate Google Sheets file, so the original CSV stays in Drive unchanged.
You can also double-click the CSV in Drive. That opens a preview, and you can click Open with Google Sheets at the top of the preview to get the editable version.
Other Ways to Upload From a Computer
- Drag and drop: Open a folder at drive.google.com and drag the CSV from your desktop or File Explorer into the browser window.
- Folder upload: Click New > Folder upload to send a whole folder of CSV files at once.
- Drive for desktop: If you install Google’s Drive for desktop app, a Google Drive folder appears on your computer. Files you drag into it upload to Drive and show up at drive.google.com.
If you upload a file with the same name as one already in that Drive folder, Google adds it as a new version of the existing file. To keep both, click Keep both files when Drive asks.
Drive’s Settings page also has a Density option that lets you show more files on the screen in Google Drive.
Convert CSV Uploads to Sheets Automatically
If you upload spreadsheets often, open drive.google.com/drive/settings and check the box next to Convert uploads to Google Docs editor format. Files you upload after that are converted to Google formats, so a CSV becomes a Google Sheets file without the Open with step. This setting can only be changed on a computer.
The same setting is a quick way to convert a Word document to a Google Doc as it uploads.
The same upload steps work for other documents, and the article on uploading a PDF to Google Drive adds the phone, Chrome, and Gmail methods.
How to Import a CSV File Into Google Sheets
Use this method when you want more control, such as adding the data to an existing spreadsheet or choosing the separator yourself.

- On your computer, open Google Sheets and open or create a spreadsheet. Here’s how to create a new Google Sheets spreadsheet if you need one.
- At the top, click File > Import. The Import file window opens with tabs for My Drive, Shared with me, Recent, and Upload.
- Pick the CSV from one of the Drive tabs, or click Upload and drag the file in or click Select a file from your device. Along with Excel and OpenDocument files, Sheets can import plain text types such as .csv, .txt, .tsv, and .tab.
- Under Import location, choose where the data should go (see the table below).
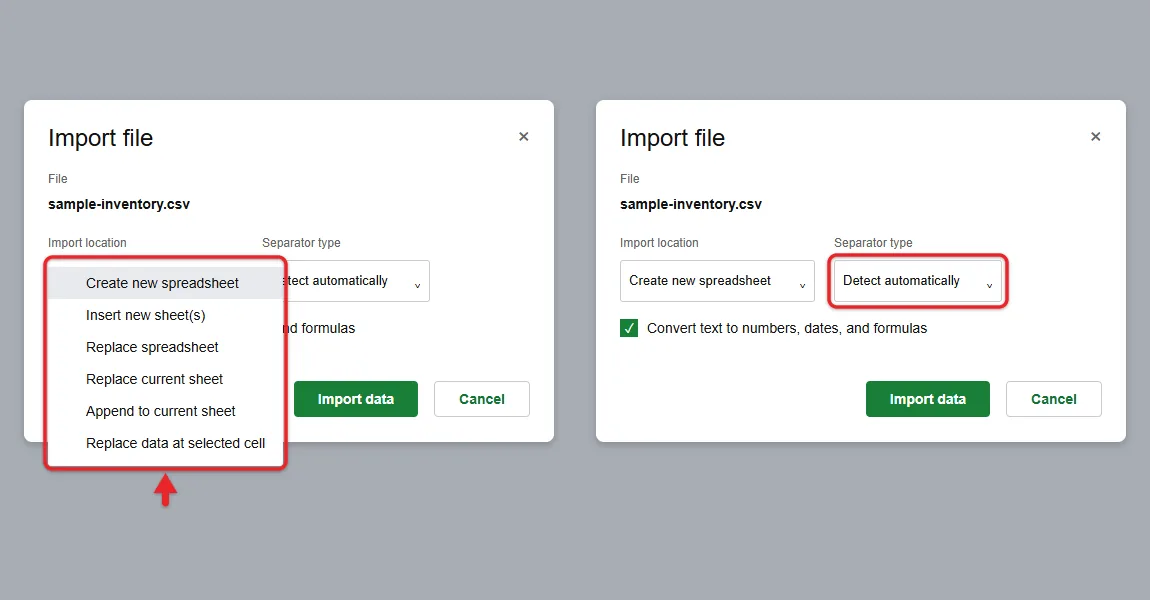
- Under Separator type, leave Detect automatically selected, or choose Comma, Tab, or Custom and type the character your file uses.
- Leave Convert text to numbers, dates, and formulas checked for most files. Uncheck it if the file has ZIP codes, account numbers, or product codes that start with zero.
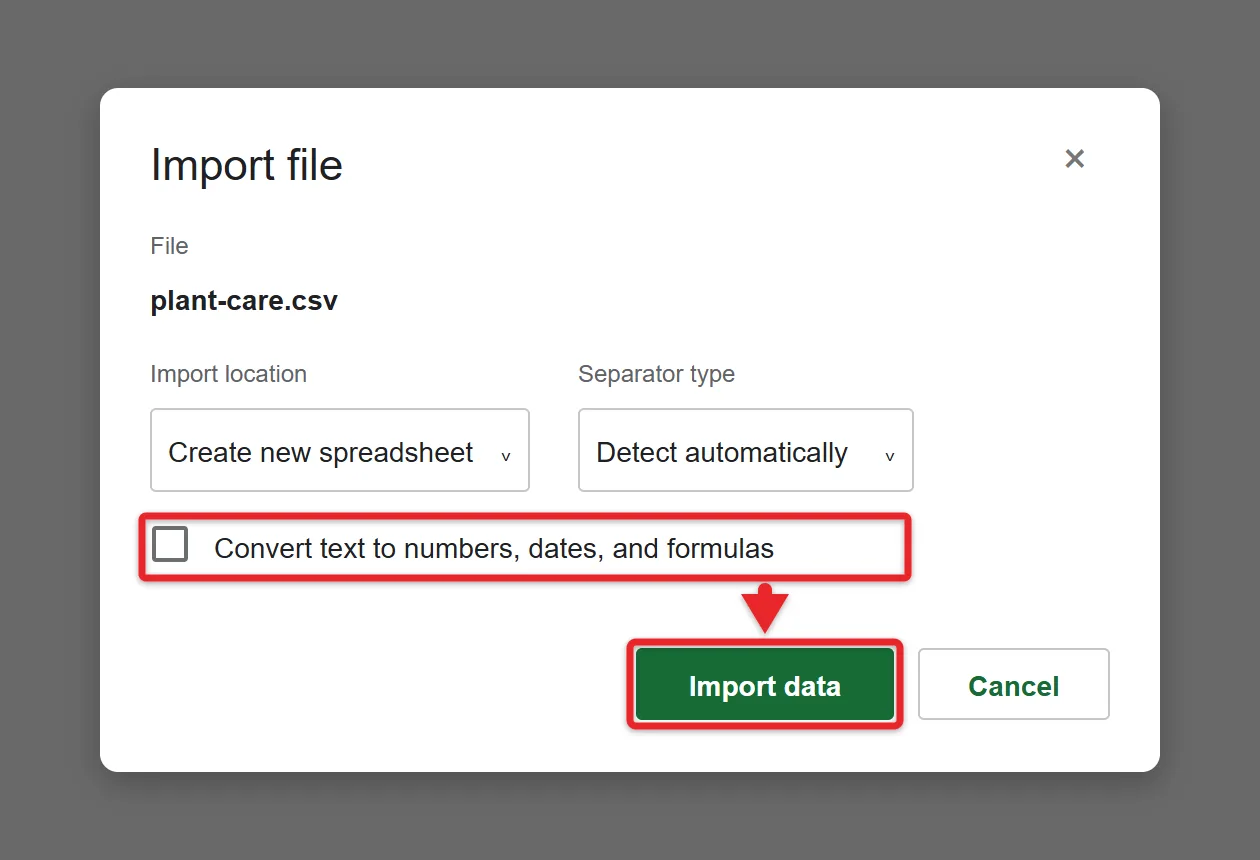
- Click Import data.
The CSV data appears in rows and columns, with each value in its own cell, in the place you picked under Import location.
Google’s help page calls the separator setting “Separator character” and the final button “Import,” so you may see either wording depending on when your account picks up interface changes.
Which Import Location to Choose
Not every file type offers all six choices. Anything that says “replace” overwrites data, so pick one of those only when you’re sure you no longer need what’s there.
| Import location | What it does |
|---|---|
| Create new spreadsheet | Puts the data in a brand new spreadsheet. The safest choice. |
| Insert new sheet(s) | Adds the data as a new tab in the spreadsheet you have open. |
| Replace spreadsheet | Removes every tab in the open spreadsheet and replaces them with the CSV data. |
| Replace current sheet | Replaces only the contents of the tab you’re on. |
| Append to current sheet | Adds the rows after the last row that has data. Works best when the columns match. |
| Replace data at selected cell | Writes the data starting at the cell you selected, over anything already there. |
When to Change the Separator
Detect automatically can find ways to split your data, such as a semicolon or fixed-width formatting. Semicolons are common in files exported in Europe, where the comma is used as a decimal point. If your columns come out jumbled, import again and choose the separator your file actually uses. To check which one that is, you can open the CSV file in Notepad and look at the characters between values.
How to Upload a CSV From an iPhone, iPad, or Android Phone
iPhone or iPad:
- Open the Google Drive app.
- Tap the Add button (the plus sign), then tap File upload.
- Find and tap the CSV, for example in the Files app’s iCloud Drive or Downloads folder.
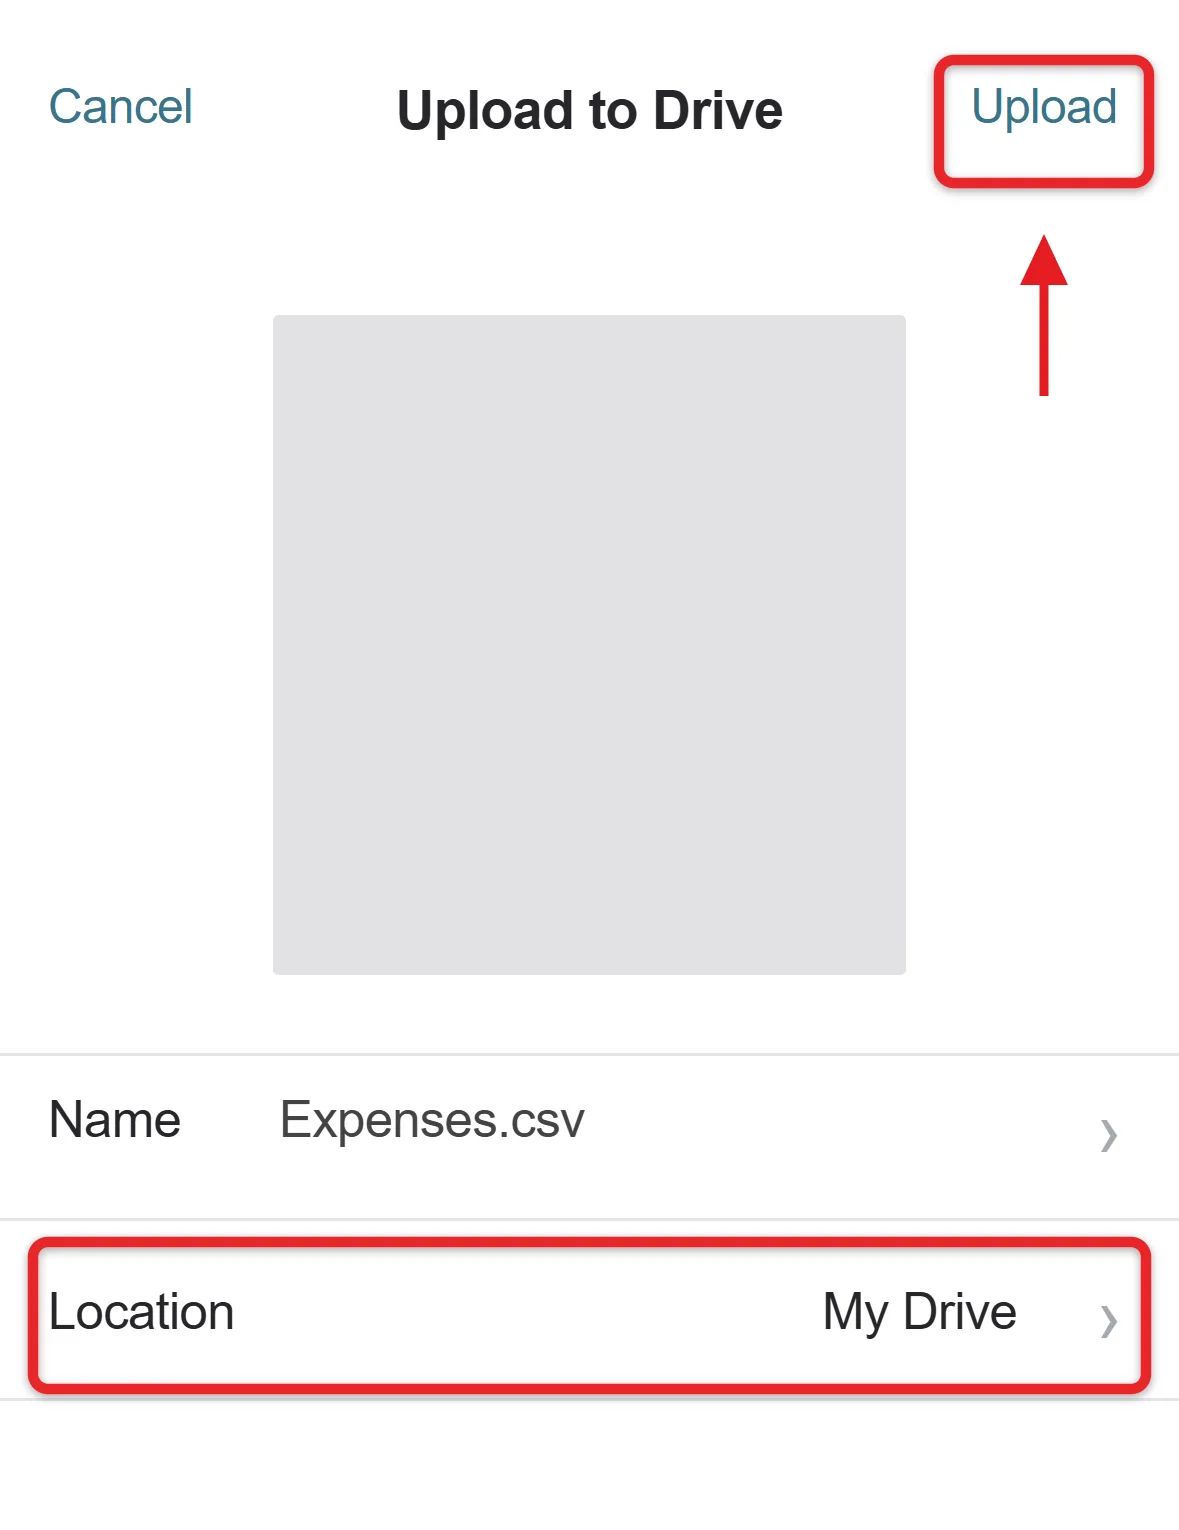
- Tap Location to pick a Drive folder, then tap Upload.
Android:
- Open the Google Drive app.
- Tap New, then tap Upload.
- Select the CSV. It appears in My Drive until you move it.
Once the file is in Drive, open drive.google.com on a computer to convert it with Open with > Google Sheets or bring it into an existing spreadsheet with File > Import. Google’s import steps are written for Sheets on a computer.
Other Ways to Get CSV Data Into Google Sheets
Paste the Text and Split It
For a short CSV, open it in a text editor, copy the text, click cell A1 in a blank Google Sheet, and paste. If every row lands in column A, select that column, click Data > Split text to columns, and pick the right character from the Separator menu that appears.
Use IMPORTDATA for a CSV on the Web
If the CSV lives at a public web address, type =IMPORTDATA("https://example.com/file.csv") in a cell, using the file’s full address including https://. The function reads .csv and .tsv files from a URL, and the data fills the cells starting where you typed the formula. It can’t read a file that needs a sign-in, so it won’t work with a private Drive link.
How to Check It Worked or Undo It
After the import, scroll to the last row and compare it with the end of the original CSV, and spot-check a few columns with numbers or dates. To undo an import into an existing sheet, press Ctrl + Z (or Cmd + Z on a Mac) right away, or use File > Version history to restore an earlier version. To remove an upload, right-click the file in Drive and choose Move to trash.
Troubleshooting CSV Imports
- Everything is in one column. The separator didn’t match. Import again with the correct Separator type, or select the column and use Data > Split text to columns.
- Accented letters or symbols look garbled. The file probably wasn’t saved as UTF-8. Open it in a text editor, save a copy with UTF-8 encoding, and import that copy.
- Leading zeros disappeared. Sheets read codes like 00123 as numbers. Import again from the original CSV with Convert text to numbers, dates, and formulas unchecked.
- Dates are wrong or swapped. Sheets reads dates using the spreadsheet’s locale, so 03/04 can mean March 4 or April 3. Click File > Settings, choose the matching country under Locale, click Save settings, and import again.
- The file opened as plain text with commas. It opened in Google Docs or the preview, not Sheets. Use Open with > Google Sheets instead.
- Google Sheets isn’t listed under Open with. Check that the file name ends in .csv. A file saved as .txt or with no extension may not offer Sheets.
- The file is too big. Google allows up to 20 million cells in a spreadsheet created in or converted to Sheets. Count rows times columns; if it’s over, split the CSV into smaller files or remove columns you don’t need first.
- The upload fails or stalls. Check that your Drive storage isn’t full, then try again in a fresh browser tab.
Why Not Google Docs?
Google Docs is a word processor, so a CSV would show up there as plain text with commas between values. Google Sheets splits the data into rows and columns, which is what you want for a CSV.
What to Do After You Open the CSV
- Sort or narrow the data with a filter in Google Sheets.
- Keep the header row visible while you scroll by freezing rows in Google Sheets.
- Share a fixed copy by converting the Google Sheets file to a PDF.
- Need a CSV again? In Google Sheets, click File > Download > Comma-separated values (.csv). Only the current tab is saved, because a CSV holds one sheet.
CSV Upload Questions
Can I import a CSV that uses semicolons instead of commas?
Yes. Leave the separator on Detect automatically, which can detect a semicolon, or choose Custom and type a semicolon.
Does Google Drive change my original CSV file?
No. Opening a CSV with Google Sheets creates a separate Google Sheets file. The CSV you uploaded stays in Drive as it was, unless you turned on the setting that converts uploads.
Why do my imported numbers or dates look wrong?
Sheets converts values it recognizes as numbers or dates, and it reads dates using the spreadsheet’s locale. Fix the locale under File > Settings, or import again with Convert text to numbers, dates, and formulas unchecked if the values should stay exactly as typed.
Can I import a password-protected file?
No. Google’s import steps say to choose a file that isn’t password-protected. Remove the password in the program that created the file, then import it.
Can I upload several CSV files at once?
Yes. In Drive, select several files in the File upload window or use Folder upload. Each CSV stays a separate file. To combine them into one sheet, you can merge CSV files into one file in Windows first, then import the combined file.
Related Guides

Matthew Burleigh is the founder, head writer, and editor of Solve Your Tech, which he launched in 2012. He has written technology tutorials since 2008 and worked in IT since 2003, including small-business support, IT management, and consulting. He holds Bachelor’s and Master’s degrees in Computer Science from Arizona State University.
Matthew writes practical guides for Windows, iPhone and iPad, Microsoft Office, Outlook, Google apps, and Android. Solve Your Tech’s guides are checked step by step against the device or app maker’s own documentation and tested on his own devices whenever he has the hardware or software, with clear steps, sources, and update dates.
Read more about Matthew and how Solve Your Tech writes and updates its guides, or report a correction.