To stop Microsoft Word from flagging frequently confused words, go to File > Options > Proofing, clear the Frequently confused words check box, and click OK. Word keeps checking spelling and the rest of your grammar. It only stops marking words that it thinks you mixed up with a similar one, such as “their” and “there.”
These steps are for the Word desktop app on Windows, including Word for Microsoft 365. Word on a Mac and Word for the web handle this differently, and both are covered further down.
Before You Change the Setting
- The setting belongs to Word, not to one document. Once you turn it off, it stays off for every document you open on that computer until you turn it back on.
- Nothing in your document is edited or deleted. Only the underlines for this one type of suggestion go away.
- Word will no longer warn you about real mix-ups such as “affect” and “effect” or “its” and “it’s.” If you only want to silence one word, see the alternatives below first.
- The option is not in every version of Word. Older versions used a check box named Use contextual spelling instead, and Word for the web has no Word Options window.
How to Turn Off Frequently Confused Words in Word
- Open Microsoft Word. Any document works, because this is an app-wide setting.
- Click the File tab at the top-left of the window.
- Click Options at the bottom of the left column. If the window is small, look under More. The Word Options window opens.
- Select the Proofing tab on the left.
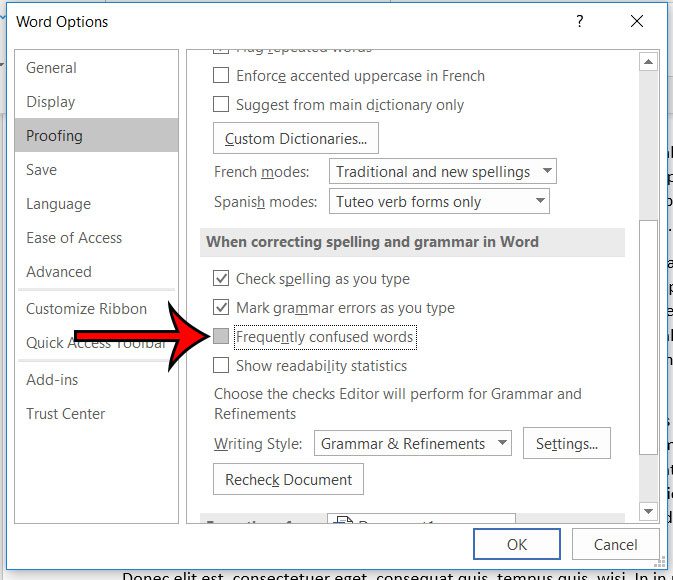
- Scroll to When correcting spelling and grammar in Word and clear the Frequently confused words check box.

- Click OK. Clicking Cancel or the X discards the change.
Microsoft lists the same File > Options > Proofing path for Word’s spelling and grammar options in its Check spelling and grammar in Office article.
Screenshots of the Steps
These screenshots show steps 2 through 6 in Word for Microsoft 365 on Windows: the File tab, Options, the Proofing tab, and the Frequently confused words check box. Other recent desktop versions look very similar.


What the Frequently Confused Words Setting Does
A normal spell check only catches words that are not in the dictionary. It cannot tell that “I will see you their” is wrong, because “their” is a real word. The Frequently confused words setting covers that gap. Microsoft’s developer documentation calls this the contextual speller, and describes it as checking spelling based on the context of a word and the words around it.
When the check finds a possible mix-up, Word underlines the word and offers a replacement. It does not change your text for you. That is why the setting can get in the way: names, legal or technical phrases, dialogue, and deliberate word choices can all be marked even when they are exactly what you meant to type.
Turning the setting off is a good fit when Word keeps marking the same correct word. If Word is actually replacing what you type, that is a different feature called AutoCorrect, which has its own section below.

How to Confirm It Worked or Turn It Back On
Go back to your document and look at a word that was marked before. The underline should be gone. If you want a quick test, type a sentence with an obvious mix-up and see whether Word leaves it alone.
To undo the change, return to File > Options > Proofing, check the Frequently confused words box again, and click OK.
If you clicked Ignore Once on some suggestions earlier and want Word to look at them again, the same Proofing tab has a Recheck Document button. Word then shows a warning about resetting the spelling and grammar checker. Click Yes to continue.
Ways to Silence One Suggestion Without Turning Off the Whole Check
If the check is useful most of the time, one of these narrower options may suit you better.
Ignore a single suggestion
Right-click the underlined word. Microsoft’s Check grammar, spelling, and more in Word article says the menu lets you choose Ignore Once to skip that instance, or Don’t check for this issue to tell Editor to stop checking for that type of issue. Editor is the name of the writing assistant built into Word for Microsoft 365. Ignored issues can come back after you close and reopen the document.
Turn off individual grammar rules
On the Proofing tab, the Settings button in the When correcting spelling and grammar in Word section opens a list of grammar and style checks. Clear the ones you do not want and click OK. In Word for Microsoft 365 you can reach the same kind of list from the Editor button on the Home tab, as described in Microsoft’s Grammar settings article.
Skip checking for selected text
Select the word or passage, then go to Review > Language > Set Proofing Language. The dialog box includes an option to not check spelling or grammar for the selection. This is handy for a block of code, a quotation, or a name that Word keeps marking. Remember that spelling mistakes in that text will not be caught either.
Hide errors in one document only
At the bottom of the Proofing tab is an Exceptions for list. Pick the current document, then select Hide spelling errors in this document only or Hide grammar errors in this document only. This hides the underlines in that file and leaves your Word settings alone for everything else.
If Word Is Changing Your Words Automatically
The frequently confused words check only underlines text. If Word swaps a word the moment you press the spacebar, AutoCorrect is doing it. Microsoft’s Turn AutoCorrect on or off in Word article gives this route:
- Go to File > Options > Proofing and select AutoCorrect Options.
- On the AutoCorrect tab, clear Replace text as you type.
- Click OK.
To stop just one replacement, leave that box checked. Type the word in the Replace box, select the entry in the list, and click Delete. Microsoft’s Add or remove AutoCorrect entries in Word page warns that the AutoCorrect list is shared, so a change made in Word also affects the other Office programs that use AutoCorrect.
If your phone is the one replacing words, here is how to change the auto-correct setting on an iPhone.
Word for Mac and Word for the Web
Word for Mac: there is no File > Options window. Click the Word menu > Settings (called Preferences in older versions), then click Spelling & Grammar to change which spelling and grammar checks run. AutoCorrect has its own AutoCorrect pane in the same window.
Word for the web: the browser version has no Frequently confused words check box. Microsoft’s Word for the web Editor page says you can adjust what is checked at Review > Editor > Editor Settings. To skip checking for part of a document, select the text, go to Review > Editor > Set Proofing Language, and choose Don’t check spelling or grammar.
Troubleshooting

Word still underlines the word
The underline may come from a different check. Office marks possible spelling errors with a red squiggly line and possible grammar errors with a blue one. If the word still has a blue underline, try clearing individual rules with the Settings button, or clear Mark grammar errors as you type to stop grammar marking as you type. A red underline means the word is not in the dictionary. Right-click it and choose Add to Dictionary if it is spelled the way you want.
I can’t find the Frequently confused words box
Make sure you are on the Proofing tab and scroll down to the When correcting spelling and grammar in Word section. It is below the AutoCorrect and Office-wide spelling sections. If the box is not there, your version may use different wording, or you may be in Word for the web. The proofing language can matter too. Microsoft’s language list shows context-sensitive spell checking for only some languages, including English, French, and German.
The check box is gray or the change does not stick
Confirm that you clicked OK and not Cancel. On a work or school computer, some Office settings can be managed by the organization. If a setting keeps resetting or cannot be clicked, ask your IT administrator.
Word is not marking anything at all
If no underlines appear anywhere, automatic checking may be turned off, or the document may be set to hide errors. To check those settings, read about turning on spell check in Word.
Frequently Asked Questions
Does turning off Frequently confused words turn off spell check?
No. Check spelling as you type and Mark grammar errors as you type are separate check boxes on the same Proofing tab. Clearing Frequently confused words only stops Word from marking real words that it thinks are used in the wrong place.
Does this setting apply to one document or to all of them?
It applies to Word itself, so it affects every document you open in that copy of Word. To hide marks in a single file, use the Exceptions for options at the bottom of the Proofing tab instead.
Will other people see the underlines when I share the document?
The Frequently confused words option is part of your Word settings, not the file. Someone who opens the document in their own copy of Word sees whatever their settings produce, so they may still see the word underlined.
Does this change anything in Outlook?
The check box in Word Options is a Word setting. Outlook keeps its own spelling options at File > Options > Mail > Spelling and Autocorrect, according to Microsoft. Many of Word’s formatting tools do carry over to Outlook, though. For one example, here’s how to use strikethrough in Outlook.
Is there a list of the words Word treats as frequently confused?
Microsoft’s support articles do not publish one. The check is based on context, so the same word can be marked in one sentence and left alone in another.
Next Step
With this check turned off, mix-ups like “then” and “than” are yours to catch. One simple way to proofread is to listen to the document. You can use Read Aloud in Microsoft Word to have Word read your text back to you.

Matthew Burleigh is the founder, head writer, and editor of Solve Your Tech, which he launched in 2012. He has written technology tutorials since 2008 and worked in IT since 2003, including small-business support, IT management, and consulting. He holds Bachelor’s and Master’s degrees in Computer Science from Arizona State University.
Matthew writes practical guides for Windows, iPhone and iPad, Microsoft Office, Outlook, Google apps, and Android. Solve Your Tech’s guides are checked step by step against the device or app maker’s own documentation and tested on his own devices whenever he has the hardware or software, with clear steps, sources, and update dates.
Read more about Matthew and how Solve Your Tech writes and updates its guides, or report a correction.