If you have used previous versions of the Windows operating system and remember seeing files and folders that were slightly transparent in comparison to the rest of your files, then you have seen hidden files and folders.
The Windows operating system attempts to hide files and folders that are important to the operation of your computer to prevent people from accidentally editing or deleting them.
However, these files are still there and you can see them by adjusting one setting for your Windows Explorer folders.
Continue reading this tutorial to learn how to show hidden files and folders in Windows 7 and adjust files that you had previously been unable to see.
Our Windows 7 AppData guide can provide more information on a hidden folder that you may need to work with at some point in the future.
Showing Hidden Files and Folders in Windows 7
One of the main reasons that you might want to show hidden files and folders is to make changes to files that are located in the AppData folder of your user profile.
This is the folder that contains most of the program information and files that are created by Microsoft Office programs.
Additionally, it contains the Startup folder where you can modify the programs that launch when you turn on your computer.
You can check out one of our other articles, how to start Google Chrome automatically, if you are interested in having a particular program start whenever you turn on your computer.
Begin the process of unhiding files and folders in Windows 7 by clicking the Windows Explorer icon in the taskbar at the bottom of your screen. It is the manila folder icon shown in the image below.
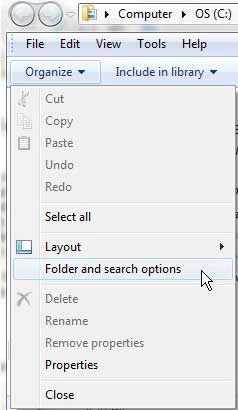
Click the Organize drop-down menu in the horizontal blue bar at the top of the window, then click the Folder and Search Options menu. This opens a new window called Folder Options.
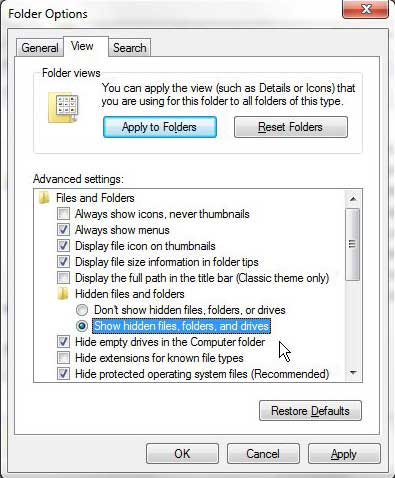
Click the View tab at the top of the Folder Options window, then locate the Hidden files and folders section in the Advanced Settings area of the window.
Check the option to the left of Show hidden files, folders and drives.
Click the Apply button to apply the changes, then click the OK button to close the window. You can return to this window at any time from any Windows Explorer folder and disable the viewing of hidden files and folders if you no longer want the option enabled.

Matthew Burleigh has been writing tech tutorials since 2008. His writing has appeared on dozens of different websites and been read over 50 million times.
After receiving his Bachelor’s and Master’s degrees in Computer Science he spent several years working in IT management for small businesses. However, he now works full time writing content online and creating websites.
His main writing topics include iPhones, Microsoft Office, Google Apps, Android, and Photoshop, but he has also written about many other tech topics as well.


