It is becoming increasingly necessary for the average person to be able to share files that are larger than 25 MB in size.
Unfortunately, most email providers will not allow you to do this and even if they do, you still need to count on your recipient being able to receive the file.
This is why file sharing sites exist, because you can upload large files then send a link for the file to the person with whom you want to share the file.
However, many of these services require you to register for a new account, and include a less than ideal user experience.
Fortunately, your Hotmail account comes with free access to a SkyDrive cloud storage account.
You can use SkyDrive to send a file that is bigger than 25 MB in Hotmail (click here to learn about Hotmail’s attachment limit) and your recipient can simply download the file from the link they receive.
It should be noted that the recipient might need to have a Windows Live ID in order to access any shared files. A Windows Live ID is free and useful, so it is worth signing up for one if they do not have one already. Their Windows Live ID does not need to be the email address with which the file was shared, however.
Send Large Files with Hotmail
If you haven’t started using your free SkyDrive account yet, then you are missing out on an impressive cloud storage solution. Read this article to learn more about some of the exciting things you can do with SkyDrive.
Begin the process of sharing your large file in Hotmail by following the instructions below.
1. Navigate to skydrive.live.com.
2. Type your Hotmail email address and password into their respective fields, then click the Sign In button.
3. Click the Upload button at the top of the window.
4. Browse to the file you want to send, then double-click the file to upload it to your SkyDrive account.
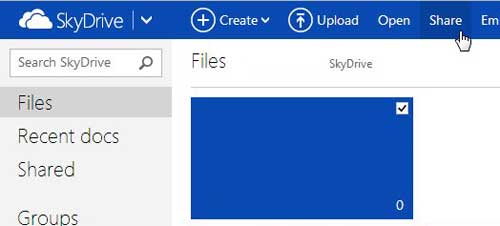
5. Check the box next to or inside the file you just uploaded (how your files are displayed in SkyDrive will depend upon several factors), then click the Share button at the top of the window.
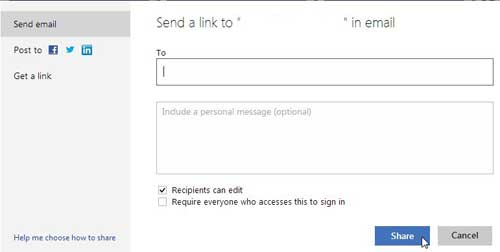
6. Type the email address of your intended recipient into the To field, type the body of the message into the Include a personal message field, choose whether recipients can edit the file and whether or not the person needs to sign in to access the file, then click the Share button.
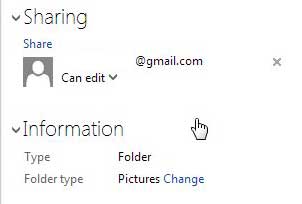
When you return to your SkyDrive folder, you will see that the name of the person to whom you just sent the file is now listed under the Sharing section at the right side of the window for your selected file.
Now that you know how to send a file bigger than 25 MB in Hotmail, you can take advantage of this feature to share large files with others.
You can remove their sharing permissions at any time by clicking the X to the right of their name, or you can change their permissions using the drop-down menu under their name.

Matthew Burleigh has been writing tech tutorials since 2008. His writing has appeared on dozens of different websites and been read over 50 million times.
After receiving his Bachelor’s and Master’s degrees in Computer Science he spent several years working in IT management for small businesses. However, he now works full time writing content online and creating websites.
His main writing topics include iPhones, Microsoft Office, Google Apps, Android, and Photoshop, but he has also written about many other tech topics as well.


