When you make new documents in Microsoft Word, you assume that you won’t have any trouble finding them later when you need them.
But if the file are difficult to locate or you want to put them in a different location, then our tutorial below will show you how to change the default save location for Word 2010.
How to Use SkyDrive As Your Default Word 2010 Save Folder
- Open Microsoft Word.
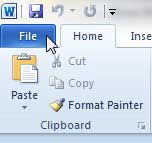
- Click File.
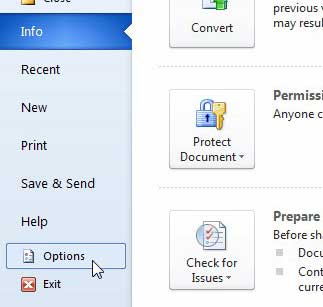
- Choose Options.
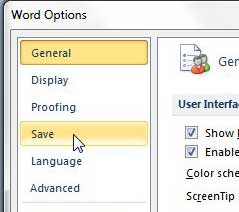
- Select the Save tab.
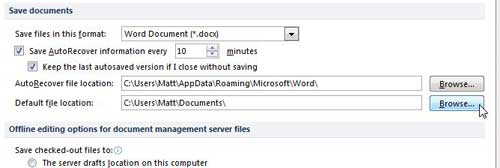
- Click the Browse button next to Default file location.
- Choose the desired folder.
- Click OK.
Our guide continues below with additional information on how to change the default save folder in Microsoft Word 2010, including pictures of these steps.
If you have followed the instructions in this article to set up a Skydrive account with your Windows Live ID and download the app to your Windows computer, then hopefully you are enjoying the ease with which you can add files to your SkyDrive account.
These files are stored and accessed in a way that is very similar to any other file or folder on your computer and, fortunately, most of the programs on your computer will handle it as such.
You can take advantage of this fact and configure Word 2010 to save files to SkyDrive by default .
This is an incredibly useful feature, as it allows you to automatically save documents that you have created directly to your SkyDrive cloud storage.
Related Topic: Need to change the margins in your document? Our Microsoft Word 2010 margin guide can show you how.
How to Set The SkyDrive Folder as the Default for Word 2010 Saves (Guide with Pictures)
As mentioned previously, you need to have the SkyDrive for Windows app installed on your computer already for this method to work.
This app is free and you can find it directly from your SkyDrive account. Specific, step-by step instructions for downloading and installing the SkyDrive app can be found here. Once you have configured SkyDrive as a local folder on your computer, you are ready to set up Word 2010 to use that folder.
Step 1: Launch Word 2010.
Step 2: Click the File tab at the top-left corner of the window.
Step 3: Click the Options button in the column at the left side of the window.
Step 4: Click Save in the column at the left side of the Word Options window.
Step 5: Click the gray Browse button to the right of Default file location.
Step 6: Click the SkyDrive option in the column at the left side of the window, then click the OK button.
Step 7: Click the OK button at the bottom of the Word Options window to save your changes and close the window.
Any new document that you create in Word 2010 should now automatically save to this location.
That will allow you to access that file from any other computer with an Internet connection, ensuring that you will never have to worry about having forgotten a document at work or on your other computer.
Now that you know how to change the default save location in Microsoft Word 2010 you will be able to use this to make it easier for you to find the documents that you create.

Matthew Burleigh has been writing tech tutorials since 2008. His writing has appeared on dozens of different websites and been read over 50 million times.
After receiving his Bachelor’s and Master’s degrees in Computer Science he spent several years working in IT management for small businesses. However, he now works full time writing content online and creating websites.
His main writing topics include iPhones, Microsoft Office, Google Apps, Android, and Photoshop, but he has also written about many other tech topics as well.


