Windows 7 does a great job of remembering the security and password information for wireless networks to which you have connected in the past.
But you might run into some problems if you have connected to a network at one point while you have your computer, but the security key or password for that network has since changed.
It is not immediately obvious how to change the password for a memorized network, which can prevent you from accessing the Internet or network utilities until the password is updated.
So continue reading below to learn how to change a wireless network security key for a network that is memorized in Windows 7.
As an Amazon affiliate, I earn from qualifying purchases.
Are you disappointed with the speed of your wireless network? Sometimes simply purchasing a new or upgraded router can improve the speed and performance of your network, as well as the devices connected to it. Check out some excellent and well-reviewed options here to see what you have available to you on the router market.
How to Change a Network Key in Windows 7
One nice aspect of the way that Windows 7 manages networks is that you can access a list of networks to which you have connected through the Control Panel.
So even if you are not currently connected to a network for which you need to change the security settings, you can make adjustments as you find out about them.
This level of control will help to ensure that you have the ability to stay connected to networks at home, work, or on the road.
Step 1: Right-click the network icon in the system tray at the bottom-right corner of your screen, then click the Open Network and Sharing Center option.
If you can not find this icon, you can also access the Network and Sharing Center menu from the Control Panel on your Start menu. You can also read this article to learn about ways to quickly access programs and menus in Windows 7.
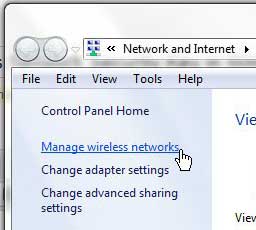
Step 2: Click the Manage wireless networks link in the column at the left side of the window.
Step 3: Double-click the wireless network for which you wish to change the wireless security key.
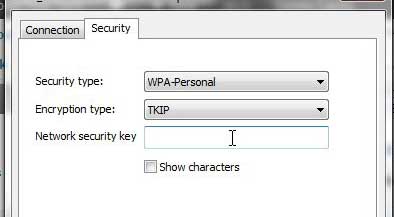
Step 4: Click the Security tab at the top of the window.
Step 5: Click inside the field to the right of Network security key, then enter the current correct wireless network security key.
If necessary, you can also change the Security type and Encryption type from the drop-down menus on this window as well.
Step 6: Click the OK button at the bottom of the window to save and apply your changes.
Now that you know how to change a wireless network security key in Windows 7, you will be able to update this information on your computer whenever you need to.

Matthew Burleigh has been writing tech tutorials since 2008. His writing has appeared on dozens of different websites and been read over 50 million times.
After receiving his Bachelor’s and Master’s degrees in Computer Science he spent several years working in IT management for small businesses. However, he now works full time writing content online and creating websites.
His main writing topics include iPhones, Microsoft Office, Google Apps, Android, and Photoshop, but he has also written about many other tech topics as well.


