While many of the device management tasks that you will need to do on your iPhone can be performed directly from the device, you might occasionally need or want to connect your iPhone to your Mac.
When you do this, you can use iTunes to manage the device, as well as the content that you have in iTunes.
Our tutorial will show you how to authorize a computer in iTunes on a Mac so that you can take full advantage of the capabilities of the iTunes software on your computer.
As an Amazon affiliate, I earn from qualifying purchases.
How to Grant iTunes Permissions on a MacBook
- Open iTunes.
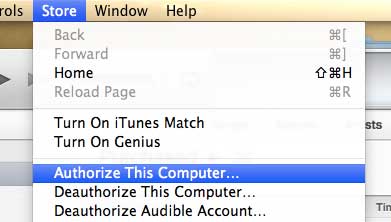
- Select Store at the top of the screen.
- Choose Authorize this computer.
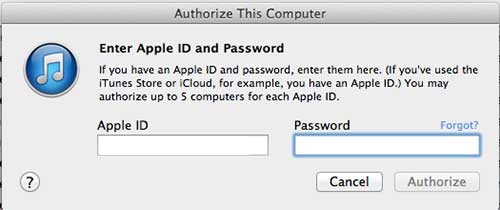
- Type your Apple ID and password.
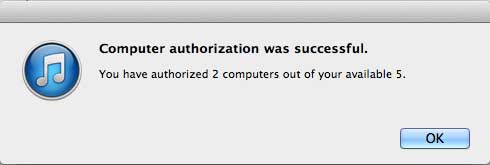
- Click OK.
Our guide continues below with additional information on how to authorize a computer in iTunes on a Mac, including pictures of these steps.
All of the apps, music, movies, and TV shows that you buy through iTunes are affiliated with your Apple ID.
You can then link the iTunes installation on your computer with your Apple ID, which allows you to download iTunes content to that computer.
In order to do this, however, you need to authorize your computer in iTunes.
Fortunately, this is a simple process that you can accomplish using the steps outlined below.
Mac OS X iTunes – Authorize a Computer (Guide with Pictures)
You can authorize up to five computers with your Apple ID. If all of your authorizations are used, you will need to deauthorize all of your computers before you can authorize another one.
You can then simply reauthorize any computer that you want to use by following the steps outlined below.
Step 1: Launch iTunes.
Step 2: Click Store at the top of the screen.

Step 3: Select the Authorize this computer option.

Step 4: Enter your Apple ID and password when prompted.

Step 5: You will then see a screen like the image below that tells you how many of your authorizations have been used.

Now that you know how to authorize a computer in iTunes on a Mac, you will be able to use that computer to manage your iTunes library and other Apple ID content.
If you’re running out of room on your computer for your iTunes library, it might be time to consider purchasing an external hard drive to hold those files. It is also helpful for storing Time Machine backups. Click here to check out an affordable 1 TB hard drive on Amazon.
Learn how to turn on Home Sharing in iTunes so you can access your content from an Apple TV.

Matthew Burleigh has been writing tech tutorials since 2008. His writing has appeared on dozens of different websites and been read over 50 million times.
After receiving his Bachelor’s and Master’s degrees in Computer Science he spent several years working in IT management for small businesses. However, he now works full time writing content online and creating websites.
His main writing topics include iPhones, Microsoft Office, Google Apps, Android, and Photoshop, but he has also written about many other tech topics as well.