If you have purchased movies, TV shows, or music from iTunes, then those purchases are tied to an Apple ID.
If you want to be able to download those files and play them on your computer, or if you want to transfer them to a device such as an iPhone or iPad, then you need to authorize that computer for your Apple ID.
If you have signed into iTunes with your Apple ID but are not able to play any of your media files, then you have probably not yet authorized that computer for your Apple ID.
Authorize a Computer in iTunes for Windows
Note that you can only authorize up to 5 computers for one Apple ID. If you reach that maximum number of computers, then you will need to deauthorize one of the previously authorized computers in order to use your Apple ID on a new computer.
The option to deauthorize a computer is located directly below the option to authorize a computer that we will be using in the tutorial below.
Step 1: Launch iTunes.
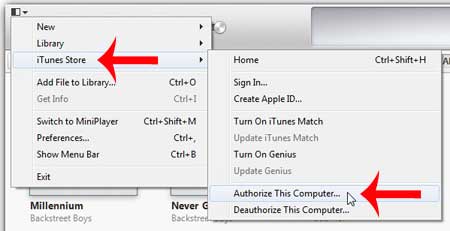
Step 2: Click the iTunes menu at the top-left corner of the iTunes window.

Step 3: Select the iTunes Store option, then click Authorize this Computer.

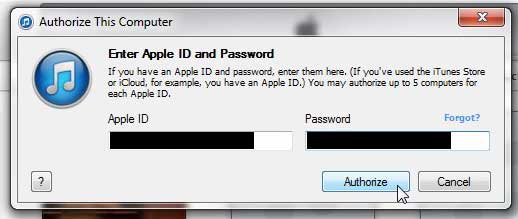
Step 4: Enter the email address and password for your Apple ID, then click the Authorize button.

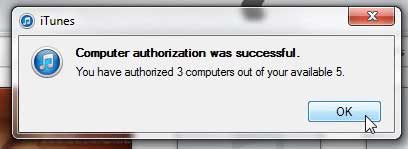
After a couple seconds you should see an image like the one below to let you know that the computer has been authorized, as well as the number of authorizations that you have used.

If you have already reached the maximum number of authorizations, then you will either need to deauthorize all of your computers from the computer that you are currently on, or you will need to specifically deauthorize a single computer by signing into iTunes on that computer and selecting the Deauthorize this Computer option.
Now that you know how to authorize a computer for your Apple ID in iTunes, you will be able to make this adjustment so that you can connect your devices to the application.
Do you have an .m4a file that you need to get into the .mp3 format? Read this article to learn how you can do that in iTunes.
Continue Reading

Matthew Burleigh has been writing tech tutorials since 2008. His writing has appeared on dozens of different websites and been read over 50 million times.
After receiving his Bachelor’s and Master’s degrees in Computer Science he spent several years working in IT management for small businesses. However, he now works full time writing content online and creating websites.
His main writing topics include iPhones, Microsoft Office, Google Apps, Android, and Photoshop, but he has also written about many other tech topics as well.