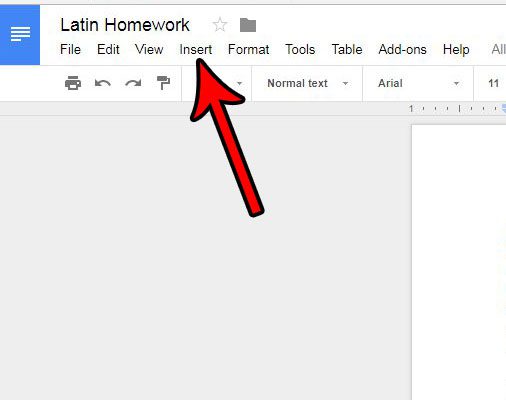
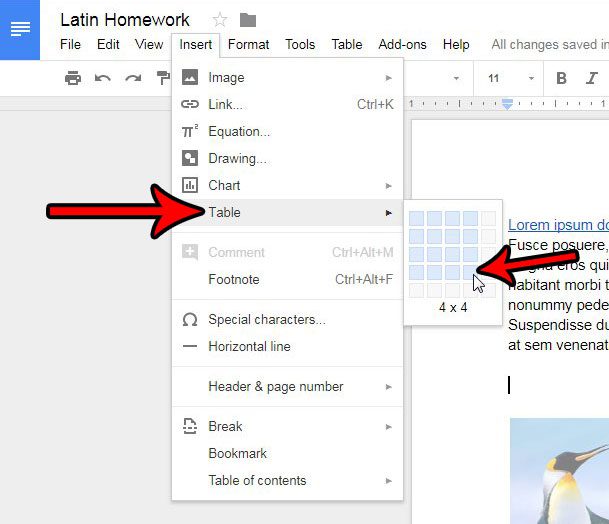
While you may have previously used Google Sheets to organize and edit data in a tabular layout, it’s possible that you want to use that layout in a document instead. You can create a table in a Google Docs document by clicking the Insert tab at the top of the window, choosing the Table option, then specifying the number of rows and columns for the table.
Tables and grid layouts like those in Microsoft Excel are popular for organizing and displaying data. Creating a table in Excel allows you to quickly customize a table so that it is sortable and filterable. It makes a lot of information much easier to read, as the structure of the data and its uniformity can help to eliminate confusion that can occur from data in a different layout.
While this type of table is most commonly seen in spreadsheets, it is beneficial in documents, too. Fortunately, you can create tables in Google Docs, thereby offering the option to formulate data in that manner if your document calls for it.
How to Add a Table to a Document in Google Docs
- Open the document.
- Choose where you want the table.
- Click Insert.
- Select Table, then the size of the table.
Our guide continues below with additional information on creating tables in Google Docs, including pictures of these steps.
Find out more about the Google Drive sign in process with our tutorial that covers this topic.
How to Insert a Google Docs Table (Guide with Pictures)
The steps in this article will show you how to create a table in Google Docs. You will be able to specify the size of the table as you add it, but you will be able to add or remove columns or rows later if you find that the initial table layout didn’t meet your needs.
Step 1: Sign in to your Google Drive and open the document into which you would like to add a table.
Step 2: Position your mouse cursor at the point in the document where you want the table to go.

Step 3: Select the Insert tab at the top of the window.

Step 4: Choose the Table option, then specify the number of rows and columns that you want the table to have.
My table in the picture below will have 4 rows and 4 columns. Note that you don’t need to be exact with the number of columns and rows you select. If you don’t know how many rows or columns you will need you can simply guess something close and add another row or column from the right-click menu later.

You can continue reading our tutorial below for additional discussion on inserting and working with tables in a Google Docs document.
Our article on how to add a row to a table in Google Docs can show you some of the ways that you can modify an existing table in your document.
More Information on Working with Google Tables in Google Docs
If you also use Google Sheets then you might find yourself in a situation where you need to insert a table from Google Sheets into your Google document. Fortunately, you only need to select the table or cells that you want to use in Docs, press Ctrl + C to copy them, then switch to the Google docs file and press Ctrl + V to paste them. As you paste the copied data into the document you will have the option to link the pasted table to the spreadsheet or paste it unlinked.
Once you have added the table to the document you are going to be able to perform a lot of different actions on that table. If you right-click on the table you are going to see a number of differentoptions, including insert row, delete row, insert column, delete column, and delete table options. A full list is below:
- Insert row above
- Insert row below
- Insert column left
- Insert column right
- Delete row
- Delete column
- Delete table – If you select Delete table it is going to completely remove the existing table and all of its data from the Google Doc.
- Distribute rows
- Distribute columns
- Sort table in ascending order
- Sort table in descending order
- Table properties
The rest of the options on this right-click dropdown menu include things like copying and pasting, which you will also find in other Google apps like Google Sheets or Google Slides.
If you select the Table properties option from this menu you are going to see a number of other options for modifying the table. This includes things like:
- Minimum row height
- Pin header row
- Allow row to overflow across pages
- Column width
- Cell vertical alignment
- Table alignment
- Left indent – if you adjust the left indent value it will move the left side of the entire table from the left side of the page.
- Cell padding
- Table border – this includes table border color and table border width.
- Cell background color
If you need to merge cells in your table then you will need to select the cells that you want to merge, then right-click on them and select the Merge cells option. Choosing to combine cells in this manner can be a useful way to modify the layout of the table if you need something other than the traditional table layout.
Most of the options for modifying the table layout are found under the Table tab at the top of the window. Note that you are able to make other changes to the table as well. For example, you can specify the vertical alignment of the data in your table if you don’t like the way that it currently looks.

Matthew Burleigh has been writing tech tutorials since 2008. His writing has appeared on dozens of different websites and been read over 50 million times.
After receiving his Bachelor’s and Master’s degrees in Computer Science he spent several years working in IT management for small businesses. However, he now works full time writing content online and creating websites.
His main writing topics include iPhones, Microsoft Office, Google Apps, Android, and Photoshop, but he has also written about many other tech topics as well.