Once you have started using the Dell Dock installed on your new Dell Computer, you will want to customize the icons that it displays.
Storing icons on the Dell Dock provides a common place to locate the programs that you use with regularity without cluttering your Desktop with icons that might get lost amidst other files that you have saved in that location.
How to Create the Shortcut
The steps in this article assume that you have already installed the Dell Dock application and that you know which other program you wish to include as a shortcut on the dock.
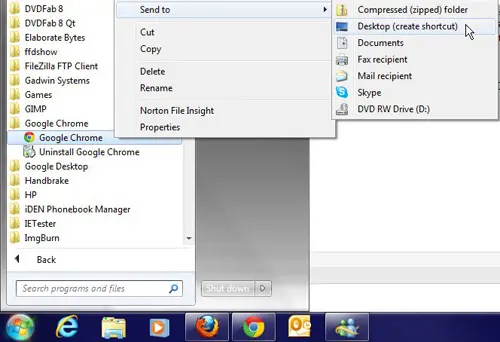
Step 1: Right-click a program from your start menu, click “Send To,” then click “Desktop.”

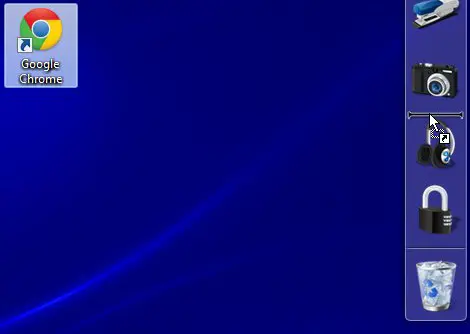
Step 2: Click the icon on your Desktop, then drag it to the position on your Dell Dock where you want to display the icon. The spot in which the icon will be displayed will be indicated by a black separator line.

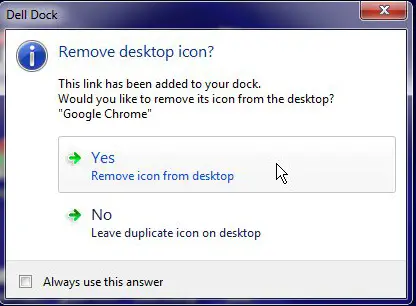
Step 3: Select what you want to do with the Desktop icon from the pop-up menu in the center of your screen.

Related: Can I Put a Chrome Shortcut on Desktop in Windows?
Now that you know how to add a new shortcut to the Dell Dock on your Windows computer, you can use the convenience of this application to make it easier to access your other favorite apps as well.
Conclusion
Once you have created the shortcut and elected whether or not to delete it from your Windows desktop, you will be able to simply click the app icon in the Dell dock.

Matthew Burleigh has been writing tech tutorials since 2008. His writing has appeared on dozens of different websites and been read over 50 million times.
After receiving his Bachelor’s and Master’s degrees in Computer Science he spent several years working in IT management for small businesses. However, he now works full time writing content online and creating websites.
His main writing topics include iPhones, Microsoft Office, Google Apps, Android, and Photoshop, but he has also written about many other tech topics as well.