The lines around the cells in your Microsoft Excel spreadsheet are called gridlines, and they serve an important function in visually separating data.
If you have ever turned off gridlines in a spreadsheet then you probably know how difficult their absence can make it to work.
This problem becomes evident on printed spreadsheets as well, so our tutorial will show you more about printing cell borders in Excel 2010 so that your documents are easier to read on paper.
How to Include the Gridlines When You Print in Excel
- Open your Excel file.
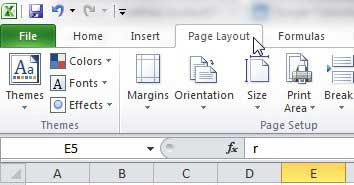
- Select the Page Layout tab.
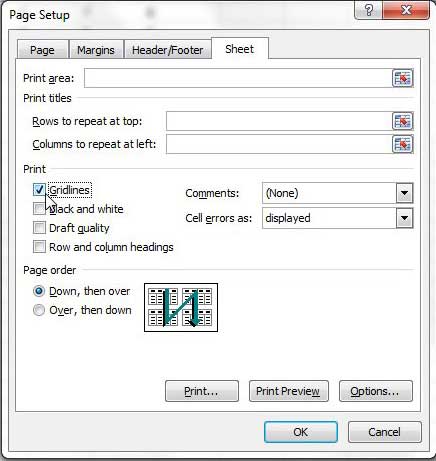
- Check the Print box under Gridlines.
Our guide continues below with additional information on printing cell borders in Excel 2010, including pictures of these steps.
Microsoft Excel 2010’s default setup is ideally suited for viewing on a computer screen.
The interface is clean and easy to understand, and you can generally infer from the different menus what you need to do to make your desired changes.
However, the default settings for printed Excel spreadsheets are not as perfect as they could be.
This problem is especially prevalent in circumstances where you are printing out a lot of data that fills an entire sheet.
It can be very difficult to trace which row or column particular cells belongs in, which can lead to confusion over the data that is being read.
You can achieve a solution to this dilemma, however, by printing cell borders in your Excel 2010 spreadsheet.
This improves the organization of your printed data by incorporating the grid pattern that you see in the spreadsheet on your computer screen.
How to Print Gridlines in Excel 2010 (Guide with Pictures)
The technical term for the effect that you want on your printed spreadsheet is gridlines.
By enabling this setting on the Page Setup menu, you will print the series of horizontal and vertical lines that help your readers keep track of the data cells that they are viewing.
I have been checking this option in my Excel spreadsheets for years, as have most of the other people that I work with.
I honestly don’t know why this isn’t the default option, but that is the opinion from my perspective. I’m sure there are other people that use Excel who dislike or have their own reasons for not printing gridlines.
Step 1: Begin by double-clicking your Excel spreadsheet to open the file in Excel 2010.
Step 2: Click the Page Layout tab at the top of the window.
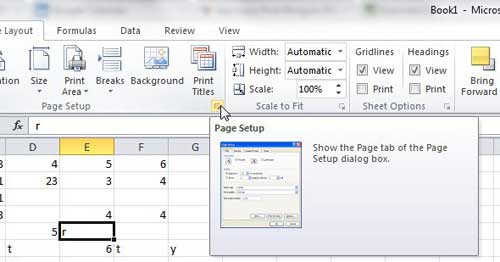
Step 3: Click the tiny Page Setup button at the bottom-right corner of the Page Setup section of the ribbon.
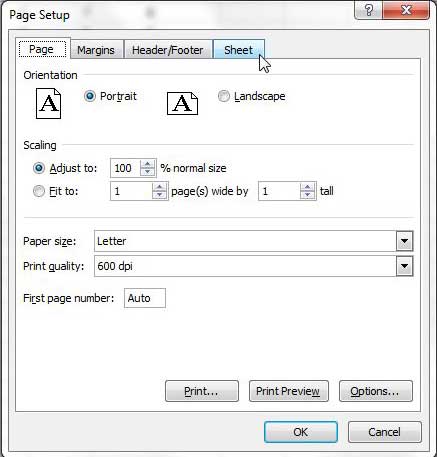
This opens a new window titled Page Setup.
Step 4: Click the Sheet tab at the top of this Page Setup window.
Step 5: Check the box to the left of Gridlines, then click the OK button at the bottom of the window.
Now that you know more about printing cell borders in Excel 2010, you will be able to turn this option on any time that you are printing a spreadsheet that is difficult to read without gridline printing enabled.
You should familiarize yourself with this menu, as it also contains many of the other options that you will need to adjust to configure printing for your Excel spreadsheet.
Navigate through the assorted Page Setup menu tabs to find options for adjusting your Margins, Page Orientation, and Header/Footer.
You can also configure your Excel document so that the top row displays at the top of every printing page, which is a helpful option for multiple page documents. Read this article to learn how to use that feature.

Matthew Burleigh has been writing tech tutorials since 2008. His writing has appeared on dozens of different websites and been read over 50 million times.
After receiving his Bachelor’s and Master’s degrees in Computer Science he spent several years working in IT management for small businesses. However, he now works full time writing content online and creating websites.
His main writing topics include iPhones, Microsoft Office, Google Apps, Android, and Photoshop, but he has also written about many other tech topics as well.


