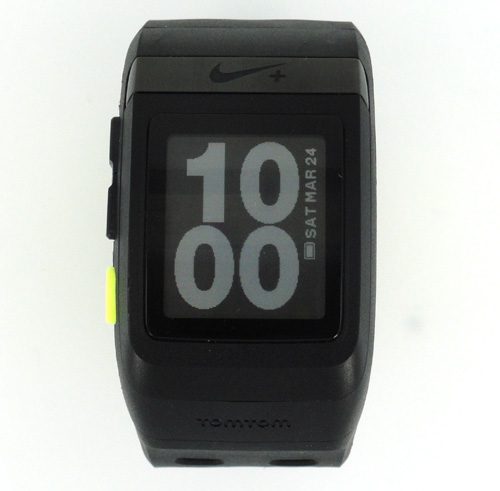
My initial impression while doing this Nike + GPS watch review was that it looked a lot cooler than any other GPS watch I have seen.
The external coloring of the watch is black, while the underside of the band is lime green.
There’s a lime green button on the side that you use to start a run and make menu selections, and there are two black buttons that you use to navigate the menus and change display metrics.
The packaging is minimalistic and reminds me of the packaging for Apple products.
Once you have removed the watch, the USB cable, the Nike sensor, and informational material from the box, you are ready to begin setting it up.
Getting Started
I signed into the Nike+ site and created a new account, and then I downloaded the Nike Connect software to my computer.
After you have installed the software, you are prompted to connect the watch to your computer. Flip down one of the ends of the watch band to reveal a connection dongle that you insert into one end of the USB cable.
The other end of the cable connects to a USB port, then Nike Connect does its magic.
You will be prompted to download a firmware update and GPS update (which you should absolutely do), then you can begin setting up your Nike+ profile.
*** I got this watch in January of 2012, after the initial firmware update that dealt with many of the issues that early adopters experienced. This Nike + GPS watch review does not take into consideration those early complaints, as they are now moot.***
Setting Up the Watch
There are a lot of options for customizing the display on your watch face, but I chose to have “Time Elapsed” as the dominant display unit.
I run on a trail with clearly marked .5 mile markers, so knowing distance isn’t an issue for me. Additionally, the “Pace” option fluctuates a lot, and I am constantly changing my pace.
You also enter your name and weight, which the watch will use to determine the number of calories you burn on the run. After the watch is charged, you are ready to go running.
There are a number of different slots on the watch band, which should make it relatively easy to find one that is comfortable.
I still found that I was in between slots, which made for a somewhat slightly uncomfortable feel on my wrist. However, once I started running, it wasn’t an issue.
As mentioned previously, the watch also comes with a Nike sensor that you can put in your Nike shoe, which the watch will use to determine distance if it loses a GPS signal.
All things considered, it seems like a pretty good backup system, as your Nike + GPS watch is capable of using any combination of these two sensors to record all of your stats.
If you only use the foot pod, though, you will obviously not have any GPS data to upload to NIke + when you sync the watch.
Once I parked my car, I pressed the “Start” button so that the watch could begin syncing with the GPS satellites.
I had heard that the initial sync could take a while, so I figured walking from my car to the start of the trail and stretching would be plenty of time for the watch to acquire a signal. Not only was it enough time, but the watch was ready to go after about 1 minute.
Since I know exactly how far I am running because of past experience on my trail, this was an ideal situation to test the accuracy of the GPS.
Additionally, my trail has significant tree cover which has been an issue for me when using phone applications that rely on the GPS on my phone.
How Good Is It?
I am happy to say that the Nike watch’s GPS and sensor combination performed admirably and was extremely accurate.
It is worth noting that even though the trail is somewhat remote, I do still live near a large city. I can’t say with certainty that the experience of individuals living in rural areas will be as good as mine.
When I got home, I connected the watch to my computer, and it automatically synced the run data to my computer.
However, the data did not initially appear on the Nike+ site. I uninstalled then reinstalled the Nike Connect software, and the data was then visible on the website.
I don’t know if there was simply an issue with the site at that point, but I have not experienced any problems since.
In conclusion, I am really enjoying this watch, and it does everything that I personally want it to do.
Pros and Cons
Pros
– Good GPS that connects quickly
– aesthetically appealing
– simple interface makes it easy to start a run and adjust the metrics displayed on the phone
Cons
– Could be more comfortable
– Some issues with the software
– Individuals looking for something for more than running might find that this watch is not ideally suited for them

Matthew Burleigh has been writing tech tutorials since 2008. His writing has appeared on dozens of different websites and been read over 50 million times.
After receiving his Bachelor’s and Master’s degrees in Computer Science he spent several years working in IT management for small businesses. However, he now works full time writing content online and creating websites.
His main writing topics include iPhones, Microsoft Office, Google Apps, Android, and Photoshop, but he has also written about many other tech topics as well.
