Do you have a cell with a lot of data that you can’t see?
You might have tried to expand the row or the column so that you could see all of that data, but you might not want to expand all of the rest of the cells in that range as well.
One way to get around this problem is by learning how to merge cells in Microsoft Excel. Our tutorial below will show you how.
How to Combine Cells in Excel 2013
- Open your Excel file.
- Select the Home tab.
- Select the cells to merge.
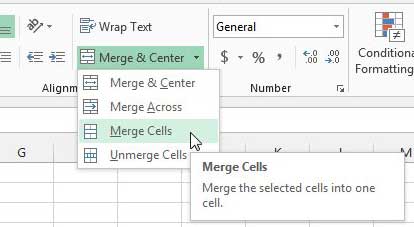
- Click the Merge & Center button, then choose Merge Cells.
Our guide continues below with additional information on how to merge Excel cells, including pictures of these steps.
Spreadsheets that are created in Microsoft’s Excel 2013 are done so for a number of different reasons, many of which cannot conform to the existing default spreadsheet layout.
If you are creating an invoice or some other type of document that will require multiple headings and sections, then you will probably need to adjust the layout to make the document look good.
Excel’s ability to merge cells is usually a helpful option in this scenario, and it can be accomplished with just a few clicks. So follow the steps outlined below to learn how to merge cells in Excel 2013.
If you know that you are going to be doing a lot of your holiday shopping online, then an Amazon Prime membership can really save you some money. You get free two-day shipping on items shipped by Amazon, plus you will have access to their Netflix-like collection of streaming videos. Sign up for a free trial of Amazon Prime to see if it is right for you.
Merging Cells in Microsoft Excel 2013 (Guide with Pictures)
Note that cell merging is best done before you have entered data into the cells, as Excel will only keep the top-left cell data if you attempt to merge cells that already contain data.
If you need to merge cells that already contain data, then it is a good idea to copy and paste that data to other cells on the spreadsheet, then move the data back after you have merged the cells.
Our tutorial on how to merge cells in Word will show you how ot perform a similar action in a document table.
Step 1: Open your spreadsheet in Excel 2013.
Step 2: Click the Home tab at the top of the window.

Step 3: Use your mouse to highlight the cells that you want to merge.

Step 4: Click the arrow to the right of Merge & Center in the Alignment section of the ribbon at the top of the window, then select the Merge Cells option.

Note that there are several other merge options as well, so you can select one of those instead if it is more appropriate.
If you’ve been looking for a tablet that will also allow you to work on Microsoft Office documents, then check out the Microsoft Surface by clicking the link below.
We have previously written about how to combine columns in Excel 2010, which may be more along the lines of what some people are trying to accomplish with their cell merge.

Matthew Burleigh has been writing tech tutorials since 2008. His writing has appeared on dozens of different websites and been read over 50 million times.
After receiving his Bachelor’s and Master’s degrees in Computer Science he spent several years working in IT management for small businesses. However, he now works full time writing content online and creating websites.
His main writing topics include iPhones, Microsoft Office, Google Apps, Android, and Photoshop, but he has also written about many other tech topics as well.