In Google Docs, you can easily indent the second line of a paragraph, also known as creating a hanging indent. First, open your document in Google Docs. To see the ruler, ensure the ‘Show Ruler’ option under the ‘View’ tab is selected. Next, highlight the text you want to indent. With the text selected, locate the left indent triangle on the ruler and drag it to where you want your text to start. Lastly, to create the ‘hanging’ effect, simply drag the first line indent marker (located just above the left indent triangle) back to the left margin. This results in only the first line being left at the margin while the rest of the paragraph is indented.
You can adjust a lot of the formatting and spacing in a document by just adding blank spaces and line breaks.
While this isn’t the ideal way to accomplish many of these things, it typically gets the job done.
But if you need to indent part of a document and aren’t able to use spaces, then you might be looking for another option.
Some document situations will call for you to indent the second line in a document. Use these steps to indent the second line in Google Docs.
How to Indent Part of a Paragraph in a Google Document
- Open the document in Google Docs.
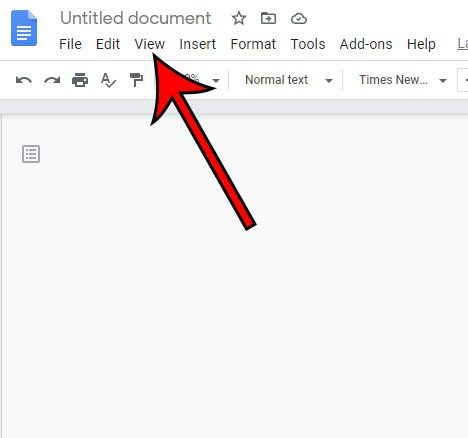
- Click the View tab at the top of the window.
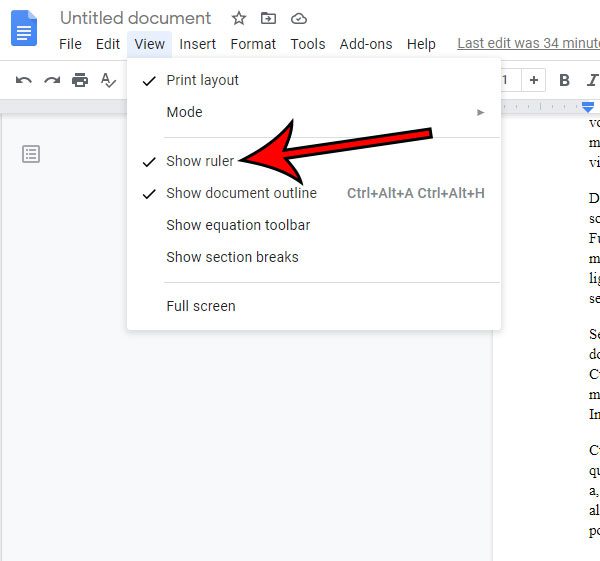
- Select the Show Ruler option if it’s not already selected.
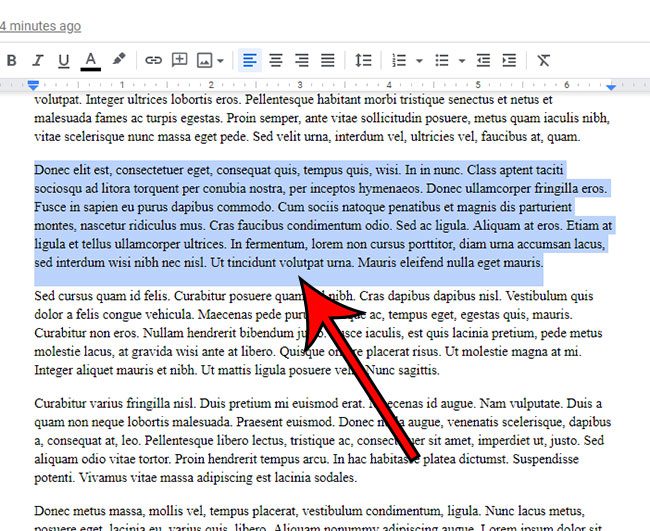
- Select the text to indent.
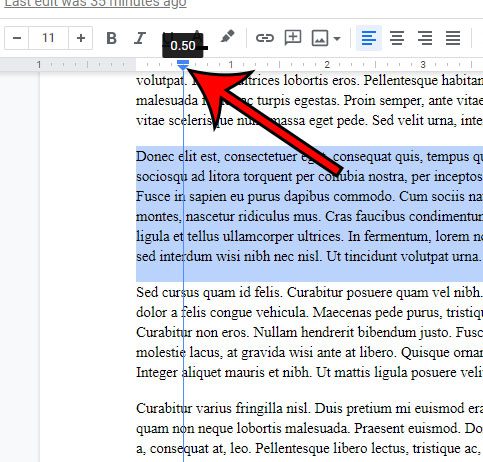
- Drag the left indent triangle on the ruler to the desired location.
- Drag the first line indent marker back to the left margin.
Our article continues below with additional information on how to indent second line in Google Docs documents, including pictures for these steps.
If you need to change the spacing in your document, then our how to double space on Google Docs article will show you how.
Occasionally when you are working with a document you will encounter an unusual situation where you need to make formatting changes that are difficult to do. Maybe you need to know how to make bullet points, or how to adjust document margins.
One such situation can arise when you are creating a bibliography or works cited page and you need to indent the second line rather than the first.
This is often referred to as a hanging indent, but there isn’t a setting on any of the menus in Google Docs that lets you apply that formatting.
However, there are a couple of controls on the ruler that allow you to accomplish what you are trying to do. Our guide below will show you how to indent the second line in Google Docs.
If you need to use columns or need to split a document, then our guide on how to divide a Google Doc in half can show you how.
How to Indent the Second and Subsequent Lines in Google Docs Paragraphs (Guide with Pictures)
These steps were performed in the desktop version of the Google Chrome Web browser but will work in other desktop browsers as well.
Step 1: Sign into Google Drive and open your document.
Step 2: Click the View tab at the top of the window.
Step 3: Click the Show ruler option if it’s not already checked.
Step 4: Highlight the paragraph for which you wish to indent the second line.
Step 5: Click on the blue triangle in the ruler and drag it to the desired location for the second line indent.
Note that the whole paragraph is going to indent while we do this, but we will fix it in a second.
Step 6: Click on the blue rectangle above the triangle and drag it back to the left margin.
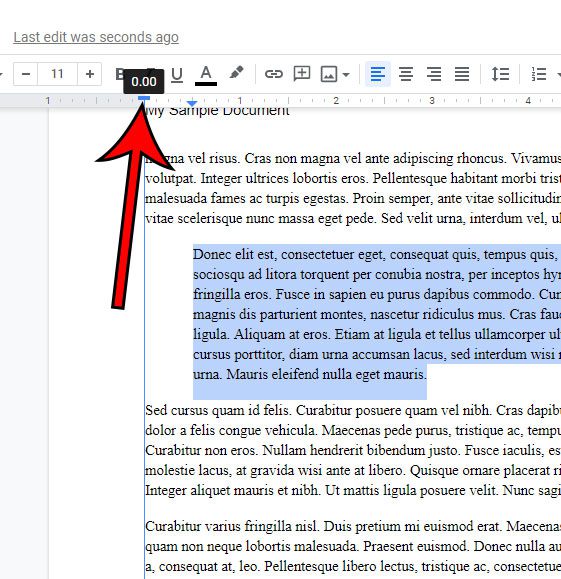
You should now have a paragraph where the second line and the rest of the lines are indented, while the top line is at the left margin.
Now that you know how to indent the second line in a paragraph in Google Docs you will be able ot do this when you are formatting citations in a document, or when you are working on your paper’s bibliography.
If you need to add subscript or superscript to your document, then this article will show you how.
The next section shows you where to find some special indentation options in Google Docs, including one specifically called a “hanging indent.”
Related: How to Remove a Google Docs Page Break
How to Apply Hanging Indent Formatting to a Google Doc
Proper formatting is crucial when it comes to documents, especially research papers that have a multitude of citations. This is where various formatting techniques come into play. One such technique is the hanging indent, which is a style of formatting that indents the second and following lines of a citation or paragraph while keeping the first line flush with the margin. This formatting style allows readers to quickly identify where the citation or paragraph begins and makes it easier to navigate through the document.
You can also check out our full article here about how to do hanging indent on Google Docs and find out about another way that you can achieve a similar look in your document.
Fortunately, Google Docs, a popular cloud-based word processing software, offers a wide range of formatting options that can be used to create hanging indents. With just a few simple steps, you can create a polished and organized research paper that is easy to read and understand. Here’s how:
- Open your Google Doc and go to the section where you want to apply the hanging indent. It could be a citation or a paragraph that requires indentation.
- Choose the line you want to indent, whether it’s the first line of a citation or the beginning of a paragraph. You can select the entire text or place your cursor at the beginning of the line.
- From the top menu, select “Format”. This will open up a dropdown menu of formatting options.
- Click on “Align & indent” from the dropdown list. This will open up a submenu of alignment and indentation options.
- Select “Indentation options”. This will open up a dialog box where you can customize the indentation.
- From the “Special indent” dropdown menu, choose “Hanging”. This will create a hanging indent for the selected text.
- Enter the desired size of the indent in the provided box. You can preview the indent in the “Preview” section of the dialog box.
- Click “Apply” to confirm your changes. Your selected text will now have a hanging indent.
By following these easy steps, you can create a hanging indent in your Google Doc. This formatting option adds a professional and organized appearance to your document, making it more legible and understandable. It also saves you time and effort compared to manually indenting each line of a citation or paragraph. With Google Docs’ formatting options at your disposal, your research paper will look polished and be closer to meeting professional standards.
See also
- How to change margins in Google Docs
- How to add strikethrough in Google Docs
- How to add a row to a table in Google Docs
- How to insert a horizontal line in Google Docs
- How to change to landscape orientation in Google Docs

Matthew Burleigh has been writing tech tutorials since 2008. His writing has appeared on dozens of different websites and been read over 50 million times.
After receiving his Bachelor’s and Master’s degrees in Computer Science he spent several years working in IT management for small businesses. However, he now works full time writing content online and creating websites.
His main writing topics include iPhones, Microsoft Office, Google Apps, Android, and Photoshop, but he has also written about many other tech topics as well.