Many of the applications that you use to edit documents will have some sort of ruler.
These can be helpful in determining the size of some document objects or making sure that an element is in the right spot.
Our how to show vertical ruler in Google Docs article will help you find the option that displays the rulers both at the top of the document and to the left of it.
How to Enable the Google Docs Vertical Ruler
- Open your document.
- Choose the Insert tab.
- Click the Show ruler option.
Our guide continues with additional information on these how to show vertical ruler in Google Docs steps, including pictures of this process.
While rulers are traditionally used to measure objects in the real world, they have some interesting applications in some of the office productivity apps that you use on your computer.
Google Docs rulers not only offer a way to see where on a page a certain object will print, but also allow you to interact with them to adjust margins and indentation.
If you’ve grown accustomed to incorporating these rulers into your editing process and note that they aren’t visible, then you may be wondering how to get them back.
Our article continues below with additional information on how to show the vertical ruler in Google Docs.
Where is the Vertical Ruler in Google Docs? (Guide with Pictures)
The steps in this article were performed in the desktop version of the Google Chrome Web browser but will work in most other desktop Web browsers as well.
These steps will show you how to display the Google Docs vertical ruler.
Step 1: Open your Google Docs document.
Go to https://docs.google.com and open the document that you wish to edit.
Step 2: Select the View tab at the top of the window.
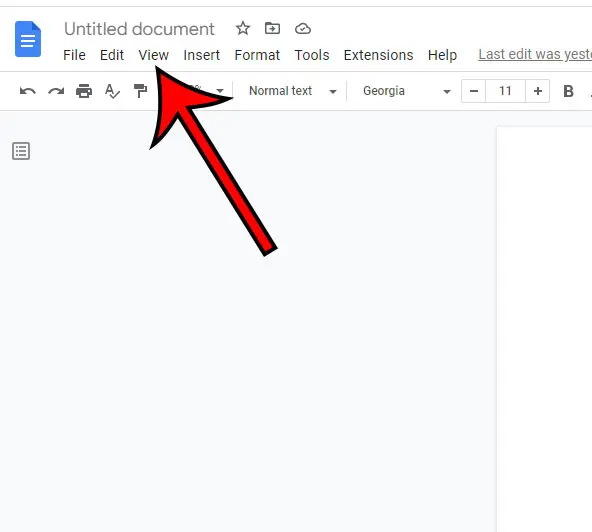
Click the View option in the horizontal menu bar under the document title.
Step 3: Click the Show ruler option to toggle the vertical ruler display on or off.
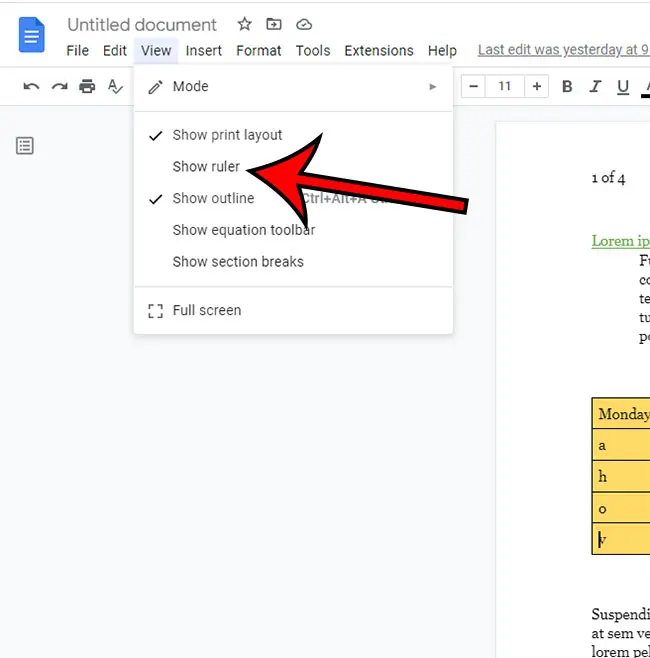
Choose the Show ruler option from the drop down menu to either show or hide the vertical ruler and horizontal ruler on the document.
Now that you have completed our how to show vertical ruler in Google Docs guide, you can toggle this setting on and off whenever you want to display or hide the ruler while you are using Google Docs to create or edit a document.
Often when you need to use the ruler, it’s due to specific formatting requirements for school or work. Another option you might need to use is a hanging indent, which we discuss in the next section.
How to Create a Hanging Indent in a Google Document
When it comes to formatting documents, particularly research papers that contain a multitude of citations, one common technique that people need to apply is a hanging indent. A hanging indent is a style of formatting that indents the second and subsequent lines of a citation or paragraph, while the first line remains flush with the margin.
Related Topic: You can read this article about how to do hanging indent on Google Docs for information on how to apply that type of indentation to some of your document content.
If you’re working on a document in Google Docs and need to apply this formatting style, you’re in luck! Google Docs offers a plethora of formatting options, including the ability to create hanging indents with ease.
To create a hanging indent in Google Docs, follow these simple steps:
- Open your Google Doc and navigate to the section where you want to apply the hanging indent.
- Click on the line you want to indent. This could be the first line of a citation or the beginning of a paragraph.
- Select “Format” from the menu at the top of the screen.
- Choose “Align & indent” from the drop-down list.
- Click on “Indentation options”.
- From the “Special indent” dropdown menu, select “Hanging”.
- Enter the desired size of the indent in the box provided.
- Click “Apply” to confirm your changes.
And voila! You’ve successfully created a hanging indent in your Google Doc.
With these formatting options at your fingertips, you can ensure that your documents are polished and professional, making them easier to read and understand.
More Information About the Google Docs Vertical Ruler
Google Docs only has one option for hiding or showing rulers. This means that you aren’t able to only show the vertical ruler or only show the horizontal ruler.
If you want to display one ruler on the screen, then you will need to display both of them.
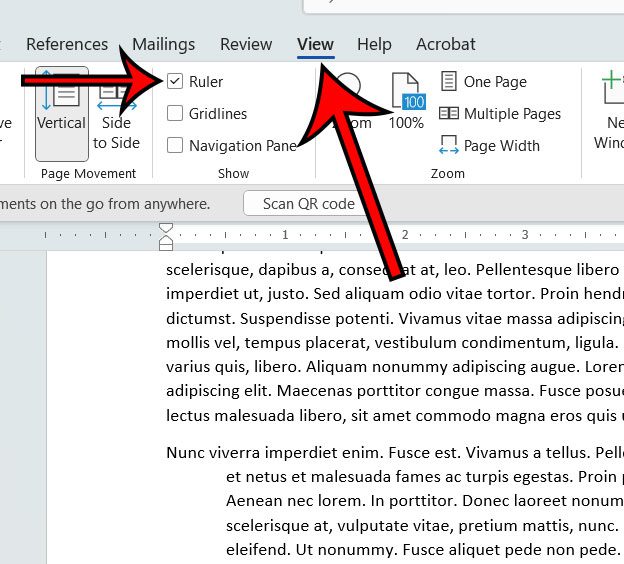
The Microsoft Word desktop word processing application also has options to hide or show the ruler.
If you open a document in Word, you can click the View tab at the top of the window, then check the box to the left of Ruler in the Show group of the ribbon to toggle the ruler display.
The mobile version of the Google Docs application doesn’t have the option to hide or show the ruler. You won’t be able to add the ruler to the interface in its smartphone application.
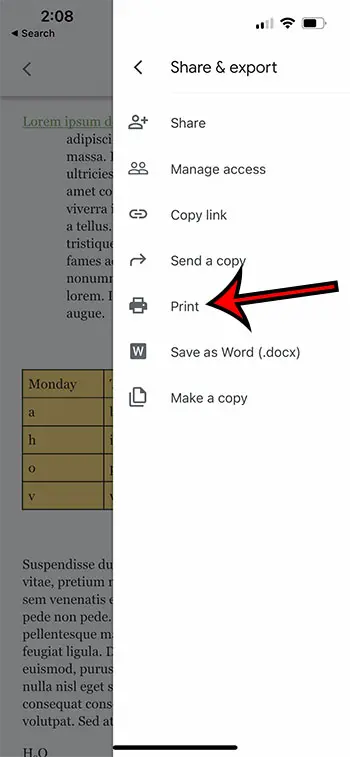
You can print a Google Docs document from the mobile app, however. Simply open the document inside the app, touch the three dots at the top-right corner of the screen, then select the Share & export option.
You can then choose Print from the menu on the right side of the menu.
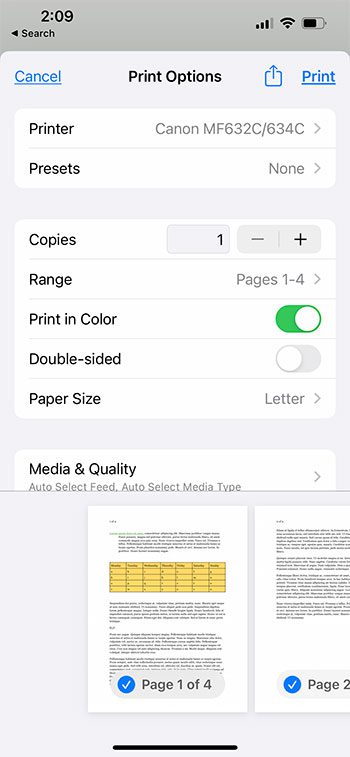
This will open the iPhone print menu, where you can adjust things like the printer, the number of copies, whether or not to print in color, and paper size.
You may also need to toggle the display type in the Google Docs laptop or desktop browser if you are having trouble with the ruler.
You can click the button at the top-right corner of the document interface to switch display modes.
The different options there are:
- Editing
- Suggesting
- Viewing
The button that you need to click will indicate the mode that you are currently in. So, for example, if your document is currently in “Editing” mode, then you would need to click the Editing button if you wanted to switch to the Suggesting or Viewing mode.

Matthew Burleigh has been writing tech tutorials since 2008. His writing has appeared on dozens of different websites and been read over 50 million times.
After receiving his Bachelor’s and Master’s degrees in Computer Science he spent several years working in IT management for small businesses. However, he now works full time writing content online and creating websites.
His main writing topics include iPhones, Microsoft Office, Google Apps, Android, and Photoshop, but he has also written about many other tech topics as well.
