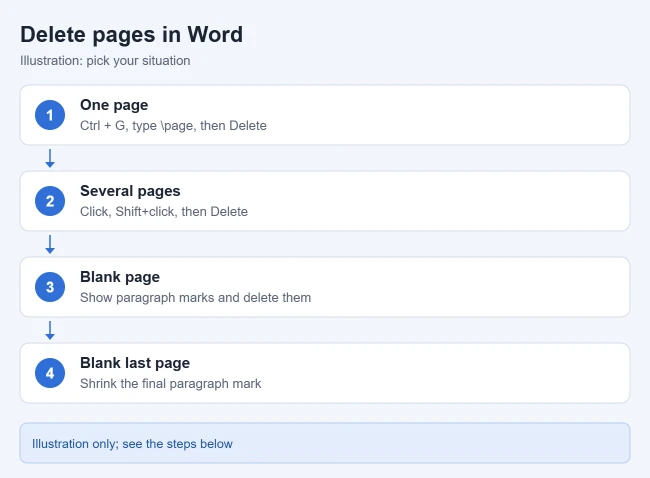
To delete a page in Word, click anywhere on that page, press Ctrl + G, type \page in the Enter page number box, press Enter, select Close, and press Delete. That selects and removes everything on the page. A blank page is different: it is held open by hidden paragraph marks or breaks, which you can show with the Show/Hide (¶) button and delete. If an empty last page won’t go away, select its final ¶ mark and set the font size to 1.
These steps cover Word for Microsoft 365, Word 2024, Word 2021, Word 2019 and Word 2016 on Windows and Mac, with separate notes for Word for the web and the Word phone app.
Before You Start
- Word has no “Delete Page” button. A Word document is one long flow of text, so you remove a page by removing what is on it, and the text after it moves up.
- Deleting a page with content removes all of its text, pictures and tables. If the document matters, save a copy first with File > Save As.
- Decide which kind of page you have. If the page has text or pictures you no longer want, use the first three methods. If the page looks empty, skip to the Delete an Empty or Blank Page section below.
Delete a Page With Content
- Click anywhere on the page you want to delete.
- Press Ctrl + G. The Find and Replace box opens on the Go To tab.
- Type
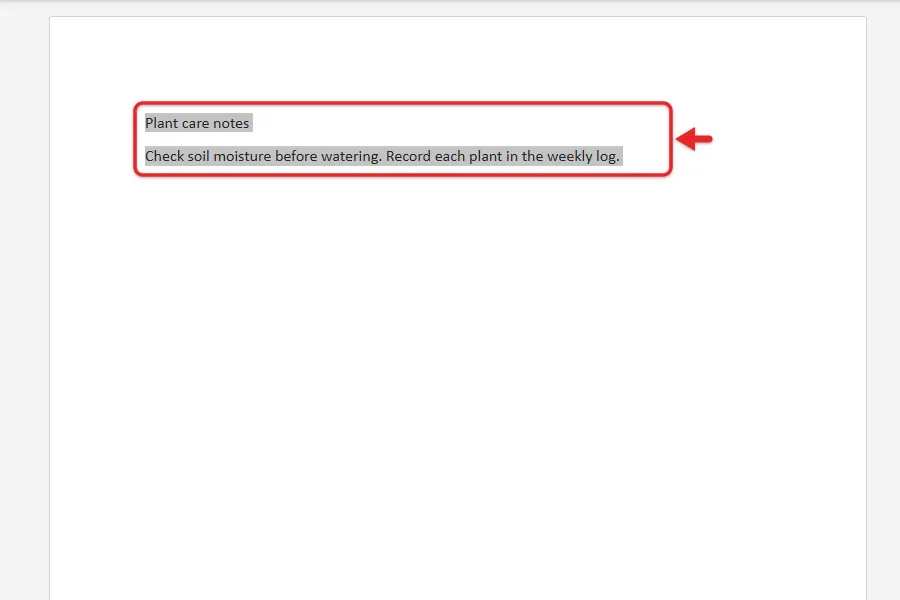
\pagein the Enter page number box. - Press Enter, then select Close. Everything on the page is highlighted.
- Check that only the page you want is selected, then press Delete.
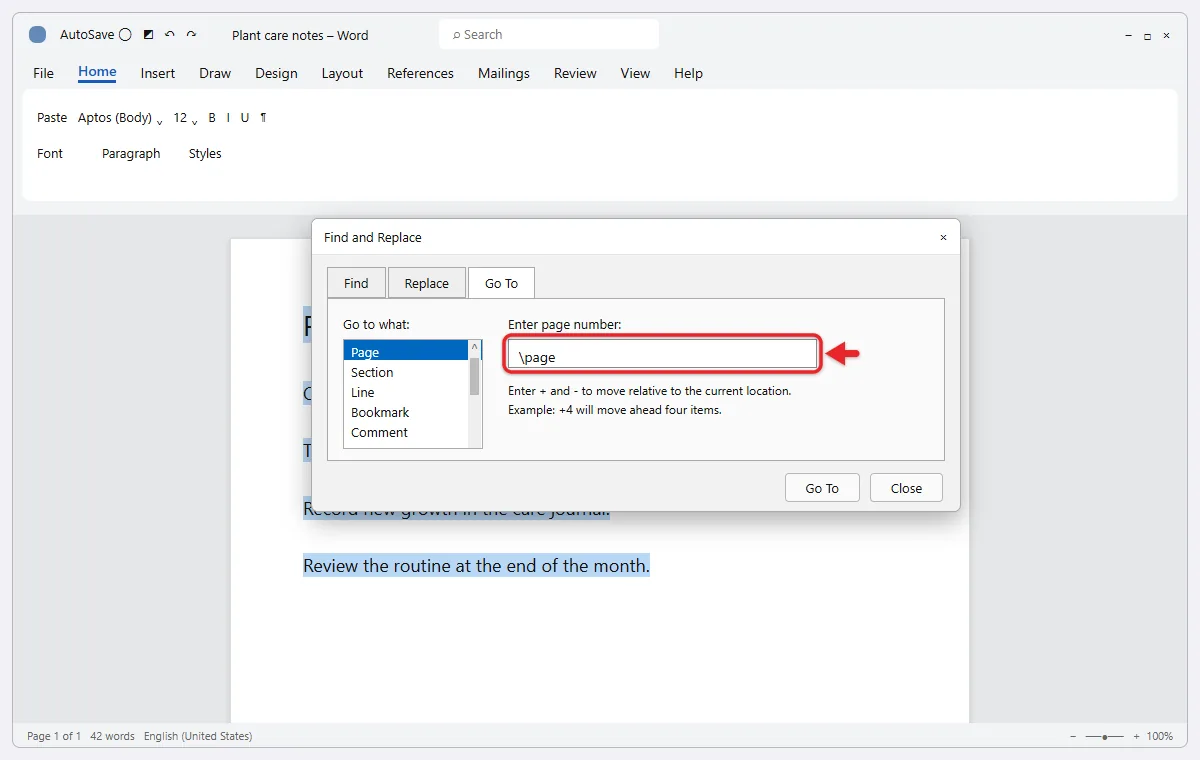
These steps match Microsoft’s guide to deleting a page in Word. \page is a built-in bookmark that always means “the page the cursor is on,” so you don’t need to know the page number. On a Mac, press Option + ⌘ + G to open Go To; the rest of the steps are the same.
If the selection runs a line onto the next page, press Shift + Left Arrow to trim it before you press Delete. That keeps the next page’s first heading and its formatting intact.
To remove only an image and keep the text, delete the picture in Word instead.
Delete a Page by Dragging or Shift-Clicking
The Go To method is the most precise, but a mouse selection works just as well for a short page.
- Click just before the first word on the page.
- Scroll to the end of the page.
- Hold Shift and click just after the last word on the page. Everything in between is selected.
- Press Delete. The page’s content disappears and the next page moves up.
Delete Several Pages at Once
- Click at the very start of the first page you want to remove.
- Scroll to the last page you want to remove.
- Hold Shift and click at the end of that page. Everything in between is selected.
- Press Delete.
For a long range, let Word do the scrolling:
- Press Ctrl + G, type the first page number you want to remove, press Enter, and select Close. The cursor is now at the top of that page.
- Press F8 to turn on Extend mode. Microsoft lists F8 as the Extend selection key in its Word keyboard shortcuts.
- Press Ctrl + G again, type the number of the page that comes right after the last page you want to remove, press Enter, and select Close. Word selects everything from the first page up to that point.
- Press Delete, then press Esc to turn off Extend mode.
For example, to remove pages 4 through 9 of a 12-page report, go to page 4, press F8, then go to page 10.
Delete a Page in Word for the Web or the Mobile App
The Go To \page trick is for the desktop app. In Word for the web and on phones, select the page’s content by dragging from the top of the page to the bottom, then press Delete or tap Backspace. If a blank page is left, delete the empty lines at the end of the previous page. Turning on page ends in Word Online makes it easier to tell where one page stops in the browser.
Word for the web can remove empty paragraphs and manual page breaks, but section breaks need the desktop app. Microsoft covers this in Delete a blank page in Word for the web. To delete an empty page in the browser:
- If the document is in Reading View, select Edit Document > Edit in Word for the web.
- Empty paragraphs look like blank lines. Select them and press Delete.
- To remove a page break, click it to select it, then press Delete.
If the buttons you need are hidden in the compact toolbar, show the full ribbon in Word Online first. If a section break is causing an extra page, select Open in Word to open the document in the desktop app and use the section break steps below.
Delete an Empty or Blank Page
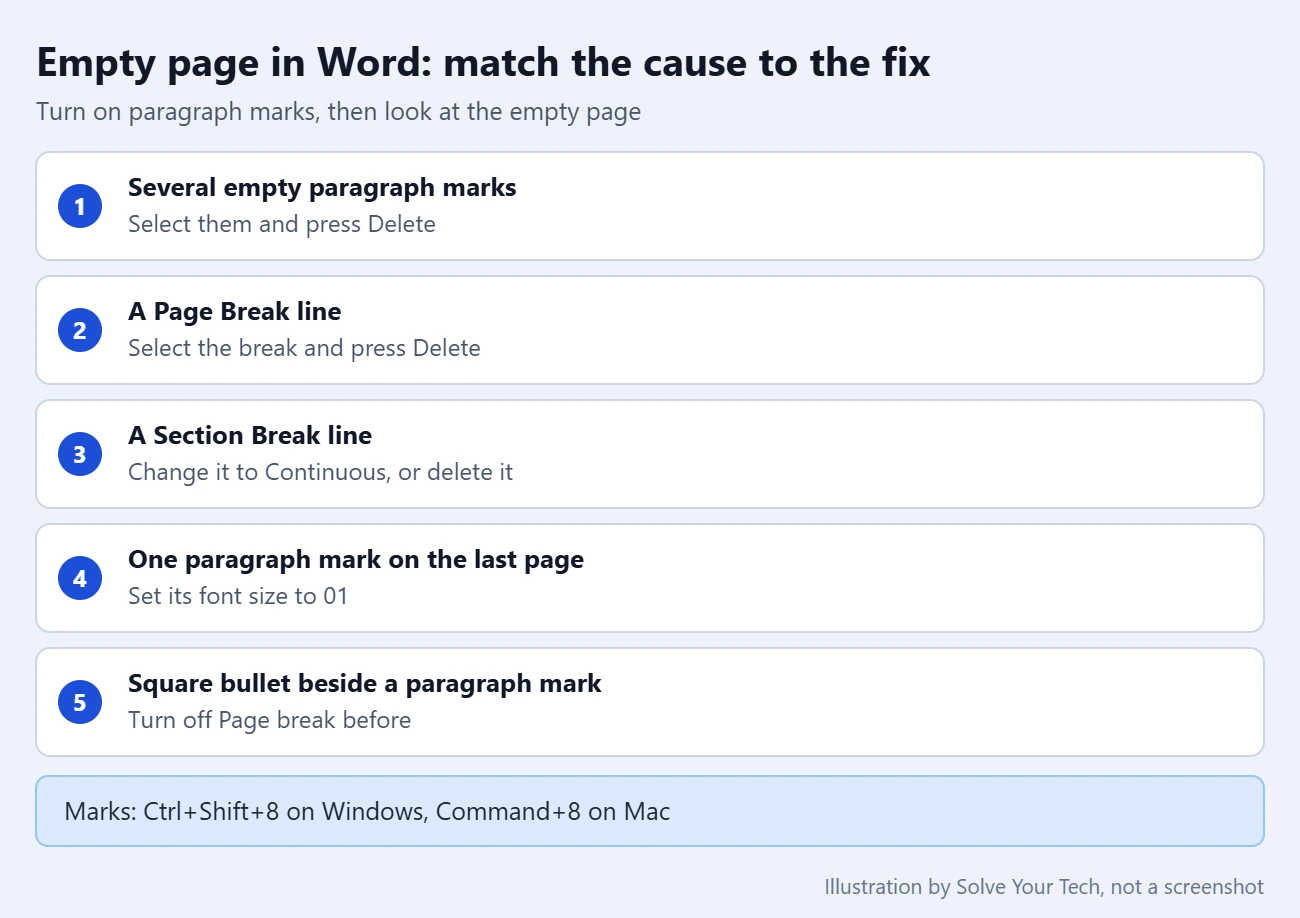
An empty page is almost never truly empty. It holds hidden marks that Word does not show until you ask for them. It helps to work in Print Layout view (View > Print Layout) so you can see the pages as they will print. Once the marks are showing, you will usually find one of these on the empty page or at the bottom of the page before it:
- Several ¶ marks with no text: empty paragraphs, made by pressing Enter too many times.
- A line labeled Page Break: a manual page break that someone added to force a new page.
- A line labeled Section Break: see the section break steps below.
- One ¶ mark alone on the last page: Word’s required end paragraph. See the blank page at the end steps below.
- A small square bullet beside a ¶ mark: a paragraph with the Page break before setting turned on.
Remove Empty Paragraphs or a Page Break
- Press Ctrl + Shift + 8 (⌘ + 8 on a Mac), or select the ¶ (Show/Hide) button on the Home tab, to show paragraph marks and breaks.
- Go to the blank page.
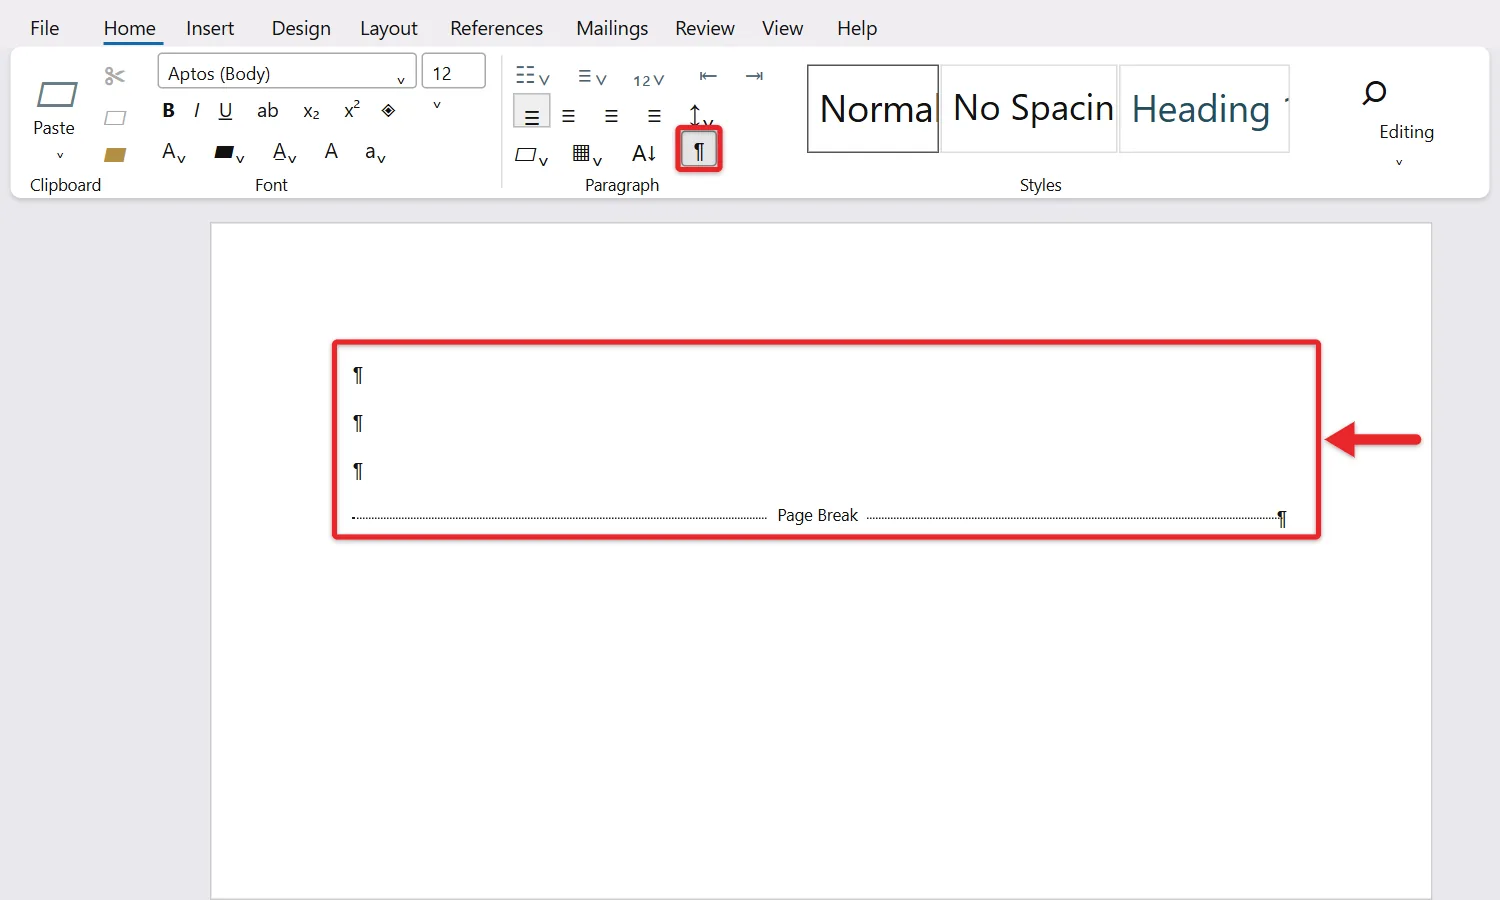
- Select any empty paragraph marks (¶) or a Page Break line on or just before the page. Double-clicking a break line selects it. Do not select marks that sit at the end of real text.
- Press Delete. The text that follows moves up.
- Press Ctrl + Shift + 8 again to hide the marks.
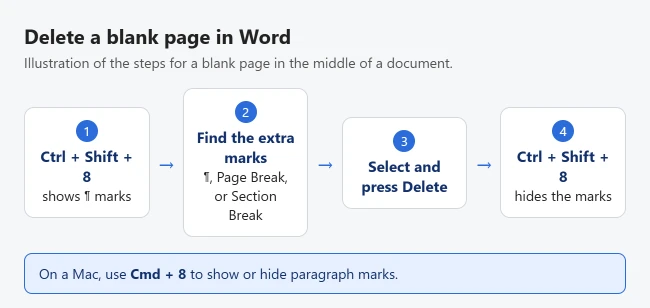
To clear every manual page break at once, use Word’s find and replace with ^m in the Find what box and leave the Replace with box empty.
You can only delete page breaks that you or someone else added. Word also places automatic breaks wherever a page fills up, and those move on their own as the text changes. Microsoft’s Remove a page break in Word article has the details. If you see no labeled break, the cause is something else on the list above.
Turn Off Page Break Before
If a blank paragraph has a small square next to it, it may have Page break before turned on. This setting forces a paragraph onto a new page without showing a break line. To turn it off:
- Right-click the paragraph and select Paragraph. On some versions this is called Paragraph Settings, and you can also open it from the small arrow in the corner of the Paragraph group on the Home tab. On a Mac, go to Format > Paragraph.
- Select the Line and Page Breaks tab.
- Under Pagination, uncheck Page break before, then select OK.
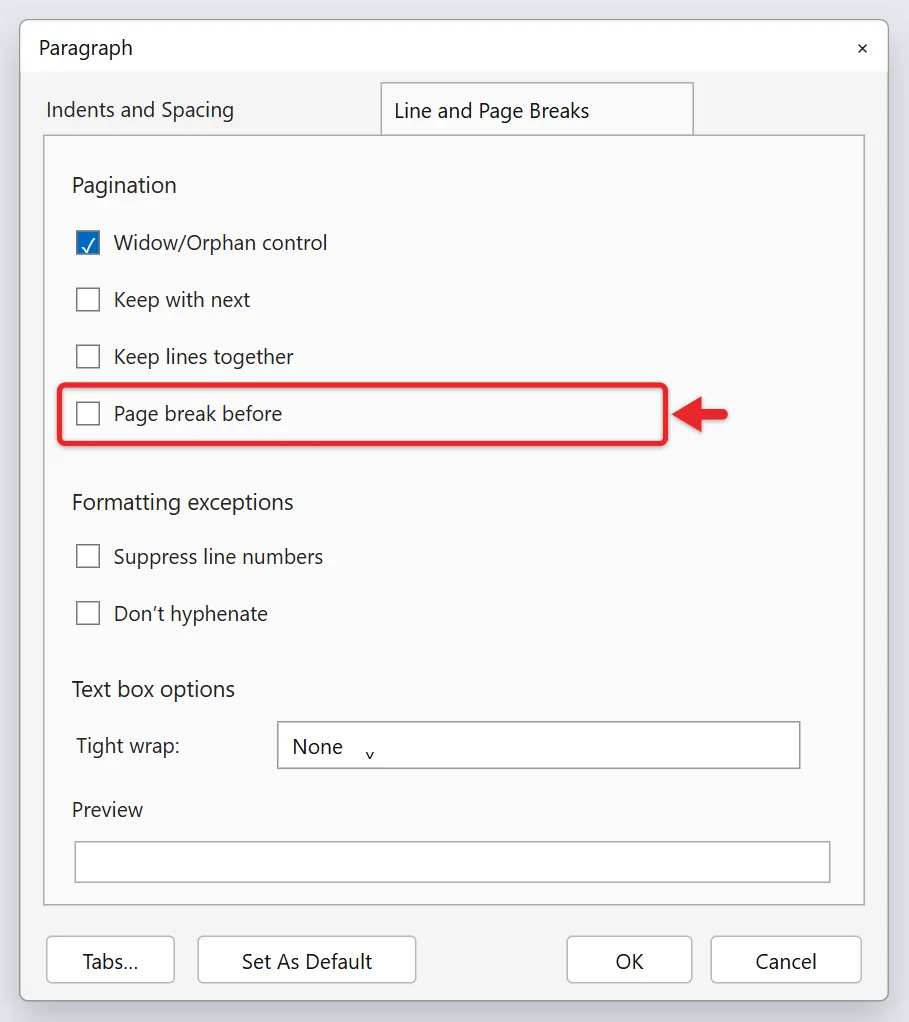
Microsoft has more fixes for stubborn blank pages in its delete a blank page guide.
Delete a Blank Last Page or a Blank Page After a Table
Every Word document ends with a paragraph mark that can’t be deleted, and Word always places one after a table too. When that mark is pushed onto its own page, shrink it:
- Press Ctrl + Shift + 8 (⌘ + 8 on a Mac) to show paragraph marks.
- Select the last ¶ mark on the blank page.
- Click in the Font size box on the Home tab, type 1, and press Enter. The mark becomes tiny and moves back onto the previous page.
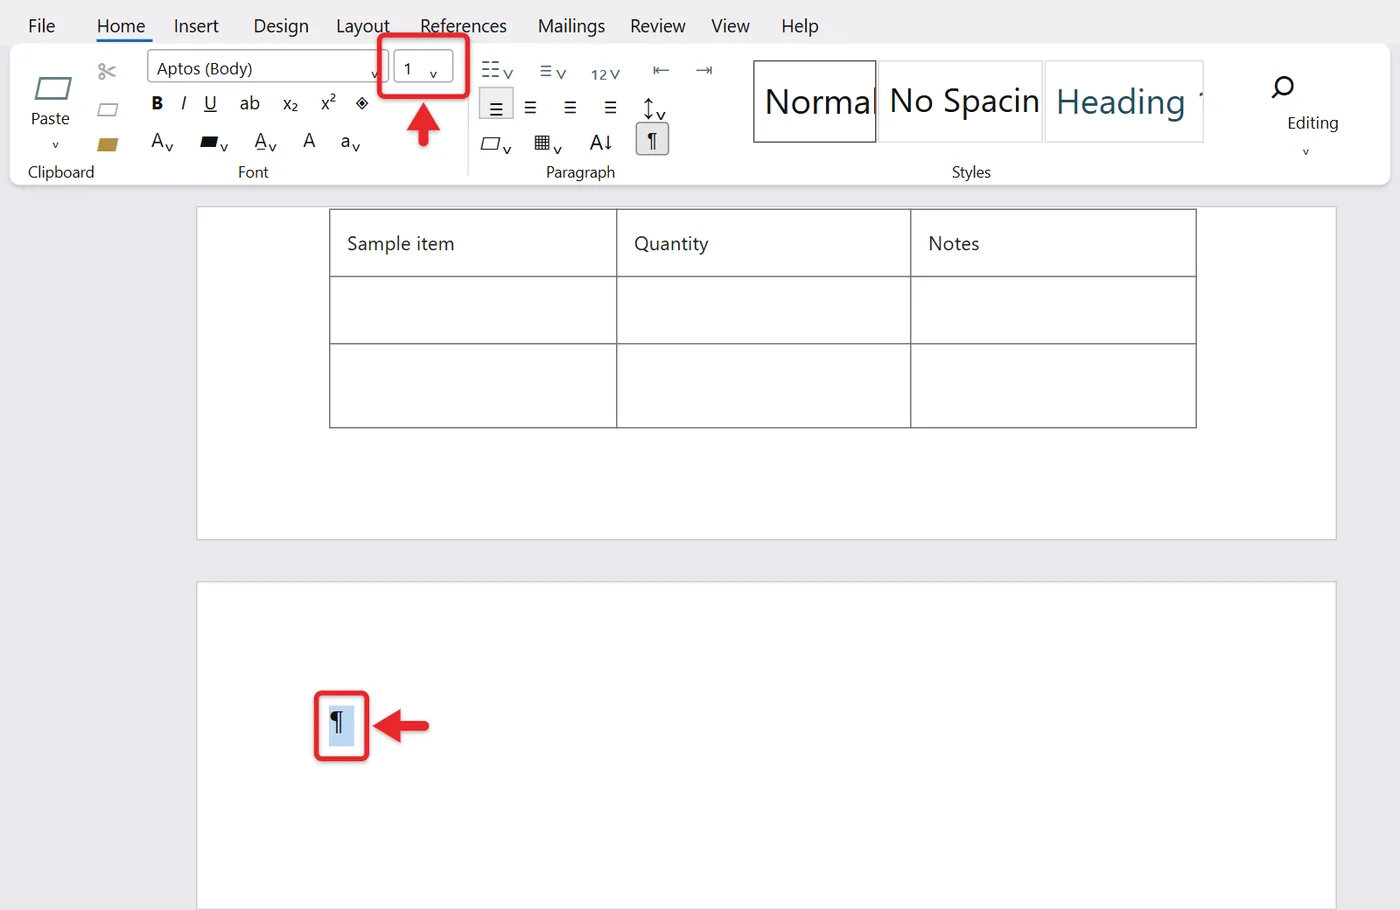
- If the page is still there, go to Layout > Margins > Custom Margins and make the bottom margin a little smaller. Try a small value such as 0.3 inches. This moves text on every page of that section, so look through the document afterward. You can set the margins back to 1 inch in Word afterward.
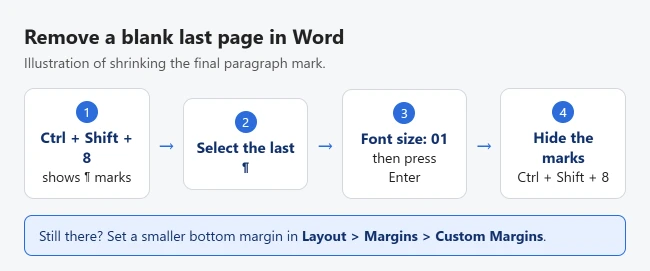
Typing 01 in the Font size box gives the same 1-point result. If the last page has a section break on it instead, place your cursor directly before the section break and press Delete.
If the table itself fills the page, you can also drag its bottom border up slightly or reduce the row height so the paragraph after it fits.
Remove a Section Break That Adds a Blank Page
A section break splits a document into parts that can have their own margins, orientation, headers and page numbers. A Continuous break keeps the new section on the same page. Next Page, Odd Page and Even Page breaks start a new page, and an Odd Page or Even Page break can add an empty page to get to the right side.
Warning: deleting a section break merges the two sections, and the combined section takes the formatting of the section that came after the break. Headers, footers, margins or a landscape page in Word can change.
The safer fix keeps the break but stops it from starting a new page:
- Show paragraph marks so you can see the Section Break line.
- Double-click the section break. The Page Setup box opens.
- On the Layout tab, set Section start to Continuous. Microsoft’s article calls this the Breaks drop-down, so the label may differ in your version.
- Select OK.
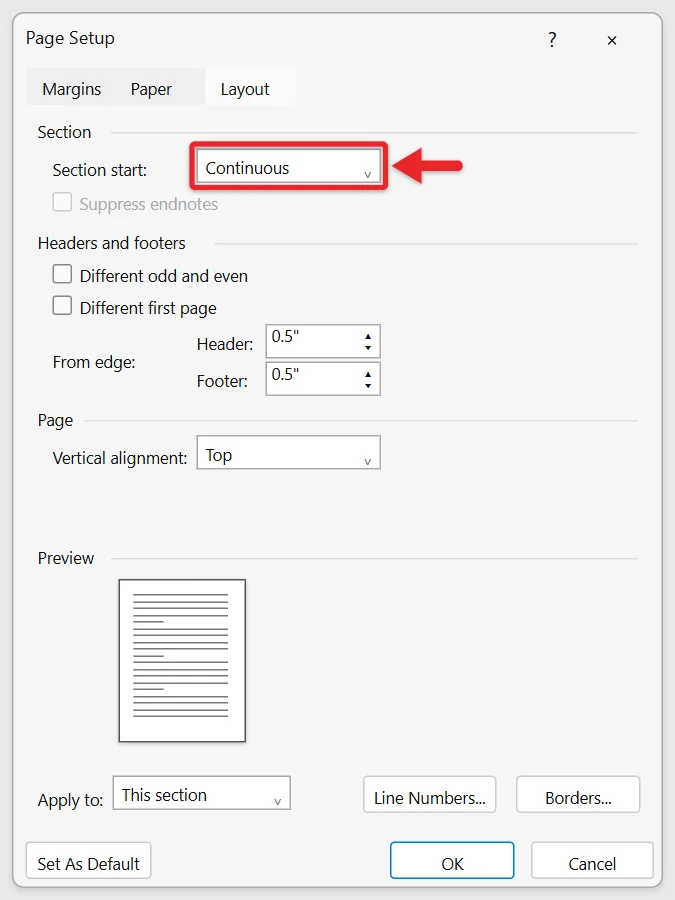
If you don’t need the second section at all, click just before the section break and press Delete, then check the headers and page numbers. On a Mac, select the section break and then press Delete. Saving a copy of the document first is a sensible precaution.
Troubleshooting
The break or text won’t delete
Check whether Track Changes is on (Review tab). With tracking on, Word marks a deletion instead of removing it, so the page stays. Press Ctrl + Shift + E to turn tracking off, or accept the change with Review > Accept.
You can’t click on the break line
Switch to View > Draft. Breaks show as full-width labeled lines that are easier to select. Return with View > Print Layout. If the document still looks unusual after that, you can put it back to normal view.
Formatting changed after you deleted a section break
Press Ctrl + Z to bring the break back, then change it to Continuous instead, as shown in the section break steps above.
Nothing happens when you press Delete
The document may be read-only or protected. Select Enable Editing on the yellow bar if you see one, or go to Review > Restrict Editing and select Stop Protection if you know the password.
The empty page has no marks on it
The paragraph after it probably has Keep with next or Keep lines together turned on, which pushes a block of text to a new page and leaves a gap. Open the Paragraph box, go to Line and Page Breaks, and uncheck those options. If every heading does this, the setting is part of the heading style; right-click the style in the Styles gallery and select Modify to change it for all of them.
Backspace removed text from the page before
Backspacing from the top of a page deletes the paragraph mark above it and can merge two paragraphs. Press Ctrl + Z and use the Show/Hide method instead.
How to Check It Worked and Undo It
- Look at the page count on the status bar at the bottom of the window. It should drop by the number of pages you removed.
- Scroll through the pages around the deletion and check that headings, tables and pictures didn’t shift.
- Update a table of contents or cross-references if you have them: right-click the table and choose Update Field.
- To bring a page back, press Ctrl + Z (⌘ + Z on a Mac) right away. You can press it several times to step back through changes.
- To undo the end paragraph fix, select the last ¶ mark again and type a normal font size, such as 11 or 12.
To remove the whole file rather than a page, delete the Word document itself.
Frequently Asked Questions
Why does my Word document have an empty page?
It is usually extra empty paragraphs, a manual page break, a section break that starts on a new page, or Word’s end paragraph pushed onto a new page. Press Ctrl + Shift + 8 (⌘ + 8 on a Mac) to show paragraph marks and see which one it is.
Why can’t I delete the last empty page in Word?
Word always keeps one paragraph at the very end of a document, and it can’t be deleted. When the page before it is full, that paragraph lands on a new page. Select its ¶ mark, type 1 in the Font size box and press Enter so it fits on the page before.
How do I add a page instead?
Here’s how to add a page in Word.
Why does my page come back?
A section break set to start on a new page can create one. Double-click the section break with Show/Hide on and change Section start to Continuous, if your layout allows it.
Can I delete a page from the Navigation Pane?
Not directly. The Navigation Pane’s page thumbnails let you jump to a page, but you delete by selecting its content. If your document uses headings, right-click a heading in the Headings view and select Delete to remove that whole section. To move pages instead, change the page order in Word.
Will my page numbers update?
Yes. Page numbers in headers and footers are fields that Word recalculates, so the following pages renumber themselves. If you deleted a section break, check that numbering didn’t restart.
Can I undo a deleted page?
Yes. Press Ctrl + Z right away. If you already closed the file, look for an earlier version under File > Info > Version History when the file is saved in OneDrive or SharePoint.
What if Word won’t respond because a dialog box is open?
Find and close it first. Here is how to close a dialog box in Word.
How do I delete a blank page in Google Docs?
The steps are different. Here is how to delete a blank page in Google Docs.

Matthew Burleigh is the founder, head writer, and editor of Solve Your Tech, which he launched in 2012. He has written technology tutorials since 2008 and worked in IT since 2003, including small-business support, IT management, and consulting. He holds Bachelor’s and Master’s degrees in Computer Science from Arizona State University.
Matthew writes practical guides for Windows, iPhone and iPad, Microsoft Office, Outlook, Google apps, and Android. Solve Your Tech’s guides are checked step by step against the device or app maker’s own documentation and tested on his own devices whenever he has the hardware or software, with clear steps, sources, and update dates.
Read more about Matthew and how Solve Your Tech writes and updates its guides, or report a correction.