You can clear the formatting from your cells in Excel 2011 by clicking the gray button at the top-left of the spreadsheet, choosing the Home tab, clicking Clear, then Formats.
The cells in a Microsoft Excel spreadsheet can have so many different formats applied to them that you could spend several minutes trying to get rid of all of them individually.
This is not only frustrating and time-consuming, it’s also prone to error.
Our tutorial below will show you how to clear all cell formatting in Excel 2011 with just a few steps.
How to Get Rid of All of the Formatting in Microsoft Excel 2011
- Open your spreadsheet.
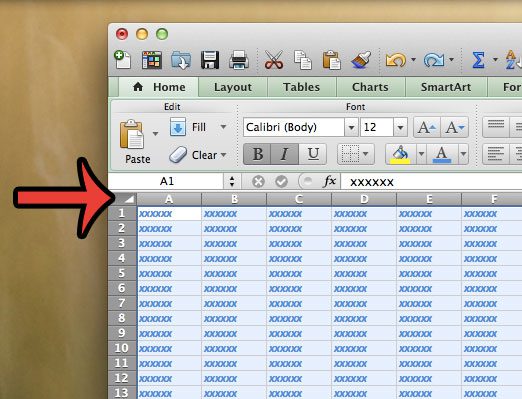
- Click the gray cell between the row 1 and column A headings.
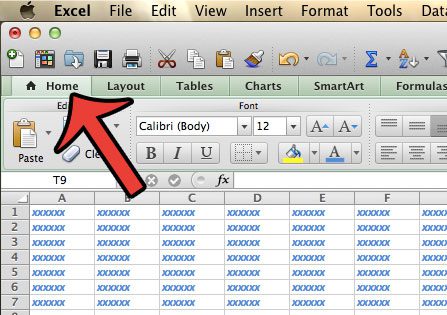
- Select the Home tab.
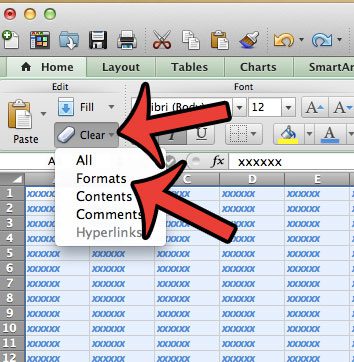
- Click Clear, then choose Formats.
Our guide continues below with additional information on how to clear all cell formatting in Excel 2011, including pictures of these steps.
Cell formatting can be a problem when you need data to display in a certain fashion in your Microsoft Excel worksheet.
There are many ways to change the formatting of a cell, but if you have received a spreadsheet from another person, then finding each of the options that they have modified can be frustrating.
Fortunately, Microsoft Excel 2011 for Mac has a function that removes all the formatting from your selected cells.
Our tutorial below will show you how to quickly select every cell in your worksheet, then remove all of the formatting that has been applied to those cells. Then you can start from scratch and format your cell data as needed for your current project.
How to Remove All Cell Formatting from a Spreadsheet in Excel 2011 (Guide with Pictures)
The steps in this article were performed using the Excel 2011 application for the Mac operating system. The method for performing this action in Windows versions of Excel is slightly different. If you are using Microsoft Excel 2013, then you can clear cell formatting using the steps in this article.
Step 1: Open your worksheet in Excel 2011 for Mac.
Step 2: Click the cell at the top-left corner of the worksheet, above the row 1 heading, and to the left of the column A heading.
This will select every cell in the worksheet.
The cell in question is identified in the image below.
If you only need to select some cells, however, then you can click and drag your mouse to select individual cells, or you can click a number to the left of a row, or a letter at the top of a column, to select that entire range of cells.

Step 3: Click the Home tab at the top of the window.

Step 4: Click the Clear button in the Edit section of the navigational ribbon, then click the Formats option.

Now that you know how to clear all cell formatting in Excel 2011, you can use this method to get rid of formatting that you find in spreadsheets that you are editing.
All of the formatting that has been applied to the cells in your worksheet will now be removed. This will make it much simpler to format the cells in your worksheet as required for your project.
Are you having difficulty printing the worksheets that you have created, or are editing, in Microsoft Excel 2011 for Mac? You can learn how to print your worksheet on one page if you find that you have extra columns which are causing your spreadsheet to print on more pages than you want.

Matthew Burleigh has been writing tech tutorials since 2008. His writing has appeared on dozens of different websites and been read over 50 million times.
After receiving his Bachelor’s and Master’s degrees in Computer Science he spent several years working in IT management for small businesses. However, he now works full time writing content online and creating websites.
His main writing topics include iPhones, Microsoft Office, Google Apps, Android, and Photoshop, but he has also written about many other tech topics as well.