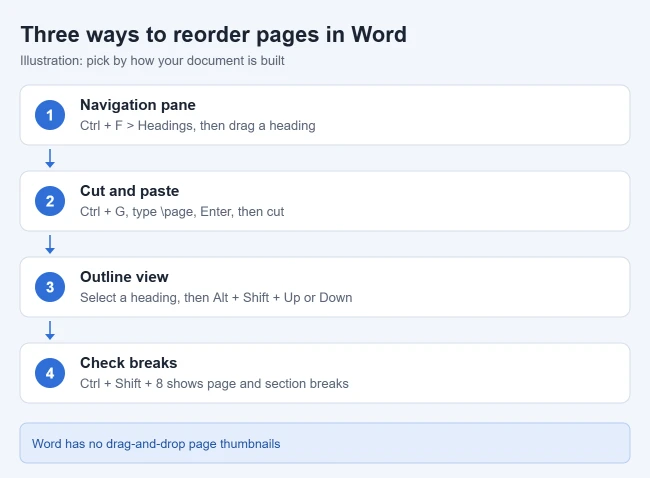
Word doesn’t let you drag pages around like slides. To change the page order, either move sections with the Navigation pane or cut and paste the page’s content. If your document uses headings, open View > Navigation Pane, select Headings, and drag a heading to a new spot. Everything under that heading moves with it.
These steps work in Word for Microsoft 365, Word 2024, 2021, 2019, and 2016 on Windows, and the shortcuts have Mac equivalents noted below. Word documents flow as one long stream of text, so “moving a page” really means moving the content on it. Word then works out new page breaks on its own, which is why a page you move may not stay exactly one page long.
Which Method Should You Use?
| Your document | Best method | Why |
|---|---|---|
| Each page or section starts with a heading | Navigation pane | Drag one heading and the whole section follows |
| No headings, and you’re moving one or two pages | Cut and paste | Works in every document and every version |
| Several pages need a new order | Clipboard history | Cut all the pages first, then paste them back in the order you want |
| Long report, book, or manual with heading levels | Outline view | Collapse everything to headings and move sections with the keyboard |
Before a big reorganization, save a copy of the file with File > Save As. If something goes wrong later, you can also restore a previous version of a Word file.
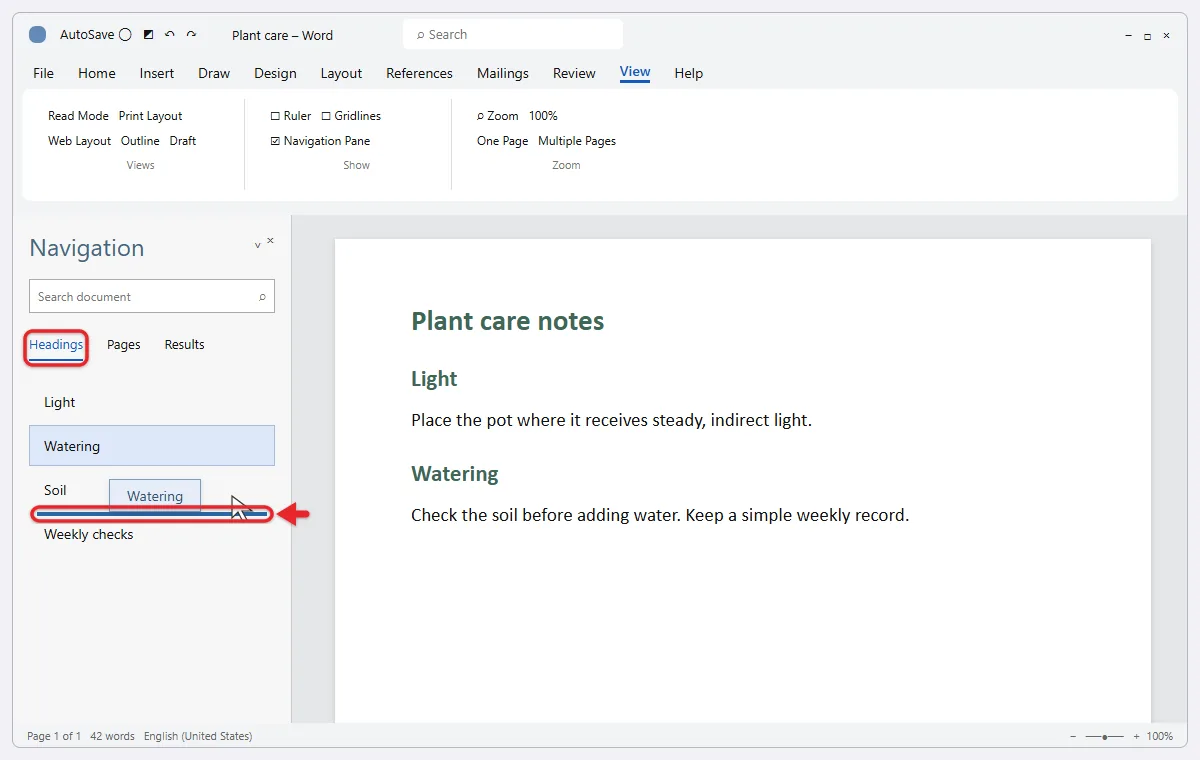
This works when each page or section starts with a heading formatted with a Heading style, such as Heading 1.
- Press Ctrl + F, or go to View and check Navigation Pane. The pane opens on the left.
- In the Navigation pane, select the Headings tab. Your document’s headings appear as a list.
- Drag a heading up or down to where you want that section. A line shows where it will land, and the heading and everything under it move together when you let go.
- Press Ctrl + Z right away if something lands in the wrong place.
Microsoft explains this in its guide to using the Navigation pane in Word. You can also right-click a heading there to change its level or add a new heading. Headings inside tables, text boxes, headers or footers don’t appear in the pane, and protected regions can stop a section from moving.
A section ends where the next heading of the same or a higher level begins. If a page has a Heading 1 partway down it, dragging the page’s first heading moves only the text up to that Heading 1. Collapse the list with the small arrows next to each heading so you can see which sections are nested inside others.
For search, page thumbnails and the full right-click heading menu, read more about the Navigation pane in Word.
No headings? Add them first
Click in the first line of each page, then choose Heading 1 on the Home tab. Once every page starts with a heading, you can reorder the whole document from the Navigation pane. Headings also power a table of contents.
If you don’t want those headings in the final document, treat them as temporary. Type a short label such as “Page 3” at the top of each page, style it as Heading 1, reorder the pages in the Navigation pane, and then delete the labels when you’re finished.
Method 2: Cut and Paste a Page
This works in any document, with or without headings. The quickest way to select exactly one page is Word’s built-in \page bookmark, which Microsoft uses to select a page.
- Click anywhere on the page you want to move.
- Press Ctrl + G (on a Mac, Option + Command + G). In the Enter page number box, type
\page, press Enter, then select Close. The whole page is selected. - Press Ctrl + X to cut it. The page disappears and the pages after it move up.
- Click at the start of the page that should come after it and press Ctrl + V. The content moves to the new spot.
You can also select a page by clicking at the very start of its content, holding Shift, and clicking at the end. Another option is to click at the start of the page and press Shift + Page Down until the whole page is highlighted.
If the page has sketches or shapes on it, check that they moved with the text. Setting their text wrapping keeps them in place, and drawing in Word shows how.
Try choosing Keep Source Formatting from the right-click paste options so the moved text keeps its look, or Keep Text Only if you want it to match the text around it. Use Ctrl + C instead of Ctrl + X to leave the original in place. To duplicate a page instead of moving it, see Microsoft’s guide to copying a page in Word.
If the content needs a fresh page to land on, first add a page in Word at the new spot. Pressing Ctrl + Enter inserts a manual page break, which keeps the moved page from running into the text before it.
Method 3: Reorder Several Pages With Clipboard History
Windows 11 and Windows 10 can hold more than one cut item at a time. This is handy when you want to swap pages or put several of them in a new order without scrolling back and forth.
- Press Windows key + V. If clipboard history is off, select Turn on.
- Cut the first page you want to move with the
\pageselection and Ctrl + X. Repeat for each page you need to move. - Click where the first page should go and press Windows key + V. A list of your recent cuts appears.
- Select the item you want. It’s pasted at the cursor.
- Move the cursor to the next spot and repeat until every page is back in the document.
Word’s own Clipboard pane does the same job inside Word. On the Home tab, select the small arrow in the corner of the Clipboard group, then click an item in the pane to paste it.
Method 4: Rearrange in Outline View
- Go to View > Outline, or press Ctrl + Alt + O. The document shows as an outline of headings and text.
- Use Show Level to show only Level 1 headings, so each section collapses to one line.
- Click a heading and press Alt + Shift + Up arrow or Down arrow to move it. The collapsed section moves with it. You can also use the Move Up and Move Down arrows on the Outlining tab, or drag the plus sign next to a heading.
- Select Close Outline View when you’re done. Word returns to Print Layout, the usual page view. If your document still looks different, you can get your Word document back to normal view.
Alt + Shift + Up and Down move selected paragraphs, as listed in Microsoft’s Word keyboard shortcuts. Those shortcuts also move a single paragraph in Outline view, so collapse the section first if you want the whole section to go with its heading.
Tips for Moving Pages Cleanly
- Turn on formatting marks with Ctrl + Shift + 8 (Command + 8 on a Mac) so you can see page and section breaks, and include them in your selection.
- If you leave a manual page break behind when you cut a page, you’ll get an empty page where the old one was.
- If pages have different headers, orientation, or page numbering, section breaks hold those settings. Move the section break along with the content, or the layout may change. The steps for making only one page landscape in Word show how those breaks work.
- Check page numbers and the table of contents afterward. Automatic page numbers update on their own. Right-click the table of contents and choose Update Field to refresh it.
- If moving content leaves a blank page, you can delete the empty page in Word.
How to Check the New Order
Open the Navigation pane and select Pages to see thumbnails of every page in order. Scroll through them to confirm the moved page is in the right spot and that no page is blank or half empty. If the order is wrong, press Ctrl + Z until the document is back the way it was, or close the file without saving and reopen your copy.
Troubleshooting
- The Headings tab is empty. Your titles are probably bold text, not real headings. Apply Heading 1 from the Home tab and they appear in the pane.
- A heading won’t drag. The document may have restricted editing or protected regions. Check Review > Restrict Editing, or ask the file’s owner to remove the restriction.
- Text stays behind after a move. Body text that sits above the first heading on a page doesn’t belong to that heading’s section. Add a heading above it or cut and paste it separately.
- The page looks different after pasting. Use Keep Source Formatting, and make sure you moved any section break that went with the page.
- The Go To trick selects the wrong page. Click directly in the page’s text before pressing Ctrl + G, not in the margin or header.
Frequently Asked Questions
Can I drag page thumbnails to reorder them?
No. In the Navigation pane, Pages shows thumbnails and lets you jump to a page, but you can’t drag thumbnails to reorder them. Drag headings on the Headings tab instead.
Can I reverse the order of all pages?
Not with a built-in button. Move pages one at a time with the methods above, or save the document as a PDF and use a PDF editor to reorder pages.
How do I move a page in Word on a Mac?
The Navigation pane, Outline view, and cut-and-paste methods all work. Use Command + X and Command + V, and Option + Command + G to open Go To. The Navigation pane behaves a little differently in Word for Mac.
Can I change the page order in Word for the web?
Yes, with cut and paste. Select the page’s content by clicking at the start, holding Shift, and clicking at the end, then cut and paste it in the new spot. For the Navigation pane and Outline view, use the desktop app with Open in Desktop App.
Will page numbers update after I move pages?
Yes, if you used Word’s automatic page numbers from Insert > Page Number. Numbers typed by hand stay the same and need to be fixed manually.
If you’d rather remove a page than move it, delete the page in Word instead. To get rid of the whole file, read about deleting documents from Microsoft Word.

Matthew Burleigh is the founder, head writer, and editor of Solve Your Tech, which he launched in 2012. He has written technology tutorials since 2008 and worked in IT since 2003, including small-business support, IT management, and consulting. He holds Bachelor’s and Master’s degrees in Computer Science from Arizona State University.
Matthew writes practical guides for Windows, iPhone and iPad, Microsoft Office, Outlook, Google apps, and Android. Solve Your Tech’s guides are checked step by step against the device or app maker’s own documentation and tested on his own devices whenever he has the hardware or software, with clear steps, sources, and update dates.
Read more about Matthew and how Solve Your Tech writes and updates its guides, or report a correction.