Many of the apps and websites that you visit might want to send you notifications or gain access to your contacts.
Often these requests are for a good reason, but occasionally, there may be a request that you are concerned about.
Fortunately, Windows 10 lets you control permissions for apps and sites that request this type of access, and you can control settings for your camera as well.
Our tutorial below will show you how to view and change the Windows 10 camera permissions if you suspect that there is an app with permissions that shouldn’t have them.
How to Switch the Camera Permissions Windows 10 Settings
- Click the Windows button.
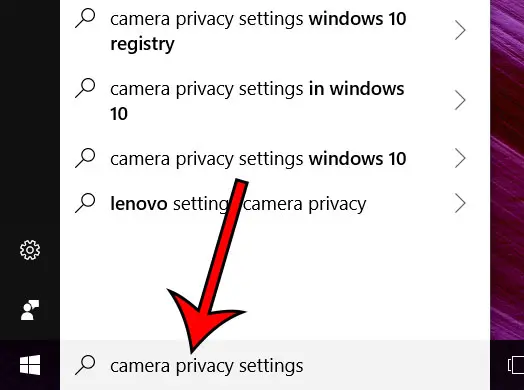
- Search for “camera privacy settings.”
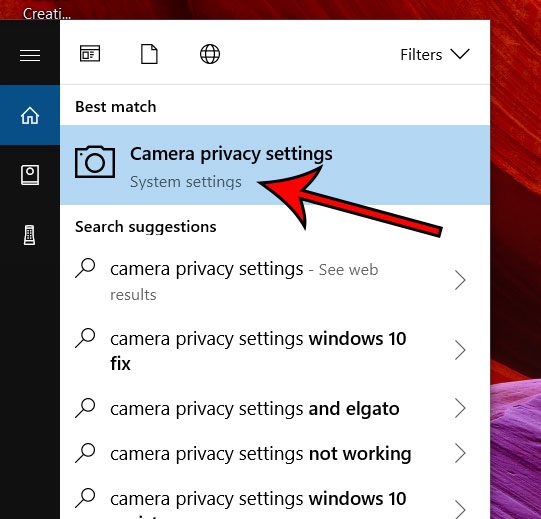
- Choose the “camera privacy settings” result.
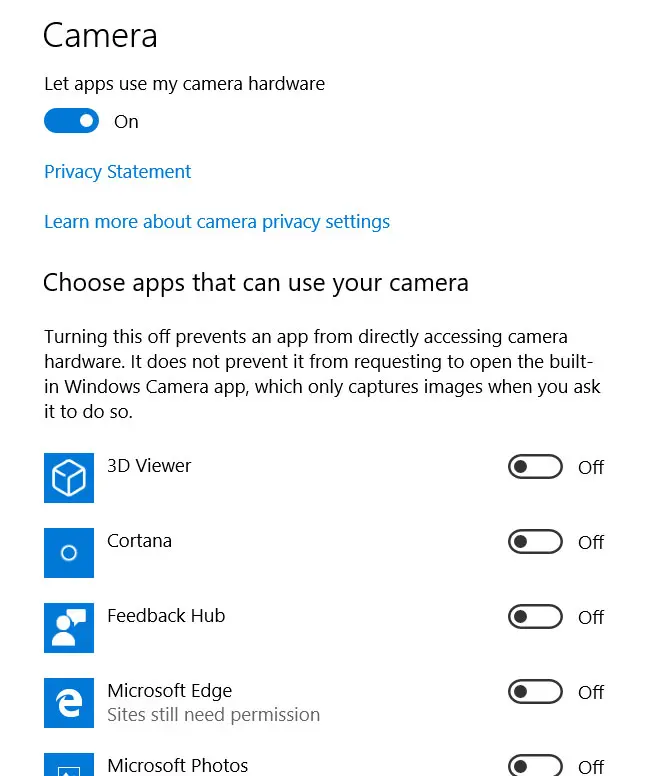
- Enable or disable Windows 10 camera permissions as needed.
Our guide continues below with additional information on how to change the camera permissions in Windows 10, including pictures of these steps.
Most laptops that you purchase today have a webcam built in. The webcam has become a standard component for many computers, and many of the apps that you use everyday likely have some way that they can utilize that camera.
But you might be concerned that a bad person could gain access to your webcam and turn it on whenever they want.
One way to prevent this is to keep a close eye on the camera permissions for your applications.
Our tutorial below will show you where to find these permissions so that you can customize them, and even block any app from trying to use your camera hardware at all.
Related Topic: Check out our Windows 10 download folder guide if you are having trouble finding the files that you have downloaded in your Web browser.
How to Choose Which of Your Programs Can Use the Camera in Windows 10 (Guide with Pictures)
The steps in this article are going to show you where to find the menu that contains the camera permissions for apps on your computer.
Here you will be able to choose which apps have permission to use your camera.
Note that even if the permission is off, the app can still request to use the Windows Camera app if an activity occurs in the program that requires the camera.
Step 1: Type “camera privacy settings” into the search field at the bottom-left corner of the screen.

Step 2: Choose the Camera privacy settings option at the top of the list of search results.

Step 3: Click the button to the right of each app for which you would like to grant permissions.

Note that there is also an option at the top of the screen where you can simply elect to prevent any apps from trying to use your camera hardware.
Taking a screen shot in Windows 10 is a fast way to capture a picture of your screen and create an image file that you can edit or share.
Looking for an easier way to launch the programs that you use everyday? Customize the Start screen with your most used apps so that they are visible at the top of the menu whenever you click the Start button.

Matthew Burleigh has been writing tech tutorials since 2008. His writing has appeared on dozens of different websites and been read over 50 million times.
After receiving his Bachelor’s and Master’s degrees in Computer Science he spent several years working in IT management for small businesses. However, he now works full time writing content online and creating websites.
His main writing topics include iPhones, Microsoft Office, Google Apps, Android, and Photoshop, but he has also written about many other tech topics as well.