Are you familiar with a lot of the formulas in Excel, but you don’t remember the exact parameters that you need to use?
Microsoft Excel contains a vast amount of features and settings, and the number of formulas that you can use to compare data can be somewhat overwhelming.
Our article below discusses the autocomplete setting for formulas and how you can turn it on or off as needed.
How to Toggle Excel’s Formula AutoComplete Setting On or Off
- Open Excel.
- Choose the File tab.
- Click the Options button.
- Select the Formulas tab.
- Check the Formula AutoComplete box.
- Click OK.
You can continue reading below for additional information on how to enable formula autocomplete in Excel, including pictures of these steps.
If one of the calculations that you are performing in your spreadsheet involves percentages and you would like them to display that way, then find out more with our percent formula Excel guide.
Excel 2013 contains a large library of formulas that offer a variety of different mathematical operations.
If you have difficulty remembering all of the formulas contained within the program, then you might find the Formula AutoComplete option to be very useful.
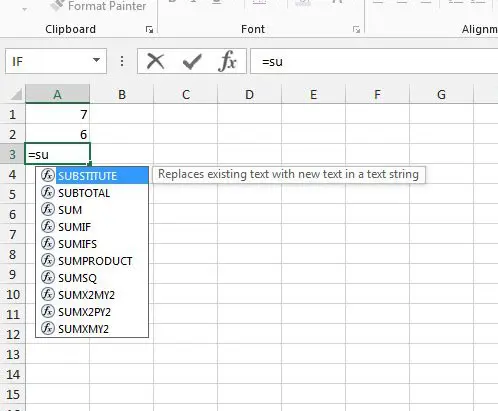
This setting allows you to start typing a formula into a cell, at which point Excel will display a list of formulas that start with the letters you are typing.
The Formula AutoComplete setting can be disabled, however, from the Excel Options menu.
If it is not working on your computer and you would like to fix that, then read our steps below to learn how to re-enable the setting.
You can also check out our tutorial on how to subtract in Excel and find out how to use a really versatile subtraction formula.
Adjusting the Default Formula AutoComplete Setting in Excel 2013 (Guide with Pictures)
The steps in this article will assume that the Formula AutoComplete is currently disabled in your Excel 2013 settings.
Once you have completed the steps below, you will be able to start typing a formula into a cell, and Excel will display an AutoComplete list that includes formula options you can click to use.
Step 1: Open Excel 2013.
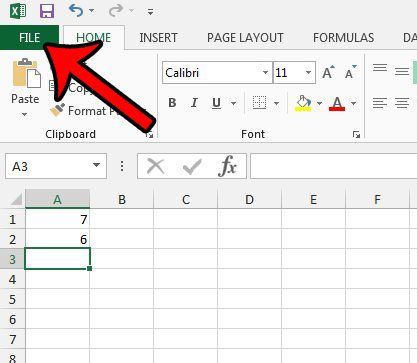
Step 2: Click the File tab at the top-left corner of the window.
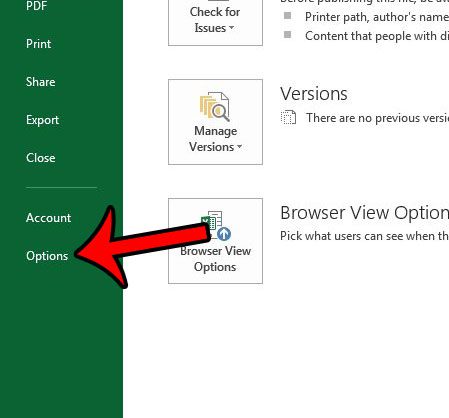
Step 3: Click the Options button at the bottom of the column on the left side of the window.
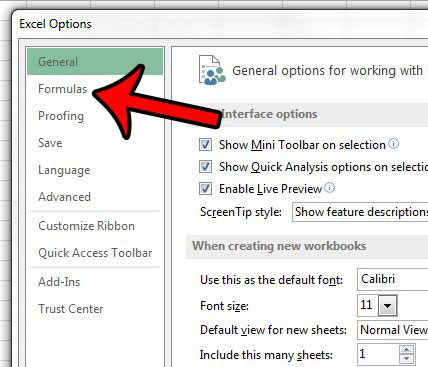
This opens a new window called Excel Options.
Step 4: Select the Formulas tab at the left side of the Excel Options window.
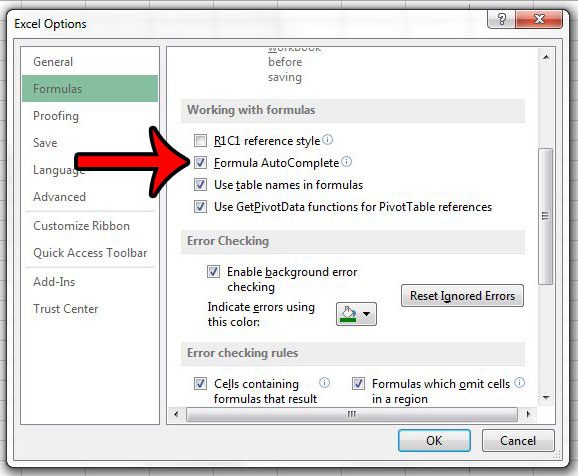
Step 5: Click the box to the left of Formula AutoComplete in the Working with formulas section of the menu. You can then click the OK button at the bottom of the window to apply your changes.
Now when you start typing a formula into a cell, you should see a list under the cell that offers some formula options for you. Clicking one of those options will enter the formula into the cell, at which point you will need to enter the values and the parameters for the formula.
Do you have two columns of data that you need to combine, and are looking for a simple way to do it. Learn about the concatenate formula and see if its utility will improve your Excel experience.

Matthew Burleigh has been writing tech tutorials since 2008. His writing has appeared on dozens of different websites and been read over 50 million times.
After receiving his Bachelor’s and Master’s degrees in Computer Science he spent several years working in IT management for small businesses. However, he now works full time writing content online and creating websites.
His main writing topics include iPhones, Microsoft Office, Google Apps, Android, and Photoshop, but he has also written about many other tech topics as well.