You can remove your photos from your iPhone’s iCloud backup by going to Settings > selecting your Apple ID card > iCloud > Photos > and then turning off Sync This iPhone.
The free 5 GB of storage that you get with your Apple ID can be enough space for a backup at first, but that backup can quickly exceed that.
While a large iPhone backup can be due to many things, it’s often because there are too many pictures and recorded videos in the backup.
Our tutorial below will show you how to remove the Camera Roll from the iCloud Backup on an iPhone 5 to reduce the size of the backup.
How to Turn Off the Camera Roll Backup on an iPhone
- Open Settings.
- Select your Apple ID.
- Choose iCloud.
- Select Photos.
- Disable Sync This iPhone.
Note that you may not see the Photos option here if you are using iCloud Photos. If you are using that, then you will need to select Photos from the top iCloud menu and, turn it off there, then go to the iPhone backup.
Our guide continues below with additional information on how to remove the Camera Roll from the iCloud Backup on an iPhone 5, including pictures of these steps.
Related: Check out the article about how to turn off flash notification if you want to know more about making the iPhone camera flash go off for alerts.
Are you getting a warning on your iPhone that your iCloud Storage is almost full and that you cannot create a backup?
This happens pretty often for iPhone users that have the free 5 GB of storage that come with an iCloud account and have not purchased any additional iCloud storage from Apple.
The lack of available space can be due to any number of apps that store a lot of data on your device, but perhaps one of the most common reasons is that your Camera Roll is too large.
Fortunately, it is possible to customize the items that are included in your iCloud backup, and you can remove the Camera Roll from the list of items included when an iCloud backup is created.
How to Stop Backing Up the Camera Roll on the iPhone 5 (Guide with Pictures)
The steps in this article were performed on an iPhone 5 using the iOS 7 operating system. These steps will assume that you have already configured iCloud on your iPhone and are currently using the iCloud Backup feature.
Note that this will not delete your Camera Roll from your iPhone. It will simply stop backing up your Camera Roll to iCloud.
This also means that you will not have a backup of the pictures on your iPhone, so you might want to consider an alternative solution, such as Dropbox.
Step 1: Touch the Settings icon.

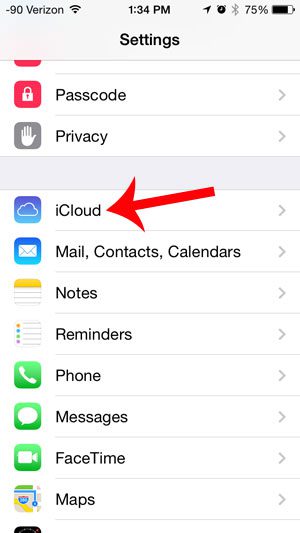
Step 2: Scroll down and select the iCloud option.
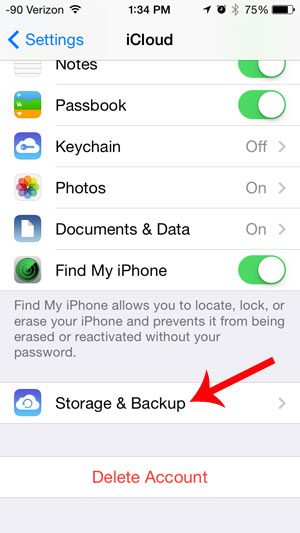
Step 3: Scroll down and select the Storage & Backup option.
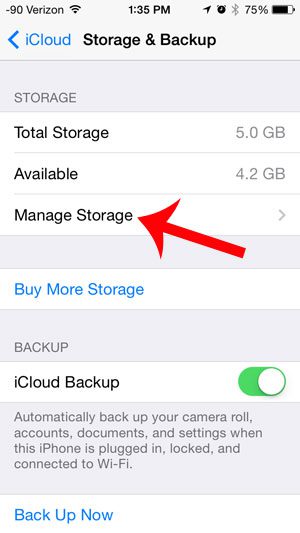
Step 4: Select the Manage Storage option at the center of the screen.
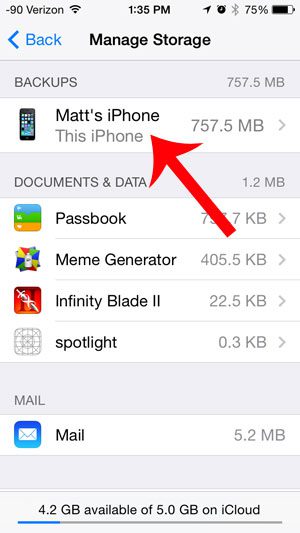
Step 5: Select your iPhone backup at the top of the screen.
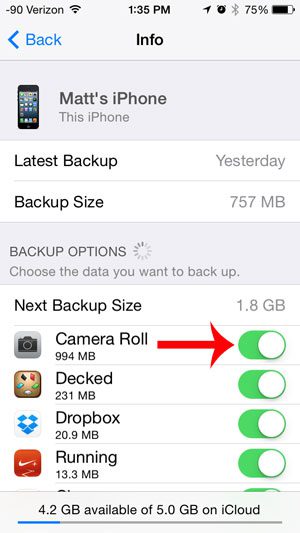
Step 6: Touch the button to the right of Camera Roll.
There will be green shading around the button if your pictures are currently being backed up to iCloud, as in the image below.
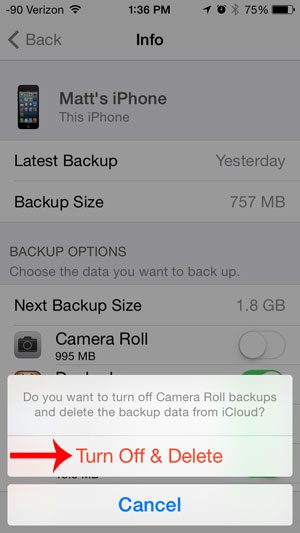
Step 7: Touch the Turn Off & Delete button.
As mentioned previously, this will not delete the pictures from your Camera Roll. It will only delete the Camera Roll data that is backed up to iCloud, and will no longer back up the Camera Roll when an iCloud backup is created.
Now that you know how to remove the Camera Roll from the iCloud Backup on an iPhone 5, you can reduce the size of the backup so that it’s (hopefully) small enough to fit in the default iCloud storage.
Are you taking advantage of the Find My iPhone feature of iCloud? This is the option that will allow you to locate your iPhone if it is lost or stolen.

Matthew Burleigh has been writing tech tutorials since 2008. His writing has appeared on dozens of different websites and been read over 50 million times.
After receiving his Bachelor’s and Master’s degrees in Computer Science he spent several years working in IT management for small businesses. However, he now works full time writing content online and creating websites.
His main writing topics include iPhones, Microsoft Office, Google Apps, Android, and Photoshop, but he has also written about many other tech topics as well.