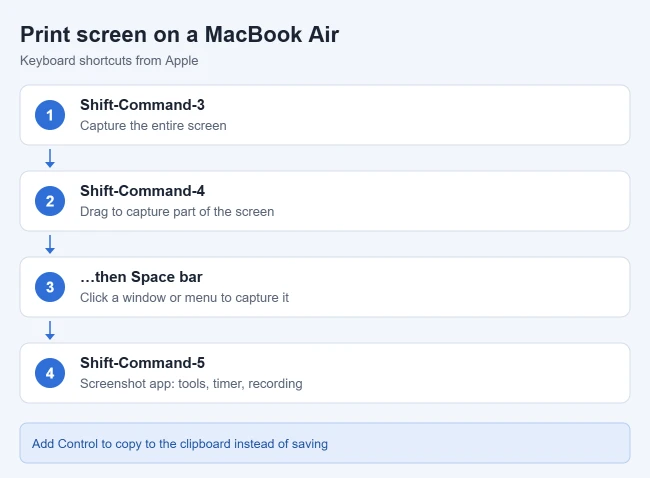
To take a screenshot on a MacBook Air or MacBook Pro, press Shift-Command-3 to capture the whole screen, or press Shift-Command-4 and drag over the part you want. The image saves to your desktop as a PNG file, and adding the Control key, as in Control-Shift-Command-4, copies it to the clipboard instead.
These steps work on any MacBook running macOS Mojave or later, including macOS 27.
Apple’s Take screenshots on Mac guide covers these shortcuts. For other devices, see taking a screenshot on any device.
MacBook Screenshot Shortcuts at a Glance
| What you want | Press | Where it goes |
|---|---|---|
| Whole screen | Shift-Command-3 | Desktop |
| Part of the screen | Shift-Command-4, then drag | Desktop |
| A window or the menu bar | Shift-Command-4, then Space bar, then click | Desktop |
| A menu and its items | Open the menu, press Shift-Command-4, then drag | Desktop |
| Screenshot app (tools, timer, recording) | Shift-Command-5 | Your chosen location |
| Touch Bar (MacBook Pro models that have one) | Shift-Command-6 | Desktop |
| Any of the above, copied instead of saved | Add Control | Clipboard |
The keys you press together are all on the left side of the keyboard: Shift, Command (the key with the ⌘ symbol), and a number in the top row. Press them at the same time and let go. You don’t need to hold them down.
How to Capture the Entire Screen
- Set up the screen the way you want it to look. Close anything private, such as an open email or a notification you don’t want to share.
- Press Shift, Command, and 3 together, then release them.
- Look for the thumbnail that slides into the lower-right corner. Click it to edit or share the screenshot, or leave it alone and it saves to your desktop after a few seconds.
You’ll find a file named “Screenshot” followed by the date and time on your desktop.
How to Capture Part of the Screen
- Press Shift, Command, and 4 together. The pointer turns into a crosshair.
- Press and hold the trackpad (or mouse button) at one corner of the area you want.
- Drag to the opposite corner. A shaded box shows what will be captured.
- To move the box without changing its size, keep holding and press the Space bar while you drag. To cancel, press Esc.
- Let go of the trackpad. Only the selected area is captured and saved.
This is the best choice for most everyday screenshots, because you don’t have to crop out the rest of the screen later.
How to Capture a Window or Menu
- Open the window or menu you want.
- Press Shift-Command-4, then press and release the Space bar. The pointer changes to a small camera.
- Move the camera over the window or menu. The window or menu is highlighted to show it’s selected.
- Click to take the screenshot.
The window is saved with a soft shadow around it. To leave the shadow out, hold Option while you click. If you want a menu along with its items but not the whole window behind it, open the menu, press Shift-Command-4, and drag over the menu instead.
How to Use the Screenshot App
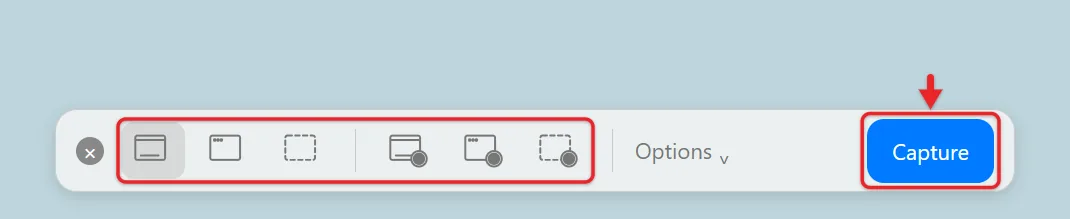
The Screenshot app gives you buttons for every capture type, plus a timer and screen recording. Press Shift-Command-5, or search for Screenshot in Spotlight (Command-Space bar). It’s also in the Utilities folder inside Applications.
- Look at the toolbar at the bottom of the screen. The first three buttons capture the entire screen, a window, or a portion of the screen. The next three record the entire screen, a window, or a portion.
- Click the tool you want. For a portion, drag the frame’s edges to resize it or drag the middle to move it.
- Click Options to change settings for this capture (see the list below).
- Click Capture for a screenshot, or Record for a video. For a window, click the window itself.
- To stop a recording, click the stop button in the menu bar at the top of the screen.
Screenshot app Options
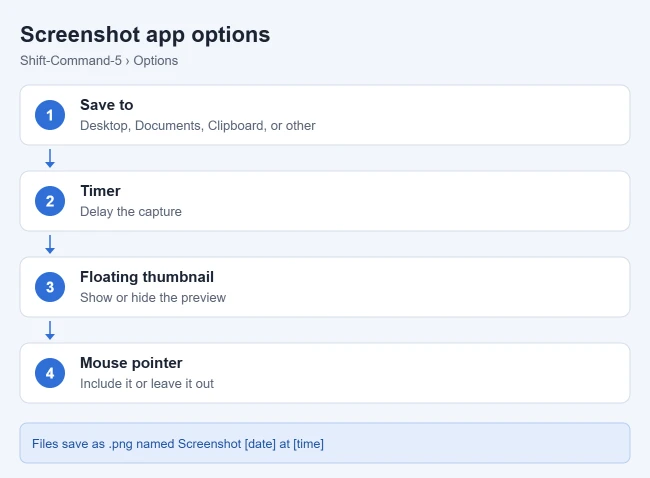
- Save to: pick a preset location such as Desktop, Documents, Clipboard, Mail, Messages, or Preview, or choose Other Location for any folder.
- Timer: wait 5 or 10 seconds before the capture, which gives you time to open a menu or hover over a tooltip.
- Microphone: recordings only; choose a mic to add narration, or None.
- Show Floating Thumbnail: turn the corner preview on or off. With it off, the file saves right away.
- Remember Last Selection: reuse the same area for the next portion capture.
- Capture Format: on supported Macs running macOS Tahoe 26 or later, choose HDR for more brightness and color on an HDR display, or SDR for standard screenshots that look the same everywhere.
- Show Mouse Pointer: include the pointer in the image or recording.
How to Screenshot a Menu That Closes Too Fast
Some menus and pop-ups disappear when you press a key. Use the timer:
- Press Shift-Command-5.
- Click Options, then choose 5 Seconds or 10 Seconds under Timer.
- Pick Capture Entire Screen or Capture Selected Portion, then click Capture.
- Open the menu during the countdown and leave it open until the screenshot is taken.
Crop the extra space afterward in the thumbnail editor or in Preview.
The floating thumbnail is the fastest way to do something with a new screenshot:
- Click the thumbnail to open an editing window. Use the Markup tools to draw, add text or shapes, highlight, or crop, then click Done.
- Drag the thumbnail into an email, a note, a chat, or a Finder window to put the image there without saving a copy on the desktop.
- Swipe it to the right to save it immediately and dismiss it.
- Control-click it and choose Save to Clipboard, or choose a different save location.
To paste a screenshot into an email or document, take it with Control added (for example, Control-Shift-Command-4), click where the image should go, and press Command-V.
Before you share, check the edges of the image for open tabs, your name, email addresses, or notifications. If you need to hide something, cover it with a solid filled shape in Markup rather than scribbling over it, so the text underneath can’t be read. Screenshots taken on the Mac can be dragged onto a nearby iPad after you turn on Universal Control.
Take a Screenshot With Preview (No Keyboard Shortcut Needed)
If you’d rather click than remember key combinations, the Preview app can capture the screen too. Apple documents this in Take a picture of your screen in Preview.
- Open Preview from the Applications folder or Spotlight.
- Choose File > Take Screenshot.
- Choose From Selection, From Window, or From Entire Screen, then drag or click to capture.
The screenshot opens in a new Preview window named “Untitled.” Choose File > Save to keep it.
Where Screenshots Are Saved
By default, screenshots go to your desktop as .png files named “Screenshot” followed by the date and time. Screen recordings are saved as .mov files named “Screen Recording.”
To change the folder:
- Press Shift-Command-5.
- Click Options.
- Under Save to, choose a location, or click Other Location and pick a folder.
The new location applies to the keyboard shortcuts too. A dedicated folder, such as one named Screenshots inside Pictures, keeps your desktop from filling up. If you’re running low on space from old captures, these steps show how to free up space on a MacBook Air.
Can’t find one? Open Finder, click the search field, and type “Screenshot,” or check the Save to setting to see where they’re going.
Change a Screenshot to JPEG or Another Format
macOS saves standard screenshots as PNG, which keeps text sharp but makes larger files. To convert one, follow Apple’s Convert image file types using Preview steps:
- Open the screenshot in Preview.
- Choose File > Export.
- Click the Format menu and choose JPEG, HEIC, PDF, or another type. For JPEG, drag the Quality slider to make the file smaller.
- Click Save.
Capture a Whole Webpage or Long Document
macOS doesn’t have a built-in scrolling screenshot. For a long webpage, receipt, or document, save it as a PDF instead, which keeps all the text. Apple’s Save a document as a PDF on Mac steps work in Safari and most apps:
- Choose File > Print.
- Click the PDF button at the bottom of the Print window, then choose Save as PDF.
- Name the file, pick a folder, and click Save.
For an image instead of a PDF, take several Shift-Command-4 screenshots as you scroll.
Using a Windows Keyboard With Your Mac
On a Windows keyboard connected to a Mac, the Windows key acts as Command and Alt acts as Option. So the full-screen shortcut becomes Windows-Shift-3, and a selection is Windows-Shift-4. You can also change which key acts as Command on a Windows keyboard.
When the Shortcut Does Nothing
- The shortcut does nothing: open Apple menu > System Settings > Keyboard, click Keyboard Shortcuts, then click Screenshots. Make sure the checkboxes are on. If someone changed a shortcut, select it and click Restore Defaults. Another app that uses the same keys, such as a third-party screenshot tool, can also take over the shortcut.
- No file on the desktop: you may have added Control, which copies to the clipboard only, or the Save to location in the Screenshot app’s Options was changed.
- The screenshot isn’t saved right away: that’s the floating thumbnail waiting a few seconds. Swipe it right to save now, or turn off Show Floating Thumbnail.
- A window or video shows up blank: some apps, including Apple’s TV app, don’t allow screenshots of their windows. This is a protection built into the app, and there isn’t a setting to change it.
- Shift-Command-6 does nothing: that shortcut only works on MacBook Pro models with a Touch Bar.
How to Change or Turn Off Screenshot Shortcuts
- Choose Apple menu > System Settings.
- Click Keyboard in the sidebar, then click Keyboard Shortcuts.
- Click Screenshots in the list.
- Turn a shortcut off with its checkbox, or double-click the key combination and press the new keys you want.
- Click Done.
To undo your changes, return to the same screen and click Restore Defaults.
Mac Screenshot Questions
Is there a Print Screen key on a MacBook Air?
No. Shift-Command-3 does the same job for the whole screen, and Shift-Command-4 captures part of it. You can assign different keys in Keyboard Shortcuts settings.
Is taking a screenshot different on a MacBook Pro?
No. The shortcuts and the Screenshot app are the same on MacBook Air and MacBook Pro. The only extra is Shift-Command-6 for the Touch Bar on MacBook Pro models that have one.
How do I record my screen instead?
Press Shift-Command-5, choose one of the three record buttons, and click Record. Click the stop button in the menu bar when you’re done. The video saves as a .mov file.
Why does my screenshot look different on another computer?
If you chose HDR under Capture Format, the screenshot is saved as an HDR image in HEIF format. An HDR screenshot appears in SDR on a standard display. Choose SDR in Options to get a standard PNG for sharing.
How do I take a screenshot on an iPad with a keyboard?
The same Shift-Command-3 and Shift-Command-4 shortcuts work on an iPad with a keyboard attached. The button method and other options are in the steps for taking a screenshot on an iPad.
Next, if you’re new to the trackpad, learn how to right-click on a MacBook Air. PowerPoint for Mac users can also take a screenshot in PowerPoint, and you can rename your MacBook Air so it’s easy to find in AirDrop.

Matthew Burleigh is the founder, head writer, and editor of Solve Your Tech, which he launched in 2012. He has written technology tutorials since 2008 and worked in IT since 2003, including small-business support, IT management, and consulting. He holds Bachelor’s and Master’s degrees in Computer Science from Arizona State University.
Matthew writes practical guides for Windows, iPhone and iPad, Microsoft Office, Outlook, Google apps, and Android. Solve Your Tech’s guides are checked step by step against the device or app maker’s own documentation and tested on his own devices whenever he has the hardware or software, with clear steps, sources, and update dates.
Read more about Matthew and how Solve Your Tech writes and updates its guides, or report a correction.