If you are just entering the job market, or if you are looking to make a career change, then you have probably determined that a lot of the available jobs require some kind of computer training. The actual extent of the necessary skills are going to vary wildly depending upon the type of job you want, but even the most basic of jobs that put you in front of a computer will require some Microsoft Excel knowledge.
However, this job requirement should not be a total deterrent if you are unfamiliar with the program. Even if you have never used Microsoft Excel before in your entire life, you can read this article to see what you should have as a base when you start applying for jobs that require some Excel experience.
If you are looking for a job, visit Jooble. They have an amazing selection of available jobs all over the world, many of which allow you to do remote work from home.
Familiarizing Yourself With the Excel Interface and Terms
Companies have a tendency not to make changes or upgrades to their system until it becomes a problem, so it might surprise you to learn that many businesses still use Microsoft Excel 2003. There have been several full version updates since then, but Excel 2003 still has a large following and install base.
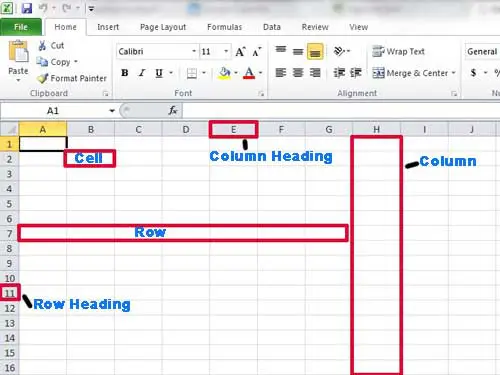
Therefore, when you are applying for a job, you might find that you need familiarity with multiple versions of Excel. But no matter which version of Microsoft Excel you are using (new versions are released every few years, and are identified by the year of their release. For example, Microsoft Excel 2010, Microsoft Excel 2013, or Microsoft Excel 2016) a few things will always remain the same. The majority of the Excel window will be taken up by a pattern of small rectangles. Each of these rectangles is called a cell, and they are organized into rows and columns. A row is a horizontal series of cells, while a column is a vertical series of cells.
Click on one of the cells and you can type a number or letter, and what you typed will be displayed in the cell. The information in the cell is called the value.
You can organize, sort and customize the appearance of your cells and values using the menus at the top of the screen.
The appearance of the menus will vary depending upon the version of Excel that you are using and, unfortunately, many different companies all use different versions of the program. However, most of the core functionality is in place in each version so, as long as you are familiar with what you need to do, you should be able to locate the necessary menu action.
Excel Sorting Tasks to Know For Job Hunting
Sorting a sequence of cells in Excel is one of the more common tasks that you will need to know when using Excel in your new job and, if you are given a pre-hire test of your competencies, you will probably be presented with a random grouping of data that you need to organize. Whether you want to alphabetize a list of last names or organize a series of numbers from highest to lowest, Excel makes this possible with one click of a button. Additionally, the method for sorting words and numbers is the same, and you can choose between sorting from lowest to highest, or highest to lowest.
One other way to sort your data is by copying and pasting information from its current cell to the location in which you actually need that information. If you have ever used a copy and paste function in any program before, the one in Excel works exactly the same way. Click on a cell, then press Ctrl + C on your keyboard to copy it (or Ctrl + X to cut it), then click the desired destination cell and press Ctrl + V to paste it.
This also works if you want to copy an entire row, column, or group of cells. Click the row number at the left side of the window, the column letter at the top of the window, or use your mouse to highlight your desired cells, then use the copy and paste commands defined earlier.
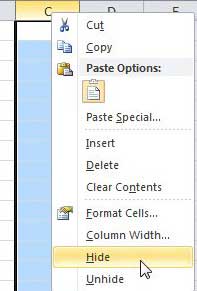
A final method of sorting involves using the Hide and Unhide options in Excel. This allows you to remove a row or column from view, while not deleting that range of data from the spreadsheet. You can hide a row or column by right-clicking the row number or column letter, then clicking the Hide option. You can unhide a row or column by using your mouse to select the rows or columns before and after the hidden series, right-clicking the selection, then clicking the Unhide option.
Useful Excel Display Formatting Options
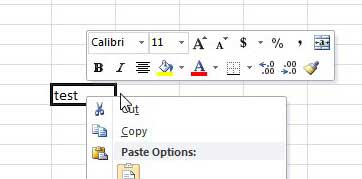
Another grouping of Excel tasks that you will encounter on a daily basis revolves around adjusting the way that your cells look, as well as the way that they print. Each version of Excel allows you to modify the color of your cells, the appearance of the font, and the size of your cells. Color changes can be quickly accessed in all versions of Excel by right-clicking the cell, then choosing from the formatting options on the shortcut menu.
You can right-click a row number or column name, then choose the row height or column width option to specify the size of the row or column that you want to modify. This same function apples if you select a group of rows or columns.
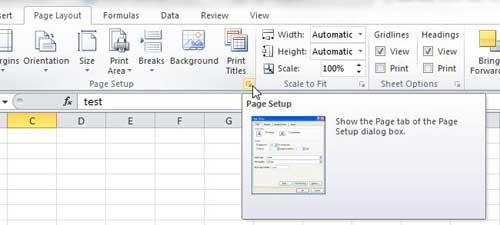
One final method to format the appearance of your Excel file, specifically for printing, is to use the Page Setup menu. The Page Setup menu is found by clicking the Page Setup button at the bottom-right corner of the Page Setup section on the Page Layout menu.
This menu includes options for you to specify the orientation of your page, the margins of the page, the header information, and whether or not to print gridlines on the page. Printing gridlines is a surprisingly important element to consider when you are printing Excel files, because it provides the best method for making a printed document more readable. Unless specifically instructed not to, I usually include them by default.
Some Basic Calculations and Formulas for Excel
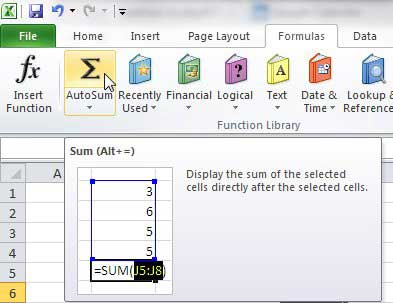
The most common thing that I run into with Excel files is simply adding a bunch of numbers together. This is especially true in business scenarios where a lot of orders and reports will be enormous spreadsheets with cells that need to be added together to determine the total value of a sale. I have personally seen people manually adding values in Excel together, which almost defeats the purpose of the program. Excel includes an AutoSum button, located on the Formulas bar, that will add a series of numbers for you automatically. Click the AutoSum button, highlight the cells you want to add together, the press Enter. The summed total of the cells will be displayed in the first cell under or to the right of the cells that you selected.
You can also type formulas into cells for a little more control over where the total is displayed. Formulas are typically composed in a format like =A1+A2, =A1-A2, =A1*A2 or =A1/A2. If you are curious, you can manually write an AutoSum function using the format =SUM(A1:A2).
Practice, Practice, Practice
As with almost everything else in life, you need to practice to get better at Excel. You might be able to perform specific tasks with guided direction, but the real value for a potential employer will come when you are able to seamlessly perform any of these tasks from memory. This will result in an increase in your productivity, which will increase your value. Additionally, as you continue to use Excel, you will discover other ways to perform tasks and you will learn other helpful tips and tricks that will make it easier to organize, sort and manipulate large amounts of data in seconds.

Matthew Burleigh has been writing tech tutorials since 2008. His writing has appeared on dozens of different websites and been read over 50 million times.
After receiving his Bachelor’s and Master’s degrees in Computer Science he spent several years working in IT management for small businesses. However, he now works full time writing content online and creating websites.
His main writing topics include iPhones, Microsoft Office, Google Apps, Android, and Photoshop, but he has also written about many other tech topics as well.
