Occasionally you will create a worksheet in Excel 2010 that contains data that you need to share, but that you don’t want someone to be able to edit.
An effective way to handle this situation is to protect that worksheet with a password.
This will configure the spreadsheet so that it can be opened and viewed, but the file viewer will not be able to edit any of the information without having the password that you set when you protected the sheet.
As an Amazon affiliate, I earn from qualifying purchases.
Prevent People from Making Changes to an Excel 2010 Worksheet
The default sheet protection in Excel 2010 will make it so that no changes can be made to your worksheet, but you will be able to allow readers to make adjustments if you so choose.
Step 1: Open the Excel file containing the worksheet that you want to protect.
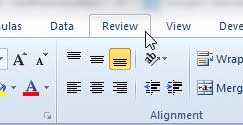
Step 2: Click the Review tab at the top of the window.

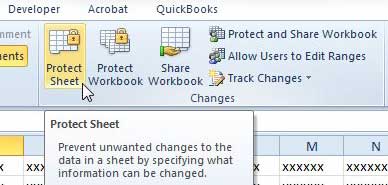
Step 3: Click the Protect Sheet button in the Changes section of the ribbon.

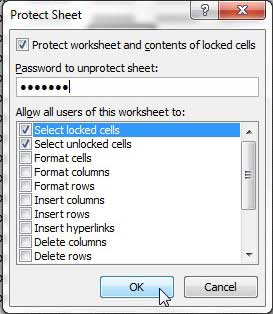
Step 4: Type a password into the Password to unprotect sheet field, then select the options that you want to allow people viewing the spreadsheet to adjust. Click the OK button when you are finished.

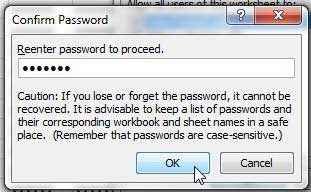
Step 5: Re-type the password into the Reenter password to proceed field, then click the OK button.

You can unprotect the sheet by returning to the location in Step 3, clicking the Unprotect Sheet option, and entering the password that you created. While the worksheet is protected, anyone that attempts to make a change will be greeted with the message below.

If you work on multiple computers, or if you simply want to back up important files to another location, then USB flash drives and external hard drives are really helpful. They are also becoming very affordable. Click here to see pricing on a 32 GB USB flash drive or a 1 TB external hard drive.
Now that you know how to protect a worksheet in Excel 2010, you can make it tougher for unwanted individuals to see the content in that sheet.
Do you work with people that are still using Excel 2003 and have trouble opening files that you send them from Excel 2010? Learn how to save as a different file type in Excel 2010 so that the file can be opened easily in Excel 2003.

Matthew Burleigh has been writing tech tutorials since 2008. His writing has appeared on dozens of different websites and been read over 50 million times.
After receiving his Bachelor’s and Master’s degrees in Computer Science he spent several years working in IT management for small businesses. However, he now works full time writing content online and creating websites.
His main writing topics include iPhones, Microsoft Office, Google Apps, Android, and Photoshop, but he has also written about many other tech topics as well.