Printed spreadsheets in Microsoft Excel for Office 365 can be difficult to read when there aren’t lines separating data.
Many people will add these lines to their documents to improve printing, but your current needs may not require those lines. Fortunately, you can adjust a setting if you need to know how to print without lines in Excel.
The lines that you are seeing are called “gridlines.” They form barriers between individual cells by showing lines on the top and bottom of each row and the left and right of each column.
New spreadsheets in Microsoft Excel don’t print these gridlines by default, but a spreadsheet that someone else created previously might have them.
Luckily removing these gridlines is a very similar process to adding them, so our guide below will show you how to remove printed gridlines in Excel.
How to Print Without Lines in Excel for Office 365
- Open your spreadsheet.
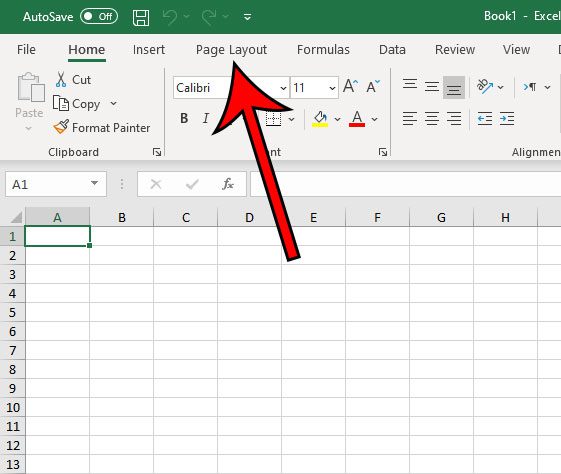
- Select Page Layout.
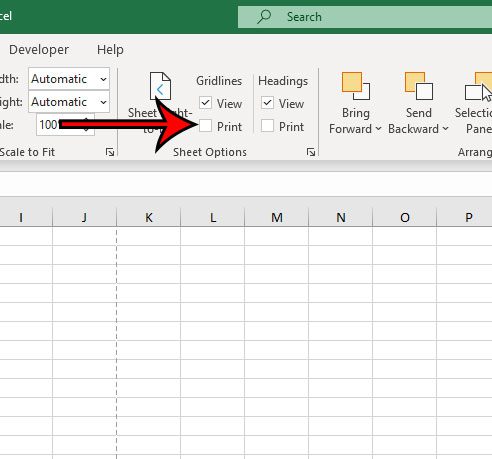
- Uncheck the Print box under Gridlines.
Our article continues below with additional information on removing the lines in Excel, including pictures of these steps.
Removing gridlines can be a helpful way to make your data look the way that you want it to, but you can read our Excel not printing all rows guide if the application isn’t printing all of the data in your sheet.
How to Print Without Gridlines in Microsoft Excel for Office 365 (Guide with Pictures)
The steps in this article were performed in Microsoft Excel for Office 365, but will work in most other versions of Excel as well.
Step 1: Open the Excel spreadsheet containing the printed gridlines that you wish to remove.
Step 2: Click the Page Layout tab at the top of the window.
Step 3: Click the box to the left of Print under Gridlines to remove the check mark.
Note that you can also elect to uncheck the View box if you don’t want to see the lines on your screen either.
Now that you know how to print without lines in Excel for Office 365, you can use this setting to control whether or not those gridlines are included in the printed version of your spreadsheet.
How to Remove Borders in Excel for Office 365
If you are still seeing printed lines after unchecking the box above, then the spreadsheet may contain borders. The border option in Excel is separate from the gridlines option, so you might need to remove those as well.
You can remove borders in Excel with the following steps.
- Select the cells that contain borders.
- Click the Home tab.
- Select the arrow next to the Border button.
- Choose No Border.

Matthew Burleigh has been writing tech tutorials since 2008. His writing has appeared on dozens of different websites and been read over 50 million times.
After receiving his Bachelor’s and Master’s degrees in Computer Science he spent several years working in IT management for small businesses. However, he now works full time writing content online and creating websites.
His main writing topics include iPhones, Microsoft Office, Google Apps, Android, and Photoshop, but he has also written about many other tech topics as well.

