The rollout of Microsoft’s new Outlook.com email system has generated a lot of buzz among people that are looking for a fast, simple new solution for managing their emails.
Plus, as a bonus, many of your first choices for email accounts might still be available. But this is not just a basic email service – Outlook.com is meant to be a direct competitor with some of the biggest names in email hosting, and this means offering a variety of ways to customize your account.
One of the things that you can do after creating your account is to learn how to create a signature for your Outlook.com email address. This will enable you to automatically add a signature at the end of every email message that you send.
As an Amazon affiliate, I earn from qualifying purchases.
Outlook.com Email Signature
Microsoft’s regular Outlook program is popular because of the amount of customization that you can apply to your emails.
While the free, online version of Outlook.com does not include this much in depth customization, it does allow you to make more of the popular adjustments, including the addition of a signature.
But if you do need all of the options offered in the installable version of Outlook, you can still buy it at Amazon.
Step 1: Open a Web browser window, then navigate to Outlook.com.
Step 2: Type your Outlook address and password into their respective fields, then click the Sign In button.
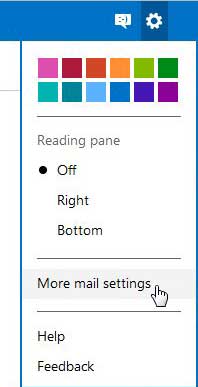
Step 3: Click the gear icon at the top-right corner of the window, then click the More Mail Settings option.
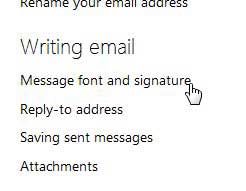
Step 4: Click the Message font and signature link under the Writing emails section of the window.
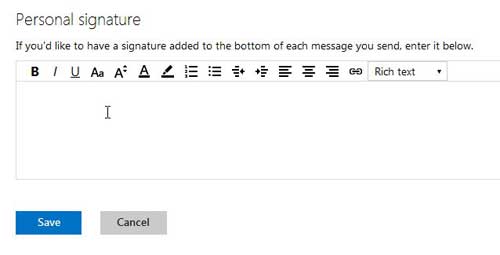
Step 5: Type your signature into the box under Personal signature at the bottom of the window. Note that there are different options in the toolbar above this box that allow you to change the text and font of the data that you are typing.
Step 6: Click the blue Save button when you have finished entering your signature.
The next time you go to write an email, you will notice that the signature is automatically added at the bottom of the message.
Now that you know how to create a signature for your Outlook.com email address, you can be sure to include important contact information tat you want to give to your email contacts.

Matthew Burleigh has been writing tech tutorials since 2008. His writing has appeared on dozens of different websites and been read over 50 million times.
After receiving his Bachelor’s and Master’s degrees in Computer Science he spent several years working in IT management for small businesses. However, he now works full time writing content online and creating websites.
His main writing topics include iPhones, Microsoft Office, Google Apps, Android, and Photoshop, but he has also written about many other tech topics as well.


