Cells in Microsoft Excel 2010 have a default size of 8.43 characters wide by 15 points high. This size is ideal for many situations, but you will eventually encounter a piece of information that will not fit within these default parameters.
Fortunately, you can choose to make any cell either smaller or larger to accommodate the information that you are inputting into the cell.
Additionally, there are several different methods that you can utilize to change the size of a cell in Microsoft Excel 2010, so you can experiment with the different available methods to determine which one is correct for your needs.
Check out our tutorial on how to expand all rows in Excel and learn about a quick and easy way to resize a lot of cells at once.
Change Cell Size in Excel 2010
The first thing to realize before you start changing your Excel cell sizes is that when you are changing the width or height of a particular cell, you are adjusting that value for every other cell in the row or column. Excel will not allow you to change the size of a single cell.
Begin the process by double-clicking the Excel file that contains the cells that you want to resize.
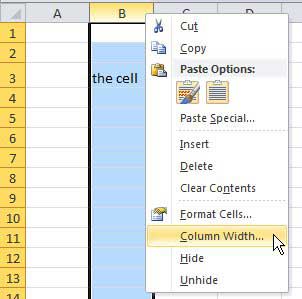
Locate the cell that you want to adjust, then right click the column heading at the top of that cell’s column. The column heading is the letter above the spreadsheet.
Click the Column Width option, then enter a value into the field. You can enter any value into this field up to 255, but bear in mind that the default value is 8.43, so adjust accordingly. Once you have entered a new value, click OK.
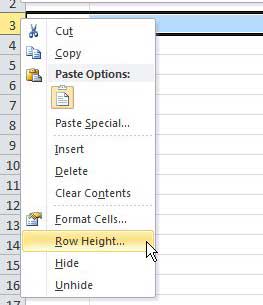
Now that we have changed the width of the column, we are going to perform a very similar action to change the height. Right-click the row heading, which is the number at the far-left side of the spreadsheet, then click the Row Height option.
Type your desired row height value into the field (any value up to 409 will work) then click the OK button.
Do you often need to adjust your column width and want to use a shortcut? This Excel auto adjust column width shortcut method might be the answer you need.
While this method will work if you can accurately guess the cell width and height that you need, it could prove to be difficult if you do not know an approximate value. Luckily Excel 2010 also includes another option that will automatically resize your row or column for you, based upon the largest cell value in your selected row or column.
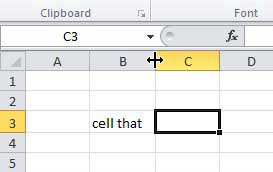
You can utilize this method by placing your mouse cursor on the line that separates your column or row heading from the one either to the right of or below it. For example, in the image below, I have placed my cursor on the line between columns B and C, because I want to automatically resize column B.
Double-click this line to have Excel automatically adjust the size of your row or column.
Note that both of these methods will work if you want to resize multiple rows or columns at once, too. Simply hold down the Ctrl or Select key on your keyboard to select all of the rows or columns that you want to resize, then use the Row Height, Column Width or double-click method to adjust the size values of the selected cells.
Our guide on how to autofit all columns in Excel can show you a simple way to fix the width of your spreadsheet columns.

Matthew Burleigh has been writing tech tutorials since 2008. His writing has appeared on dozens of different websites and been read over 50 million times.
After receiving his Bachelor’s and Master’s degrees in Computer Science he spent several years working in IT management for small businesses. However, he now works full time writing content online and creating websites.
His main writing topics include iPhones, Microsoft Office, Google Apps, Android, and Photoshop, but he has also written about many other tech topics as well.


