If you have a device that contains a lot of important information or files, then you should create a backup of that device in case something goes wrong.
Your iPhone 11, for example, might have some notes, pictures, or videos that you might not be able to recreate and would make you upset if you lost them.
Our tutorial below will show you how to back up iPhone 11 to iCloud steps so that you can not only enable the automatic backup feature on the device but also manually run a backup right now.
How to Create an iPhone 11 Backup
- Open Settings.
- Select your Apple ID card.
- Choose iCloud.
- Select iCloud Backup.
- Turn on Back Up This iPhone.
- Tap Back Up Now.
Our guide continues below with additional information on how to back up iPhone 11, including pictures of these steps.
Having a backup of your iPhone is important in case you lose or break your phone.
It’s also beneficial if you follow the steps in our how to hard reset iPhone 11 guide and want to be able to restore your files and settings.
Your Apple ID gives you a limited amount of iCloud cloud storage space, and it may be enough for you to back up your entire phone to the cloud for free.
You can even configure the backup to happen automatically so that you don’t need to think about it.
But if you are about to do something where you might lose data, or will need ot restore your device, then you may need to know how to manually back up your iPhone 11.
Backing Up iPhone 11 Tutorial (Guide with Pictures)
These steps were performed on an iPhone using the iOS 16 operating system, but will also work in some earlier versions of the iOS operating system.
These steps will show you how to back up iPhone 11 to iCloud.
Step 1: Open the Settings app.
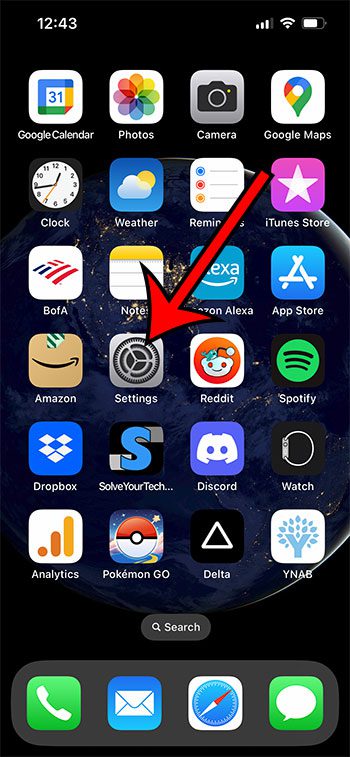
Find the gray gear Settings app icon and tap it.
Step 2: Touch the Apple ID card at the top of the menu.
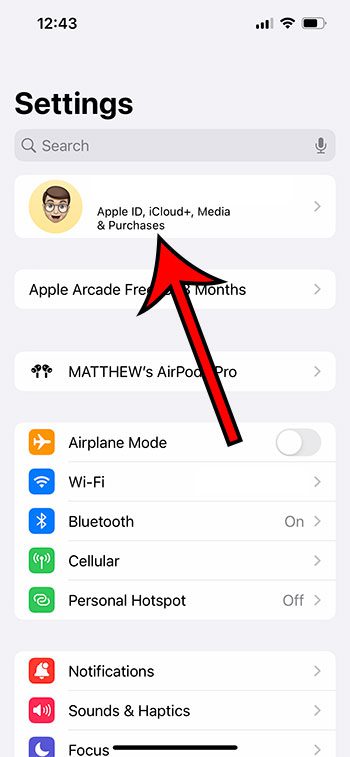
Select the Apple ID card with your name on it.
Step 3: Choose the iCloud option.
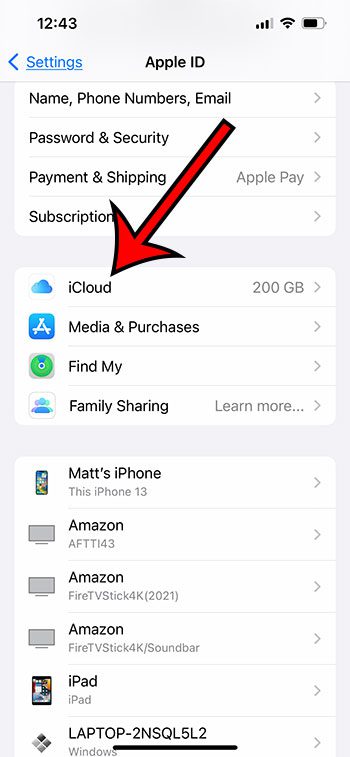
Open the iCloud menu.
Step 4: Tap the iCloud Backup button.
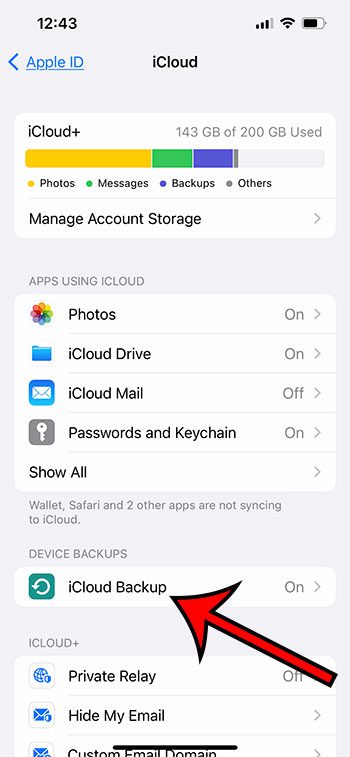
Choose iCloud Backup from the iCloud menu.
Step 5: Touch the Back Up This iPhone button to turn it on.
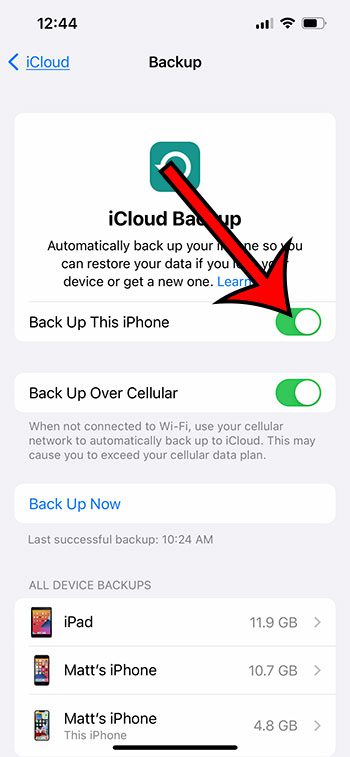
Tap the button to the right of Back Up This iPhone if it’s not already turned on.
Step 6: Tap the Back Up Now button.
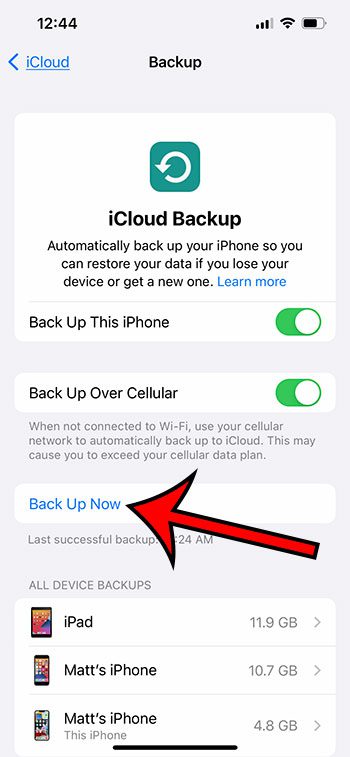
Begin the iCloud backup by selecting Back Up Now.
Now that you know how to back up iPhone 11 to iCloud, you will be able to manually run this backup whenever you are about to do something and want to make sure that you have created a copy of your files somewhere.
Note that you will receive a notification if the backup is unable to run because you don’t have enough free storage in your iCloud account.
You can also toggle the Back Up Over Cellular option if you would like.
Since backups can often be several GB in size, however, you might not want to back up your iPhone 11 over a cellular network, as it could use a significant percentage of your monthly data allowance.
More Information About iPhone 11 Backups
If you haven’t upgraded your iCloud storage and you have a lot of stuff on your iPhone, then you might need to change some of the backup settings.
You can do this by going to Settings > Apple ID Card > iCloud > iCloud Backup > selecting your phone > then customizing the options there.
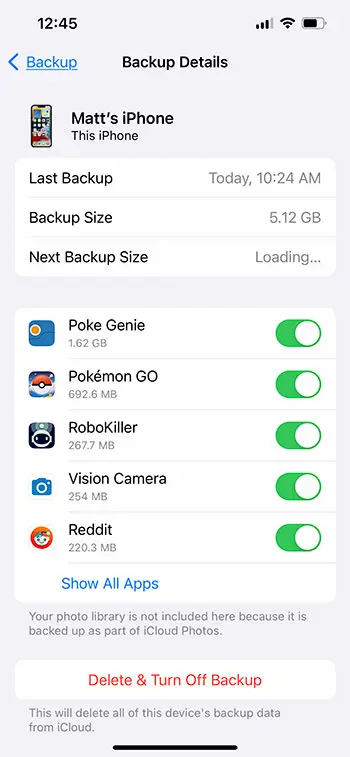
Note that you can also see information about when the last backup occurred, the size of the backup, and the projected size of the next backup.
There is also a Delete & Turn Off Backup button that you can use if you no longer wish to use the iCloud backup feature and want to delete existing backups from your iCloud storage.
What You Need for an Automatic iPhone 11 Backup to Run
Once you select the Back Up This iPhone option, your iPhone will automatically back itself up when the following conditions are met:
- The iCloud Backup feature is turned on
- Your device is plugged into a power outlet
- The phone is connected to a Wi-Fi network
- The iPhone screen is locked
- You have enough available storage space in iCloud
What is Included in an iPhone 11 Backup By Default
If you don’t change any of the iCloud Backup settings, then the following items will be included in the backup file:
- Data from your apps
- A backup of your Apple Watch
- Your current device settings
- The layout of your Home screen
- Text messages
- Photos and videos
- The history of items you have purchased
- Your ringtones
- The password for your Visual Voicemail
Note that items that are already saved to iCloud, such as your contacts, reminders, notes, and other items, are not part of the backup since that information is already saved in iCloud.
Continue Reading

Matthew Burleigh has been writing tech tutorials since 2008. His writing has appeared on dozens of different websites and been read over 50 million times.
After receiving his Bachelor’s and Master’s degrees in Computer Science he spent several years working in IT management for small businesses. However, he now works full time writing content online and creating websites.
His main writing topics include iPhones, Microsoft Office, Google Apps, Android, and Photoshop, but he has also written about many other tech topics as well.
