Windows Live Movie Maker gives you a good assortment of editing tools for making common changes to a video that you open in the program.
However, any change that you make is going to be applied to the entire selected video clip and, if you have only opened one file, that is the entire clip.
But sometimes, you are going to want to make an adjustment to only part of your video clip. You can accomplish this by learning how to split a clip in Windows Live Movie Maker.
This separates your video clip into two video clips, allowing you to make changes to only the selected clip, thereby leaving the other clip in its’ previous state.
How to Split a Clip Into Two Clips in Windows Live Movie Maker
This is a great tool for a lot of different reasons. It allows you to split a clip so that you can insert a title screen or image into the middle of a clip, plus it gives you the option of speeding up or slowing down a specific segment of your video clip.
Step 1: Begin by opening Windows Live Movie Maker. You can find the program by clicking the Start button, clicking All Programs, then clicking Windows Live Movie Maker.
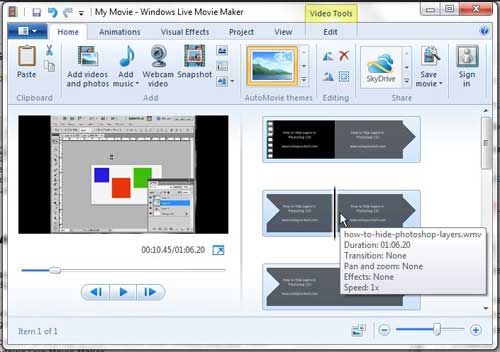
Step 2: Click the Add Videos and Photos button at the top of the window, then double-click the video file that you want to split to open it in Windows Live Movie Maker.
Step 3: Click the point in the timeline at the right side of the window where you want to split the clip. I typically use the timeline to select a rough point in my video file where I am going to split it, then I play, rewind and pause the video using the preview window at the left side of the window until I get the exact spot.
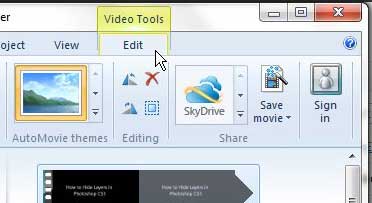
Step 4: Click the Edit tab at the top of the window, under Video Tools.
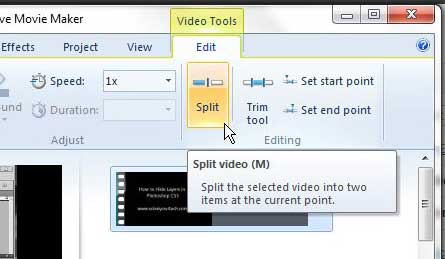
Step 5: Click the Split button in the Editing section of the ribbon at the top of the window.
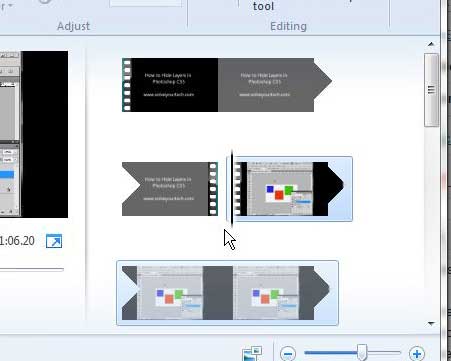
You will notice that there are now two separate video clips in the timeline at the right side of the window.
Now that you know how to split a clip in Windows Live Movie Maker, you can make it much easier to edit individual parts of a video that you have created.
You can simply click the clip that you want to edit to make changes to just that clip, leaving the other one in the state that it was prior to the split.

Matthew Burleigh has been writing tech tutorials since 2008. His writing has appeared on dozens of different websites and been read over 50 million times.
After receiving his Bachelor’s and Master’s degrees in Computer Science he spent several years working in IT management for small businesses. However, he now works full time writing content online and creating websites.
His main writing topics include iPhones, Microsoft Office, Google Apps, Android, and Photoshop, but he has also written about many other tech topics as well.


