When making a video project in Windows Live Movie Maker, you can use the Title Screen tool to insert a blank, black screen.
You can then use the text tool to add words to this screen, which makes it the ideal choice for a title screen.
This title screen can also be inserted into other points in your video, however, which also makes it useful for simply conveying information about the previous or upcoming clip.
Unfortunately, the title screen is seven seconds long by default, which might be more time that you want your viewers to spend reading a sentence or phrase.
Continue reading this tutorial to learn how to shorten the duration of title screens in Windows Live Movie Maker.
Windows Live Movie Maker – Reduce Title Screen Time
I find myself using the title screen tool in Windows Live Movie Maker with regularity simply because it is so useful when you are making a slideshow or a short movie that requires more information than the video itself conveys.
But if you are making a two or three-minute video and put in several title screens, the video can easily be another thirty seconds to a minute in length.
That is a lot of extra time, particularly for a piece of information that might take two seconds to read.
Luckily the process for shortening title screen duration in Windows Live Movie Maker is pretty straightforward, so you should be able to get your video down to a more acceptable length.
Begin by opening your Movie Maker project.
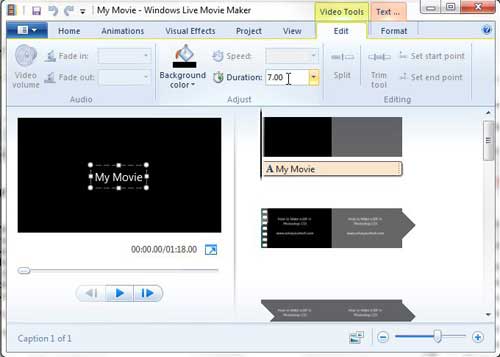
Click the title screen in the timeline at the right side of the window for which you want to shorten the duration.
Click the Edit tab under Video Tools at the top of the window.
Click inside the field to the right of Duration in the Adjust section of the ribbon at the top of the window.
Enter the amount of time for which you want the title screen to be displayed, then press Enter.
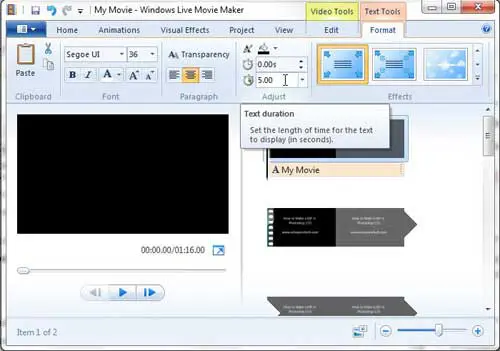
You can specify the duration for the text that is displayed on the title screen as well.
Confirm that the title screen is still selected, then click the Format tab under Text Tools at the top of the window.
Click inside the top time field in the Adjust section of the ribbon, then enter the starting point for the title screen text. For example, if you wanted the text to display one second after the screen, you would enter “1.00” into this field.
Click inside the bottom time field in the Adjust section of the ribbon, then enter the finishing point for the title screen text.
Now that you know how to shorten the duration of title screens in Windows Live Movie Maker, you can make the video more enjoyable for your audience, while also reducing its length.

Matthew Burleigh has been writing tech tutorials since 2008. His writing has appeared on dozens of different websites and been read over 50 million times.
After receiving his Bachelor’s and Master’s degrees in Computer Science he spent several years working in IT management for small businesses. However, he now works full time writing content online and creating websites.
His main writing topics include iPhones, Microsoft Office, Google Apps, Android, and Photoshop, but he has also written about many other tech topics as well.

