Apps for the iPhone often release new updates that improve the way the app functions. Whether it is the addition of a new feature or a fix for a bug in an earlier version, you typically want to install new updates for your apps as they are released.
But when you have a lot of apps on your iPhone, installing available apps can be somewhat time-consuming.
Fortunately, there is a way in iOS 7 to automatically install updates to your iPhone, which means that you do not have to worry about the increasing number in the red circle on your App Store icon, as the iPhone will automatically take care of those updates for you.
Automatic Updates in iOS 7 on the iPhone 5
This tutorial was written on an iPhone that is running the iOS 7 operating system. If your screen looks different than the one in the images below, then you may not have update to iOS 7 yet. Read this article to learn how to update to iOS 7.
The automatic app updating feature can be turned on for all of your apps only. If there are specific apps that you want to control the updates for, then you cannot turn this feature off for just that app.
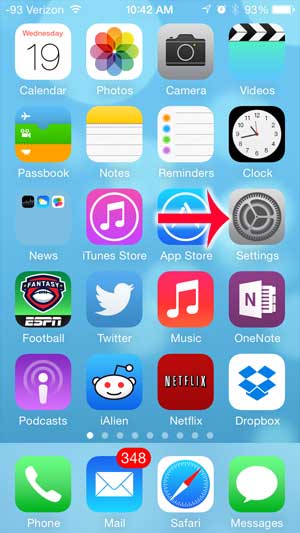
Step 1: Touch the Settings icon.

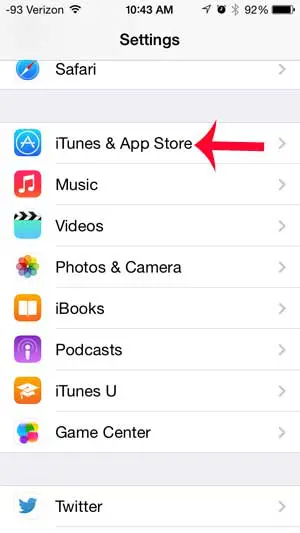
Step 2: Scroll down and select the iTunes and App Store option.

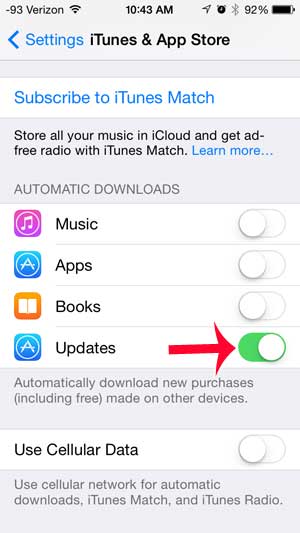
Step 3: Scroll to the bottom of the screen and touch the button to the right of Updates. You will know that it is turned on when there is green shading around the slider button.

Now that you know how to automatically install updates on your iPhone, you can ensure that you are always using the most current version of the apps that you have on your device.
Your iPad can also be configured to automatically install updates in a similar way.

Matthew Burleigh has been writing tech tutorials since 2008. His writing has appeared on dozens of different websites and been read over 50 million times.
After receiving his Bachelor’s and Master’s degrees in Computer Science he spent several years working in IT management for small businesses. However, he now works full time writing content online and creating websites.
His main writing topics include iPhones, Microsoft Office, Google Apps, Android, and Photoshop, but he has also written about many other tech topics as well.