I have found that spreadsheets I receive from other people often have some formatting that is already applied.
One big one is the print area, which can be a really frustrating thing to solve when only part of your spreadsheet is printing.
Many times, these formatting issues are due to the reuse of spreadsheets that were previously adjusted to accommodate sheets that are now a different size.
This can lead to scenarios where your printed spreadsheet is too small and very difficult to read.
Fortunately, this is a problem that you can overcome by changing some print settings back to their defaults. Our guide below will show you two locations to check.
If Microsoft Excel is only printing some of the data in your spreadsheet, then our guide on Excel not printing all rows can show you a setting to check what might be causing that.
How to Change the Page Scale in Excel 2013
The steps below will assume that there is currently page scaling that is being applied to your Excel spreadsheet, which is causing the printed version of the sheet to be very small.
This can occur in one of two ways. The first setting that we will check involves the manual scale of the page. If that setting is correct, then we will check a print setting.
Method 1 – Manual Page Scaling
Step 1: Open your spreadsheet in Excel 2013.
Step 2: Click the Page Layout tab at the top of the window.
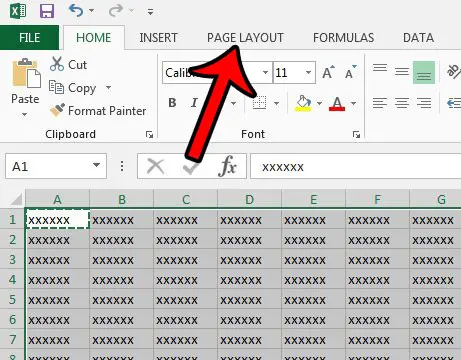
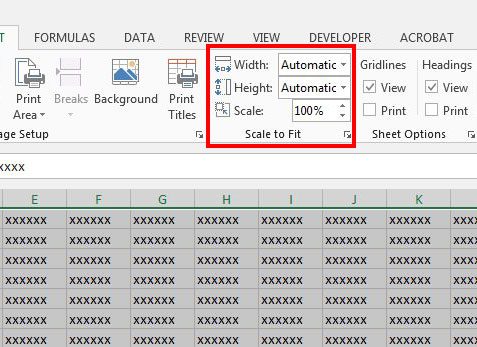
Step 3: Adjust the values in the Scale to Fit section so that they look like the image below.
Width should be Automatic, Height should be Automatic, and Scale should be 100%. These are the default print sizes for an Excel 2013 sheet. If you want to switch to an option that is bigger than what is currently set but smaller than the defaults, then adjust any of these settings accordingly.
The next section discusses a different way that you can achieve this result.
Is there a table in a document that you would like to work with in Excel? This convert table in Word to Excel article can show you how to move between those applications.
Method 2 – Print Menu Adjustments
Step 1: Open your spreadsheet in Excel 2013.
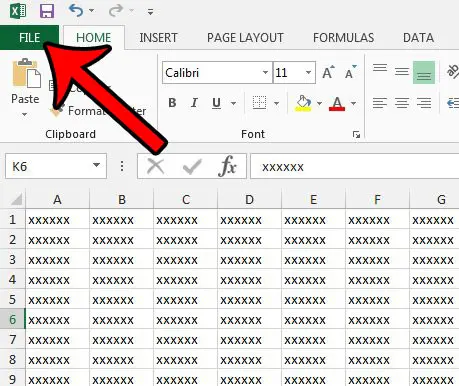
Step 2: Click the File tab at the top-left corner of the window.
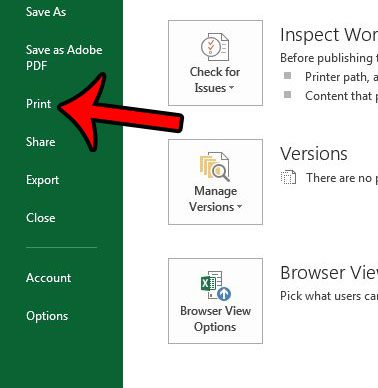
Step 3: Click Print in the column at the left side of the window.
Step 4: Click the button above the blue Page Setup link, then select the No Scaling option.
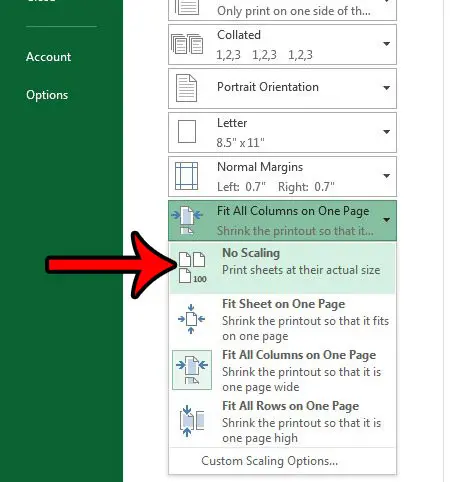
The Print Preview at the right side of the window should adjust, and your spreadsheet should now appear larger than it previously did.
Deal of the Day
- HIGH-QUALITY SOUND — Powered by the Apple H1 headphone chip, AirPods deliver rich, vivid sound.
- EFFORTLESS SETUP — After a simple one-tap setup, AirPods are automatically on and always connected. They sense when they’re in your ears and pause when you take them out. And sound seamlessly switches between your iPhone, Apple Watch, Mac, iPad, and Apple TV.
Last update on 2025-07-14 / Affiliate links / Images from Amazon Product Advertising API | As an Amazon Associate, I earn from qualifying purchases.
Now that you know about a couple of different ways that you can fix an Excel spreadsheet that is printing too small, you will be able to troubleshoot this and other similar issues that you encounter in the application.
If your spreadsheet is printing fine but is either too small or too large on your screen, then you might need to adjust the zoom level. This also makes it possible for you to manually choose how much or how little of your sheet appears on your screen.
Continue Reading

Matthew Burleigh has been writing tech tutorials since 2008. His writing has appeared on dozens of different websites and been read over 50 million times.
After receiving his Bachelor’s and Master’s degrees in Computer Science he spent several years working in IT management for small businesses. However, he now works full time writing content online and creating websites.
His main writing topics include iPhones, Microsoft Office, Google Apps, Android, and Photoshop, but he has also written about many other tech topics as well.
