To turn on word wrap in Notepad on Windows 11, open Notepad, click View, and select Word wrap. In the older Notepad that comes with Windows 10, click Format and select Word Wrap. Long lines then fold to fit the window instead of running off the right edge.
Word wrap is a display setting. It changes how Notepad shows a long line on screen, and it does not add line breaks to your file. You can switch it on and off as often as you like without changing the text.
Which version of Notepad do you have?
The setting lives in a different menu depending on which Notepad you are using, so check that first.
- Windows 11 Notepad: the redesigned app with rounded corners, a settings page, and a menu bar that reads File, Edit, View. Microsoft introduced this design in its redesigned Notepad for Windows 11 announcement. Word wrap is under View.
- Windows 10 (classic) Notepad: the older app with a menu bar that reads File, Edit, Format, View, Help. Word wrap is under Format.
You do not need any special permission or a Microsoft account to change this setting. One caution about sources: Microsoft’s own Help in Notepad page covers opening Notepad, headers and footers, and log files, but it does not describe word wrap. The menu names below match current Windows tutorials and our 2019 Windows 10 screenshots, and a label may differ slightly if your Notepad is older or newer.

How to turn on word wrap in Notepad on Windows 11
- Select the Start button, type Notepad, and select Notepad from the results. You can also open any text file that is already set to open in Notepad.
- Click View in the menu bar at the top of the window. A short menu opens.
- Click Word wrap. The menu closes and a check mark is added next to the option.
Long lines should now fold at the right edge of the window, and the horizontal scroll bar at the bottom should disappear. Nothing is saved or changed in the file itself.
Set word wrap as the default in Windows 11 Notepad
Windows 11 Notepad also has a settings page. Microsoft describes it as the home for the app theme and font options, and current Windows 11 tutorials show a Word wrap switch there too. Use it if you want your choice to apply every time Notepad opens.
- Open Notepad.
- Click the Settings (gear) button near the top-right corner of the window.
- Find Word wrap and turn the switch On.
- Click the back arrow in the top-left corner to return to your text.
If you do not see a Word wrap switch on the settings page, your version of Notepad may arrange its settings differently. Use View > Word wrap instead.
How to turn on word wrap in Windows 10 Notepad
- Select the Start button, type Notepad, and select Notepad from the results.
- Click Format at the top of the window.
- Click Word Wrap. A check mark appears next to it the next time you open the Format menu.

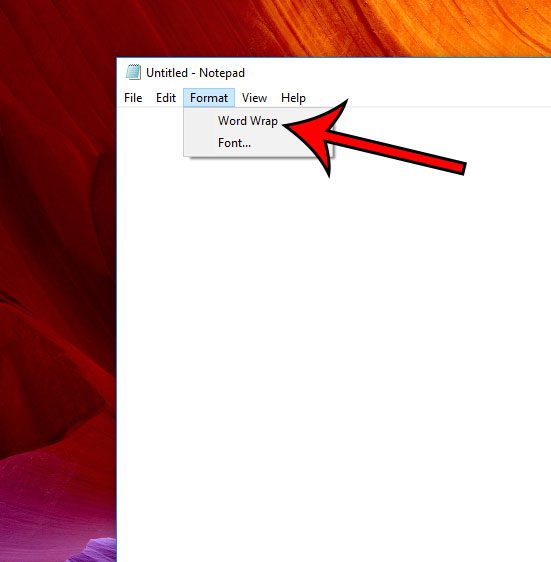
The screenshots above show the Format menu in Windows 10 Notepad in 2019. The steps are the same in the classic Notepad found on earlier versions of Windows, where the option is also in the Format menu.
How to check that word wrap is on
Three quick signs tell you the setting worked:
- The check mark. Open View (Windows 11) or Format (Windows 10) again. A check mark next to the option means word wrap is on.
- The scroll bar. With word wrap on, there is nothing to scroll sideways, so the horizontal scroll bar at the bottom of the window goes away.
- The resize test. Drag the edge of the Notepad window to make it narrower or wider. Wrapped lines reflow to match the new width.

How to turn word wrap off again
Repeat the same steps. Click View > Word wrap in Windows 11, or Format > Word Wrap in Windows 10, to remove the check mark. Each long line goes back to a single row and the horizontal scroll bar returns.
Turning it off is the better choice for some files. Word wrap makes paragraphs easier to read, but it makes rows and columns harder to follow. Consider leaving it off when you are working with:
- CSV and other data files, where each record should stay on one row. Our guide on how to open a CSV file in Notepad explains how those files are laid out.
- Log files and code, where a wrapped line can look like two separate lines.
- System files with one entry per line, such as the file covered in how to edit the hosts file in Windows 11.
Word wrap, line numbers, and the status bar
The status bar is the strip along the bottom of the Notepad window that shows the line and column of the cursor. In very old versions of Notepad, the status bar was not available while word wrap was on. Microsoft changed that in 2018: its Windows 10 preview build 17713 notes say Notepad can display line and column numbers when word wrap is enabled, and that the status bar is visible by default. You can still hide or show it from the View menu.
Keep in mind that a wrapped line is still one line. If a long sentence is shown on three rows, the status bar counts it as a single line, because the file contains only one line break at the end of it.
Word wrap not working or missing?
Work through these checks in order.
- Look in the other menu. If there is no Word wrap entry under View, you probably have the classic Notepad, so look under Format. If your Notepad has no Format menu, look under View or on the settings page.
- Toggle it. If the option is already checked but lines still run off the edge, click it once to turn it off, then click it again to turn it back on.
- Check the right window. Notepad can have several windows, and Windows 11 Notepad can have several tabs. Make sure you are looking at the file you meant to change.
- Close and reopen Notepad. Save your work first, close every Notepad window, and open the file again.
- Update Notepad. Windows 11 Notepad is updated as an app. Microsoft’s Get updates for apps and games in Microsoft Store page says to open Microsoft Store and select Check for Updates.
- The setting keeps resetting. In Windows 11, set it from the settings page rather than the View menu, as described above. You do not need to edit the registry or delete any settings files to change word wrap, and we do not recommend it.
If the text has line breaks in odd places even with word wrap off, the breaks are part of the file. Word wrap cannot remove them. You would need to delete those breaks by hand.
Frequently asked questions
Does word wrap change my file?
No. Word wrap only changes how Notepad displays long lines in the window. It does not insert line breaks, so the saved file has the same characters with word wrap on or off.
Is word wrap on by default in Notepad?
It depends on the version, and Microsoft does not document a default. Current Windows 11 tutorials describe word wrap as on by default in the redesigned Notepad, while older guides describe the classic Notepad as starting with it off. The reliable way to know is to open the View or Format menu and look for the check mark.
Is there a keyboard shortcut for word wrap in Notepad?
Microsoft does not list a dedicated word wrap shortcut for Notepad. Some websites suggest Ctrl + W, but that shortcut is commonly used to close a tab or window, so it is safer to use the menu. In either version you can open the menu bar with the Alt key and then move to the option with the arrow keys and Enter.
I don’t see Word wrap under View. Where is it?
You most likely have the classic Notepad. In that version the option is Format > Word Wrap, as in the Windows 10 screenshots above. In the Windows 11 app, also check the settings page behind the gear button.
Is word wrap the same in Notepad++?
No. Notepad++ is a separate, third-party editor that is not made by Microsoft. It has its own Word wrap option in its View menu, and its other settings are different from Windows Notepad. The steps in this guide apply only to the Notepad app included with Windows.
Why do my lines wrap at a different place than someone else’s?
Notepad wraps lines at the edge of its own window. A wider window, a smaller font, or a different zoom level fits more characters on each row, so the same file wraps differently on different screens. Since the 2018 update noted above, you can zoom with Ctrl + Plus and Ctrl + Minus, and Ctrl + 0 restores the default zoom.
Next step
Open the file that was giving you trouble, turn on word wrap from View or Format, and resize the window to confirm the lines reflow. If you are about to edit a data file, turn it off first so each record stays on its own row.

Matthew Burleigh has been writing tech tutorials since 2008. His writing has appeared on dozens of different websites and been read hundreds of millions of times.
After receiving his Bachelor’s and Master’s degrees in Computer Science he spent several years working in IT management for small businesses. However, he now works full time writing content online and creating websites.
His main writing topics include iPhones, Microsoft Office, Google Apps, Android, and Photoshop, but he has also written about many other tech topics as well.