Microsoft Excel has several different viewing options that you can pick from when you are editing your spreadsheets.
The correct view is the one that makes it the easiest for you to see the information that is important to you while allowing you to comfortably navigate the application’s interface.
But if there is a split on the screen that is making it difficult for you to work, then our tutorial on how to remove a split screen in Excel 2010 can help you to get rid of it.
How to Remove a Split in Excel Spreadsheets
- Open the Excel file.
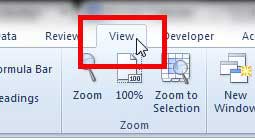
- Select the View tab.
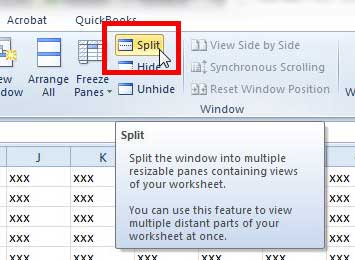
- Click the Split button.
Our guide continues below with additional information on how to remove a split screen in Excel 2010, including pictures of these steps.
There are a lot of ways to customize the appearance of a worksheet in Excel 2010, and many of them are more useful to some people than others.
For example, there are several different worksheet views that can be used, some of which are more helpful in certain situations than others.
You can return to the normal view if that is the view you prefer, which is just one way to begin restoring a heavily edited spreadsheet to the default view settings.
But there is another option that splits the screen, keeping a set group of rows at the top of the window as you scroll to the bottom.
While this can be beneficial in certain situations, it can be annoying if you aren’t used to it.
Fortunately, it is a simple process to disable the split and view the spreadsheet as you normally would.
How to Stop Splitting the Screen in Excel 2010 (Guide with Pictures)
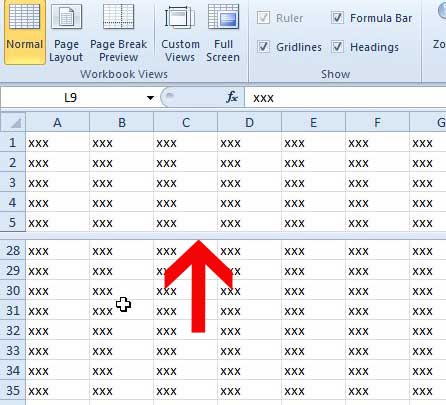
The split screen that I am referring to in this article looks like the image below –

As you can see, there is a horizontal bar that separates the rows that I have locked in the window, while the remainder of the rows scrolls normally below the split.
So continue reading below to learn how to remove this split screen on your Excel 2010 spreadsheet.
Step 1: Open the Excel spreadsheet that you want to modify.
Step 2: Click the View tab at the top of the window.

Step 3: Click the Split button to remove the split screen.
Note that the button will be highlighted in orange before you click it, then will not be highlighted after you click it.

Now that you know how to remove a split screen in Excel 2010 you will be able to turn this option on and off, depending on the current view needs for the spreadsheet that you are editing.
If you are having difficulty printing in Excel, specifically fitting large spreadsheets onto fewer sheets of paper, then check out this article about fitting a spreadsheet on one page.

Matthew Burleigh has been writing tech tutorials since 2008. His writing has appeared on dozens of different websites and been read over 50 million times.
After receiving his Bachelor’s and Master’s degrees in Computer Science he spent several years working in IT management for small businesses. However, he now works full time writing content online and creating websites.
His main writing topics include iPhones, Microsoft Office, Google Apps, Android, and Photoshop, but he has also written about many other tech topics as well.