Many tech tutorials that you find online for Microsoft Excel will tell you to navigate via the tabs at the top of the window.
This is fine for the tabs that are there by default, but it can be a problem if you need the Developer tab, which is not visible by default.
Our tutorial below will show you how to enable the Microsoft Excel developer tab so that you can use the tools that are found on that menu.
Microsoft Excel 2010 – Show Developer Tab
- Click the File tab.
- Choose the Options button.
- Select the Customize Ribbon tab.
- Check the Developer box.
- Click OK.
Our guide continues below with additional information on showing the developer tab in Excel 2010, including pictures of these steps.
If you are curious about macros and want to know how to turn them on for your spreadsheets, visit our how to enable macros in Excel 365 guide to find out more about working with them.
Some of the more advanced and impressive tasks that you can perform in Microsoft Excel will include macros. These are bits of code that you can create in excel which will let you automate certain tasks. This can save you a ton of time and reduce errors caused by user input.
But Excel macros are found on the Developer tab, which isn’t visible in Microsoft Excel by default.
Microsoft Excel 2010 uses a unique navigational structure via the various tabs displayed at the top of the window.
Each tab contains a number of different tools and options that you can use to customize the look and behavior of the data you have entered into your spreadsheets.
While there are a huge number of options available in these assorted tabs, there are even more things you can do by adding the Developer tab to the top of the window.
Many tutorials you find online for advanced Excel tasks will involve this tab, so it is important to know how to display it.
The Excel version for Mac has a developer tab, too, but the interface is a bit different. You can check out our how to add developer tab in Excel Mac article for more information.
How to Display Excel 2010 Developer Menu (Guide with Pictures)
The default tab configuration in Microsoft Excel 2010 looks like this –
Depending upon the other programs you have installed on your computer, such as certain Adobe or accounting programs, you might have some other tabs as well. But the Developer tab is not there in a default installation. So continue reading below to learn the simple method for displaying the Developer tab and gaining access to the assorted tools it contains.
Step 1: Launch Excel 2010.
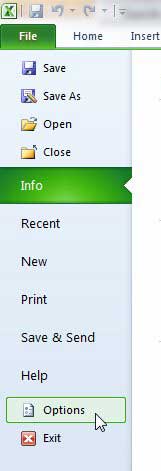
Step 2: Click the File tab at the top-left corner of the window, then click Options at the bottom of the column on the left.
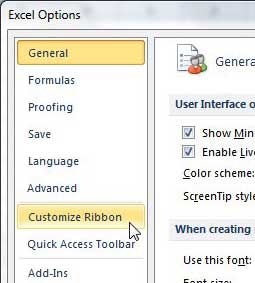
Step 3: Click Customize Ribbon from the list of tabs at the left side of the Excel Options window.
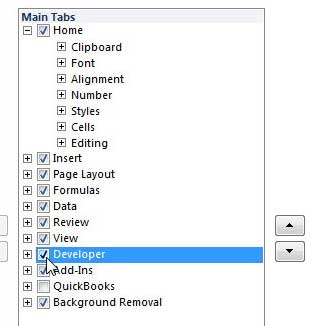
Step 4: Check the box to the left of Developer in the Main Tabs section at the right side of this window.
The Excel Developer tab is going to be visible in your application when there is a check in the Developer check box. The same goes for any of the other boxes here that indicate additional tabs on the Excel ribbon.
Step 5: Click the OK button at the bottom of the window to apply your changes.
You will now have a Developer tab at the top of your screen like this –
Now that you now how to add the Developer tab in Excel 2010 you will be able to perform all of the tasks that were previously hidden with the absence of that tab.
This new tab provides you access to many new options and tools that will expand the functionality of your Excel installation.
How to Remove the Developer Tab in Excel 2010
If you are working with an Excel installation that has a Developer tab, but you don’t want it, then you may be wondering how to remove it.
Luckily removing that tab is a very similar process to how we added it above.
If you go to File > Options > Customize Ribbon you simply need to click the box to the left of the Developer tab to remove it, then click OK.
That menu in Excel Options will only show the tabs and options with a check mark next to them.
If you want to add any other tabs or remove any other tabs, then you can feel free to customize this menu as you see fit.
More Information on How to Show Developer Tab – Excel 2010
Once you have added the Developer tab in Excel 2010 using the steps above then it will remain accessible for each future file that you open on this computer. However, this will not affect other Microsoft Office applications that you have also installed, such as Microsoft Word or Microsoft Powerpoint.
If you wish to enable the Developer tab in those applications then you will need to follow these steps there as well.
The Customize Ribbon option in the Excel Options dialog box lets you add or remove the Developer option, but it also lets you remove other tabs from the ribbon interface that you might not be using.
For example, a lot of other applications that you install, such as other document creation or accounting applications may customize the ribbon by adding their own tabs among the existing tabs.
You could also remove default ribbon tabs like the View tab or the Layout tab, if you were so inclined.
Some of the options that you will find in the left pane of the Excel Options window where you select Customize Ribbon include:
- General
- Formulas
- Proofing
- Save
- Language
- Advanced
- Customize Ribbon
- Quick Access Toolbar
- Add-ins
The Microsoft Corporation Developer tab lets you do more than just run macros or create new macros. it also provides access to advanced features like the VB editor, lets you insert controls such as form controls, and even enables things like XML commands and or allows you to manage XML maps.
Once you show the Developer tab on the ribbon it will remain there even when you close and open Excel. It will only be removed if you uninstall excel or go back to the Options menu and uncheck the box.
Most other versions of Microsoft Excel will provide access to the Developer option as well. Excel tips for other newer versions like Excel 2013, Excel 2016, or Excel for Office 365 all follow the same steps. In older versions of Excel it could be different. For example, you would need to click the Office button instead of the File tab to get to the Excel Options menu.
Have you experienced problems with the behavior of hyperlinks in your Excel spreadsheets? Learn how to disable the automatic hyperlink setting in Excel 2010 to be able to insert URLs and file locations without having Excel turn them into clickable hyperlinks.

Matthew Burleigh has been writing tech tutorials since 2008. His writing has appeared on dozens of different websites and been read over 50 million times.
After receiving his Bachelor’s and Master’s degrees in Computer Science he spent several years working in IT management for small businesses. However, he now works full time writing content online and creating websites.
His main writing topics include iPhones, Microsoft Office, Google Apps, Android, and Photoshop, but he has also written about many other tech topics as well.


