While you can spend a lot of time getting an image just right in Photoshop, that image can change dramatically when you send it to someone else.
This happens most frequently because of an issue with fonts. Font files aren’t included with Photoshop images by default, so if someone doesn’t have a font that a file uses, their computer might try and substitute one.
Our tutorial below will show you how to rasterize a text layer in Photoshop and convert it from a text layer to an image layer so that this doesn’t happen.
How to Turn Text Into Image in Photoshop
- Open your Photoshop file.
- Select the text layer to rasterize.
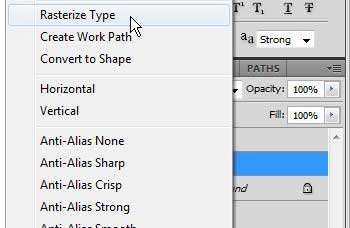
- Right-click on the selected layer and choose Rasterize Type.
Our guide continues below with additional information on how to convert a text layer to an image in Adobe Photoshop, including pictures of these steps.
One simple way to add some personalization to an image you are creating in Photoshop CS5 is through the use of a unique font.
It can completely change the way an image looks without requiring any advanced artistic skill.
Unfortunately, if you are working with someone else on the file, or if you are sending the image to a professional printer, they might not have the font.
If you send a layered PDF or PSD file to someone with the text layer in its original state, and they do not have the font, it could drastically alter the appearance of the image.
Fortunately, you can learn how to convert a text layer to an image in Photoshop CS5. You can even follow the instructions in this article to then export the text layer as its’ own image, if you so choose.
Related: Check out our guide on how to change the color of a selection in Photoshop for a quick way to change the color of an image elements.
Rasterizing Text Layers in Photoshop CS5 (Guide with Pictures)
One important thing to be aware of before you convert a layer to a flat image, or rasterize it, is that the layer will no longer be editable with the type tool.
Therefore, you should ensure that the type on the layer is finalized before you rasterize the layer.
You can gain some additional information about rasterizing layers on Adobe’s website. To learn how to convert your text layer to an image, follow the steps below.
Step 1: Open the file containing the text layer that you want to convert to an image.
Step 2: Click the desired text layer from the Layers panel on the right side of the window.
If your Layers panel is not visible, press the F7 key on your keyboard.
Step 3: Right-click the layer, then choose the Rasterize Type option.
Now that you know how to turn a text later into an image layer in Photoshop, you will be able to use this method whenever the need to rasterize some of your text arises.
You will note that the layer no longer displays the T symbol that identifies it as a type layer.
If you have multiple type layers that you want to rasterize, you can hold down the Ctrl key on your keyboard as you click each one to select it.
You can then right-click any of the selected type layers and choose the Rasterize Type option to then rasterize all of the selected layers.

Matthew Burleigh has been writing tech tutorials since 2008. His writing has appeared on dozens of different websites and been read over 50 million times.
After receiving his Bachelor’s and Master’s degrees in Computer Science he spent several years working in IT management for small businesses. However, he now works full time writing content online and creating websites.
His main writing topics include iPhones, Microsoft Office, Google Apps, Android, and Photoshop, but he has also written about many other tech topics as well.
