To add a pattern in Photoshop, select the area you want to cover, choose Edit > Fill, set Contents to Pattern, pick a pattern from Custom Pattern, and select OK. If you want to change the pattern later, use Layer > New Fill Layer > Pattern instead. To turn part of your own image into a pattern, select it with the Rectangular Marquee tool and choose Edit > Define Pattern.
Menu names follow Adobe’s help on pattern fills in Photoshop. Fill and Define Pattern also work in Photoshop CS5.
What a pattern is and what you need first
A pattern is a small image that Photoshop repeats side by side, like tiles, to cover an area. Photoshop comes with a set of ready-made patterns, called presets, and you can add your own.
- An open document. The pattern commands are for an image that is already open.
- A selection, if you only want part of the image covered. A selection is the outlined area that an edit applies to. Adobe’s Fill steps start with selecting the area you want to fill.
- A spare layer, if you want to protect the picture. Edit > Fill replaces what is inside the selection on the current layer, so add a new layer first or use a fill layer.
Fill an area with a pattern
This is the shortest route. Because it replaces the selected pixels on the layer you are working on, check that the right layer is highlighted in the Layers panel before you start.
- Select the area you want to fill with any selection tool.
- Choose Edit > Fill. The Fill dialog box opens.
- Open the Contents menu and select Pattern.
- Open the Custom Pattern menu and select the pattern you want.
- Under Blending, set Mode and Opacity. Adobe recommends Normal and 100% for full coverage.
- Select OK. Photoshop fills the selected area with the pattern.
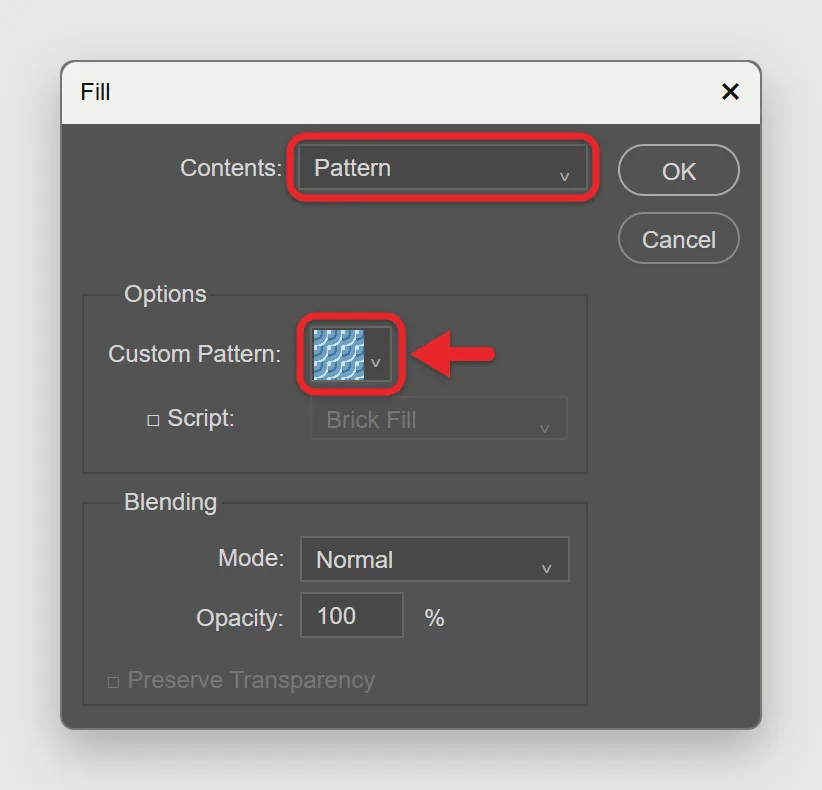
These steps match Adobe’s Use Content-Aware, Pattern, or History fills help page. For a pattern that fades out at the edges, feather the selection before you open the Fill dialog.
Add a pattern you can edit later
A pattern fill layer holds the pattern on its own layer instead of painting it into your picture. Fill layers are editable and non-destructive, which means the image underneath is not changed.

- In the Layers panel, select the layer the pattern should sit above.
- Choose Layer > New Fill Layer > Pattern.
- Type a name in the New Layer dialog and select OK.
- In the Pattern Fill dialog, choose a pattern from the pattern picker.
- Adjust Scale to make the tiles larger or smaller, and Angle to rotate them.
- Select OK. The pattern covers the whole canvas on a new layer.
To change it afterward, double-click the pattern fill layer’s thumbnail in the Layers panel. The Pattern Fill dialog reopens, and you can pick a different pattern or change the scale and angle. Pattern fill layers also work in Photoshop CS5.
To show the pattern only on the layer directly below it, select the pattern fill layer and choose Layer > Create Clipping Mask. A clipping mask limits a layer to the visible parts of the layer beneath it. Adobe covers this in Apply patterns to template images.
To place a single graphic in the middle of the document instead of repeating it as tiles, center the layer in Photoshop with the align commands.
Add a pattern from the Patterns panel
Newer versions of Photoshop have a Patterns panel that applies a pattern with a click or a drag. Choose Window > Patterns to open it. What happens depends on the kind of layer you use it on.
| Layer type | What to do | Result |
|---|---|---|
| Text layer | Select the text layer, then select a pattern in the panel | Pattern is added as a layer effect |
| Shape layer | Select the shape layer, then select a pattern in the panel | Pattern becomes the shape fill |
| Pixel layer | Drag a pattern from the panel onto the layer in the Layers panel | Pattern is applied to that layer |
| Any document | Hold Alt (Windows) or Option (Mac) and drag a pattern onto the canvas | A new pattern fill layer |
These methods come from Adobe’s Manage patterns in the Patterns panel page. Photoshop CS5 does not have this panel, so use Edit > Fill there.
Other ways to apply a pattern
- Pattern Overlay layer style: double-click a layer in the Layers panel, outside its name and thumbnail, to open the Layer Style dialog. Select the checkbox next to Pattern Overlay, which fills the layer’s content with a pattern. This suits text and logos because the pattern follows the shape of the content.
- Pattern Stamp tool: this tool paints a pattern with brush strokes. Select it in the toolbar (it shares a spot with the Clone Stamp tool), choose a pattern from the Pattern picker in the options bar, and drag across the image. Paint on a new layer so mistakes can be erased without touching the original image.
- Stroke with a pattern: the Stroke layer style can outline content with a color, gradient, or pattern. For a plain outline around a selected area, follow outlining a selection in Photoshop.
Create your own pattern
Any rectangular part of an image can become a pattern. Photoshop saves it as a preset, so it is available in other documents too.
- Select the Rectangular Marquee tool.
- In the options bar, set Feather to 0 px. Feather softens the edge of a selection, and Adobe’s steps call for zero.
- Drag a rectangle around the part of the image you want to repeat.
- Choose Edit > Define Pattern.
- Type a name in the Name field and select OK.
The new pattern then shows up in the Patterns panel and in the Custom Pattern menu of the Fill dialog. Adobe’s page for this is Define an image as a preset pattern. If you use the pattern in an image with a different color mode, Photoshop converts the pattern to match that image.

Design a seamless pattern with Pattern Preview
A seamless pattern is one where the edges of each tile line up so you cannot see where one copy ends and the next begins. Pattern Preview shows the repeat while you work.
- Open or create the document that will become one tile.
- Choose View > Pattern Preview. The area outside the canvas now repeats the canvas content.
- Add text, images, colors, or shapes.
- Choose Edit > Define Pattern, name the pattern, and select OK.
Pattern Preview works best with smart objects, and it is turned off in documents that use artboards. It is also disabled while you use tools or commands that change the document size, such as the Crop tool and Canvas Size. See Create a new pattern for Adobe’s version of these steps.
Find more patterns
If the pattern list looks short, open the Patterns panel menu (the icon in the corner of the panel) and select Legacy Patterns and More to show Photoshop’s older preset patterns.
Patterns you made in an older copy of Photoshop on the same computer can be brought over with Edit > Presets > Migrate Presets. Patterns are among the preset types this command transfers, and it requires CS3 or later to be installed on that computer.
Downloaded pattern sets usually come as a .pat file. To add one, open the Patterns panel menu, choose Import Patterns, select the .pat file, and click Load (Open on a Mac). The set appears as a new group in the panel. Only load pattern files from a source you trust.
Check the result or undo it
- Edit > Fill: the selected area shows the repeated pattern as soon as you select OK. Choose Edit > Undo to remove it.
- Pattern fill layer: a new layer appears in the Layers panel above the layer you selected. To remove the pattern, delete that layer or hide it with its eye icon.
- Pattern Overlay: clear the Pattern Overlay checkbox in the Layer Style dialog to turn the effect off.
- A pattern you defined: select it in the Patterns panel, open the panel menu, and choose Delete Pattern. Rename Pattern is in the same menu, and Restore Default Patterns brings back the standard set.
Troubleshooting
- Define Pattern is not available. Adobe’s steps require a selection made with the Rectangular Marquee tool and Feather set to 0 px. Draw the selection again with that tool and check the Feather box in the options bar.
- You cannot find the Patterns panel. Choose Window > Patterns. If your panels are scattered or missing, reset the Photoshop workspace. Older versions such as CS5 do not include this panel.
- The pattern filled the whole layer. Edit > Fill uses the current selection. Undo, make a selection around the area you want, and run the command again.
- The tiles are too big or too small. The Fill dialog steps do not include a size setting. Use a pattern fill layer and change Scale in the Pattern Fill dialog.
- Pattern Preview is grayed out. Check whether the document uses artboards, because Pattern Preview is turned off in those documents.
- The pattern hides everything below it. A pattern fill layer covers the full canvas. Add a clipping mask, or lower the layer’s opacity in the Layers panel.
Frequently asked questions
What is the fastest way to add a pattern in Photoshop?
Select an area, choose Edit > Fill, set Contents to Pattern, choose a pattern from Custom Pattern, and select OK. In newer versions you can also open Window > Patterns and apply a pattern from that panel.
Can I resize a pattern after I add it?
Yes, if you added it as a pattern fill layer. Double-click the layer’s thumbnail in the Layers panel and change Scale or Angle in the Pattern Fill dialog. A pattern applied with Edit > Fill becomes part of the layer, so undo it and fill again if the size is wrong.
Where do patterns I create go?
After you choose Edit > Define Pattern and name the pattern, it is saved to the Patterns panel. It also appears in the Custom Pattern menu in the Fill dialog.
Can I add a pattern to text?
Yes. Select the text layer in the Layers panel and select a pattern in the Patterns panel. Photoshop applies it as a layer effect, so the text stays editable. You can also turn on Pattern Overlay in the Layer Style dialog.
Does this work in Photoshop CS5?
Edit > Fill with a pattern and Edit > Define Pattern are long-standing commands. The Patterns panel and Pattern Preview are not in CS5. Adobe’s current help pages only cover current versions, so small label differences are possible in older ones.
Next step
Try a pattern fill layer on a copy of an image, then double-click its thumbnail and change the Scale value to see how the tile size affects the look.

Matthew Burleigh is the founder, head writer, and editor of Solve Your Tech, which he launched in 2012. He has written technology tutorials since 2008 and worked in IT since 2003, including small-business support, IT management, and consulting. He holds Bachelor’s and Master’s degrees in Computer Science from Arizona State University.
Matthew writes practical guides for Windows, iPhone and iPad, Microsoft Office, Outlook, Google apps, and Android. Solve Your Tech’s guides are checked step by step against the device or app maker’s own documentation and tested on his own devices whenever he has the hardware or software, with clear steps, sources, and update dates.
Read more about Matthew and how Solve Your Tech writes and updates its guides, or report a correction.