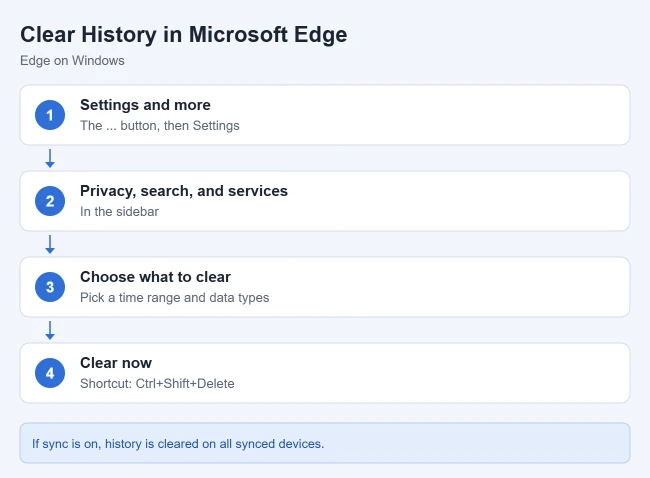
To clear history in Microsoft Edge, select Settings and more (…) > Settings > Privacy, search, and services, then select Clear browsing data > Choose what to clear. Pick a time range, check Browsing history and anything else you want gone, and select Clear now. On Windows, you can also press Ctrl+Shift+Delete to jump straight there.
This guide follows Microsoft’s View and delete browser history in Microsoft Edge article. It covers clearing history on one device or all synced devices, what each type of data means, clearing history automatically when Edge closes, and viewing your history first.
How to Clear Browsing History in Edge
- Select Settings and more (…) > Settings.
- Select Privacy, search, and services.
- Select Clear browsing data, then select Choose what to clear next to Clear browsing data now.
- Under Time range, choose how far back to go. The choices are last hour, last 24 hours, last 7 days, last 4 weeks and all time.
- Check the types of data to remove. Microsoft gives the example of removing browsing history and cookies but keeping passwords and form fill data.
- Select Clear now.
Result: The data you picked is deleted for that time range. History you delete can’t be recovered.
Shortcuts to the Clear Browsing Data Window
- Keyboard: press Ctrl+Shift+Delete on Windows. The Mac shortcut is Command+Shift+Backspace.
- Address bar: Try typing edge://settings/clearBrowserData and pressing Enter.
- History menu: open History from the Settings and more menu and select the trash icon.
Clear History on This Device Only, or on All Devices
Microsoft says items that are synced are cleared across all synced devices. So decide first:
- This device only: turn off sync first. Select Settings and more > Settings > Profiles > Sync, and select Turn off sync. Turning off sync doesn’t delete any history.
- All synced devices: make sure you’re signed in and sync is on, then clear your data as usual.
Result: You control whether your phone, tablet and other computers keep their history.
What Each Type of Browsing Data Means
Microsoft describes each option in the Clear browsing data window:
- Browsing history: the sites you’ve visited, with dates and times.
- Download history: the list of files you’ve downloaded. Microsoft says the files themselves aren’t deleted.
- Cookies and other site data: info sites save to remember you, such as sign-in info. Clearing these signs you out of most websites.
- Cached images and files: copies of pages and images that help sites load faster.
- Passwords: site passwords you’ve saved.
- Autofill form data: info you’ve typed into forms, such as your email, credit card or shipping address.
- Site permissions: settings like location, pop-ups and media autoplay for each site.
Clearing Autofill form data removes saved entries, but Edge keeps saving new ones until you turn off autofill in Edge.
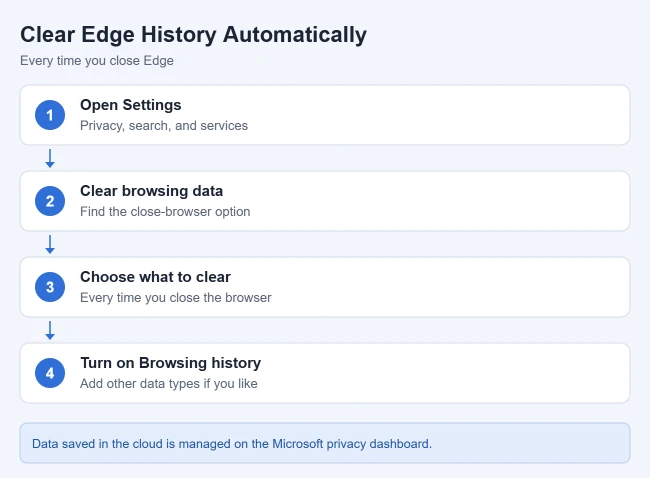
How to Clear Edge History Every Time You Close It
There is a setting that clears history automatically:
- Go to Settings > Privacy, search, and services.
- In the Clear browsing data section, select Choose what to clear every time you close the browser.
- Turn on Browsing history, plus any other types you want cleared.
Result: Edge clears the selected data each time you close it, so you don’t have to do it by hand.
How to View Your Edge History First
Want to check what’s there before you delete it? Select Settings and more > History, or press Ctrl+H. Recent versions of Edge also let you remove specific sites from that list instead of clearing everything.
History Saved in the Cloud
If you use sync or personalization, Microsoft says some data is saved to your Microsoft account. You can view or delete it on the Microsoft privacy dashboard. Data you delete there isn’t deleted from your device, so clear both if you want it gone everywhere.
Frequently Asked Questions
Will clearing history delete my saved passwords?
Only if you check Passwords. Leave it unchecked to keep them, as Microsoft suggests in its example.
Does clearing history delete my downloaded files?
No. Microsoft says clearing download history only removes the list of downloads, not the files on your computer.
More Edge Guides
- How to allow or block pop-ups in Edge
- How to show or hide the favorites bar
- How to turn off autofill in Edge

Matthew Burleigh is the founder, head writer, and editor of Solve Your Tech, which he launched in 2012. He has written technology tutorials since 2008 and worked in IT since 2003, including small-business support, IT management, and consulting. He holds Bachelor’s and Master’s degrees in Computer Science from Arizona State University.
Matthew writes practical guides for Windows, iPhone and iPad, Microsoft Office, Outlook, Google apps, and Android. Solve Your Tech’s guides are tested on current devices or checked against official product documentation, with clear steps, sources, and update dates.
Read more about Matthew and how Solve Your Tech writes and updates its guides, or report a correction.