Is the font in your spreadsheets difficult ot read because it’s so small? Or are you having trouble seeing all of your data because the text is too large?
While Microsoft Office applications like Excel have default font settings that are meant to be easy to read for everyone, that may not be the case in a number of situations.
Luckily you can adjust many of the default settings for the spreadsheets that you create, including characteristics of the font.
Our tutorial below will show you where to find and change the default size of your Excel font so that you can make it bigger or smaller as needed.
How to Change Default Font Size in Microsoft Excel 2013
- Open Microsoft Excel.
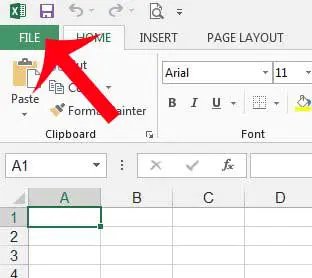
- Click the File tab.
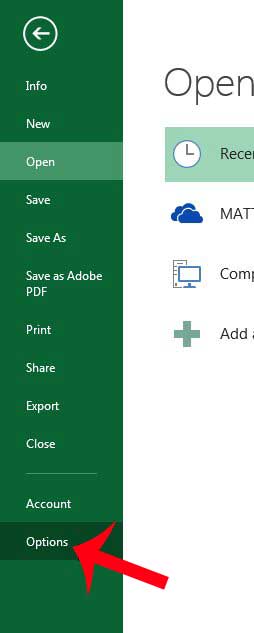
- Select the Options button.
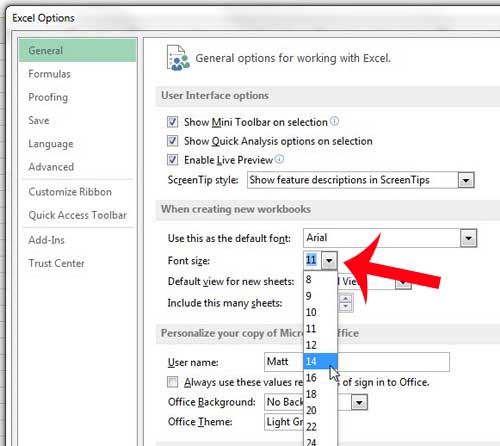
- Click the Font Size dropdown menu.
- Choose the desired size.
- Click OK.
- Click OK again, then close and reopen Excel.
Our guide continues below with additional information on how to change the size of the default font in Excel, including pictures of these steps.
The font size that you use in Microsoft Excel can make a big difference in both the appearance of your spreadsheet and your audience’s ability to read what you have entered into the cells.
If you find that your audience is often asking you to make your font size either bigger or smaller, or if you find that you are changing it whenever you create a new spreadsheet, then it might be time to change your default font in Excel 2013.
Fortunately, this is an option that can be easily modified to suit your needs and will save you time that was otherwise being wasted constantly adjusting the font settings manually.
Related: This tutorial about how to change default font in Google Docs will show you how to change a similar setting in that application.
How to Use a Bigger or Smaller Default Font in Excel 2013 (Guide with Pictures)
The steps below were performed in Microsoft Excel 2013. The steps for earlier versions of Excel, such as 2003, 2007, or 2010, will vary from these.
Additionally, note that the font will only apply to spreadsheets that you create on your computer. Spreadsheets created by others will use the font that was applied when those spreadsheets were created.
Step 1: Open Excel 2013.
Step 2: Click the green File tab at the top-left of the window.

Step 3: Click Options in the column at the left side of the window.

Step 4: Click the drop-down menu to the right of Font Size, then select your preferred font size.

Step 5: Click the OK button at the bottom of the window to apply your changes.
Step 6: Click the OK button on the pop-up window, then close and restart Excel 2013 for your new font to take effect.

Now that you know how to change the default text size in Microsoft Excel you will be able ot adjust this setting so that the size of your text when you create new spreadsheets is a size that is easiest to read for you and the people that are viewing your data.
You can use a similar method to change the default font in Excel 2013.

Matthew Burleigh has been writing tech tutorials since 2008. His writing has appeared on dozens of different websites and been read over 50 million times.
After receiving his Bachelor’s and Master’s degrees in Computer Science he spent several years working in IT management for small businesses. However, he now works full time writing content online and creating websites.
His main writing topics include iPhones, Microsoft Office, Google Apps, Android, and Photoshop, but he has also written about many other tech topics as well.