To edit a photo on iPhone, open it in the Photos app and tap the Edit button (it looks like three sliders). Tap Filters to add a filter such as Vivid or Dramatic, or tap Crop to crop, rotate, flip, or change the aspect ratio. Tap Done to save. You can undo everything later with Revert.
These steps follow Apple’s Edit photos and videos on iPhone and Crop, rotate, flip, or straighten photos and videos on iPhone guides for current versions of iOS. Below you will find how to add a filter, crop to a size, flip or rotate, straighten a tilted shot, and undo your changes, plus a note for iPhone 16 and later models.
How to add a filter to a photo
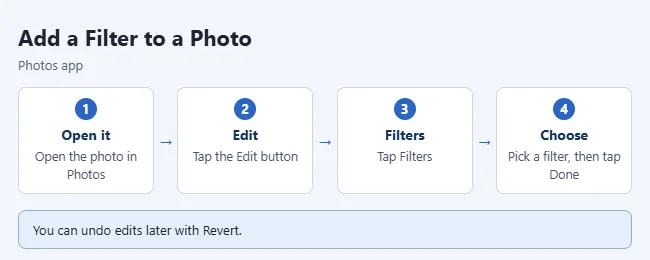
- Open the photo in Photos and tap the Edit button.
- Tap the Filters button.
- Swipe through the filters and tap one, such as Vivid or Dramatic.
- Drag the slider under the photo to make the effect stronger or weaker.
- Tap the photo to compare it with the original, then tap Done.
Result: the filter is saved to the photo. To remove a filter that was applied when you took the picture, choose Original. If you use iCloud Photos, Apple says your edits show up on all your devices.
Filters on iPhone 16 and later
Apple notes that on iPhone 16 models and later, you use Photographic Styles instead of filters to customize a photo’s look. Filters are still available on these models if you haven’t turned on Photographic Styles. To change a style, open a photo taken with a style, tap Edit, then tap Styles.
How to crop a photo
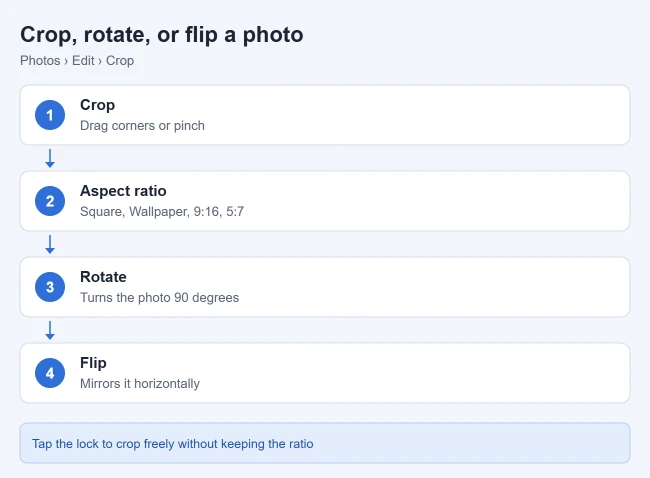
- Open the photo, tap Edit, then tap Crop.
- Drag the corners of the frame, or pinch, to choose what to keep.
- To crop to a set shape, tap the Aspect Ratio button and choose an option such as Square, Wallpaper, 9:16, or 5:7.
- Tap Done.
Result: the photo is cropped. Apple notes that dragging a corner keeps the original aspect ratio; tap the lock in the top-right corner of the photo to crop freely.
Quick crop: while viewing a photo, pinch to zoom in until it looks the way you want, then tap Crop in the top-right corner.
How to flip or rotate a photo
- Open the photo, tap Edit, then tap Crop.
- Tap the Flip button to mirror the photo horizontally, or the Rotate button to turn it 90 degrees. Tap again to keep rotating.
- Tap Done.
Result: the photo is flipped or rotated. Flipping is handy for selfies where text looks backward.
How to straighten a tilted photo
- Open the photo, tap Edit, then tap Crop.
- Tap the straighten, vertical tilt, or horizontal tilt button below the frame.
- Drag the slider until the horizon or building looks straight, then tap Done.
Result: the photo is leveled. Tap Reset before saving to go back to the original angle. To line up shots before you take them, see how to turn on the iPhone camera grid.
Other quick edits
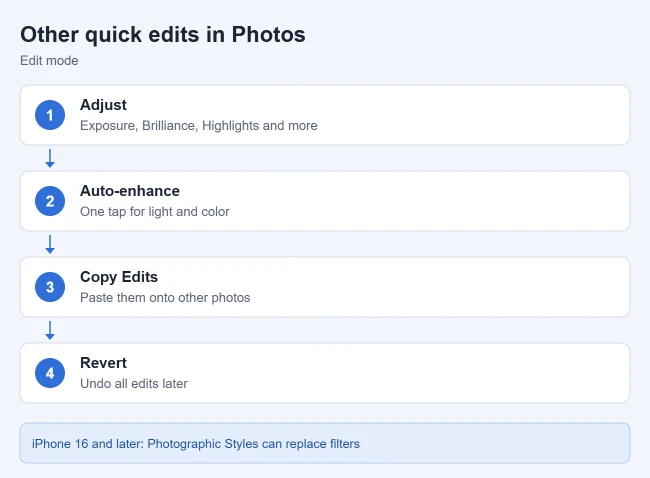
- Adjust: tap Adjust and swipe through settings like Exposure, Brilliance, or Highlights, then drag the slider.
- Auto-enhance: tap the magic wand button to fix light and color automatically.
- Copy and paste edits: tap the More button, choose Copy Edits, then select other photos and choose Paste Edits.
To remove a distracting person instead of changing the whole photo, see our guide to erasing people from iPhone pictures. It explains which models support Clean Up, how third-party Healing differs, and when cropping is the better option.
Make a Smaller Photo File on an iPad or iPhone
If you need a smaller file for an upload, create a resized copy with Shortcuts. Cropping in Photos changes the framing and keeps reversible editing data; it does not reliably produce a smaller standalone file or free storage. Resizing reduces pixel dimensions, while JPEG quality controls compression. Keep the full-size original until you have checked the exported copy.
Open Shortcuts, tap + and name the shortcut. Search for and add these actions in order: Select Photos > Resize Image > Convert Image > Save File. In Resize Image, set a smaller width, such as 1200 pixels for a photo wider than that, and leave height on Auto to keep its proportions. In Convert Image, select JPEG; expand its options to adjust Quality if necessary. In Save File, enable Ask Where to Save. Each action should use the preceding action’s output.
Run the shortcut, select one photo, allow the requested Photos access if needed, and save the result in Files with a new name. Touch and hold the exported file in Files and choose Get Info to check its size. Open it to inspect sharpness and orientation, then try the upload. If it is still too large, reduce the width or JPEG quality and export another copy. Converting a small HEIF image to JPEG can increase its size, so check the actual bytes rather than assuming conversion always helps.
This is a custom workflow built with Apple’s shortcut editor and image-transform actions. It saves a separate file and does not delete the original from Photos. JPEG also loses transparency and animation, so use a format suitable for the picture you need to share.
How to undo photo edits
Before you save, tap Cancel, then Discard Changes. After you save, open the photo, tap Edit, then tap Revert to go back to the original. Your edits don’t replace the original picture, so you can always undo them. To keep the original and the edited version side by side, duplicate the photo before you edit.
Frequently asked questions
Why don’t I see a Filters button?
On iPhone 16 and later with Photographic Styles turned on, Apple replaces filters with the Styles option. Use Styles to change the look instead.
Can I edit videos the same way?
Yes. Apple’s guides say the same filter, crop, rotate, and flip tools work for videos in the Photos app.
Related: How to hide photos on iPhone, How to remove the portrait effect from a photo, and How to add pictures to Notes on iPhone.

Matthew Burleigh is the founder, head writer, and editor of Solve Your Tech, which he launched in 2012. He has written technology tutorials since 2008 and worked in IT since 2003, including small-business support, IT management, and consulting. He holds Bachelor’s and Master’s degrees in Computer Science from Arizona State University.
Matthew writes practical guides for Windows, iPhone and iPad, Microsoft Office, Outlook, Google apps, and Android. Solve Your Tech’s guides are tested on current devices or checked against official product documentation, with clear steps, sources, and update dates.
Read more about Matthew and how Solve Your Tech writes and updates its guides, or report a correction.