One of the parts of printing a document from your computer to your printer involves something called a print spooler.
If the spooler isn’t working properly, then you will find that nothing will print either.
Luckily you can go into a settings menu in Windows where you are able to stop the print spooler, then restart it.
Our tutorial below will show you how to stop a print spooler in Windows.
As an Amazon affiliate, I earn from qualifying purchases.
How to Stop the Windows Print Spooler
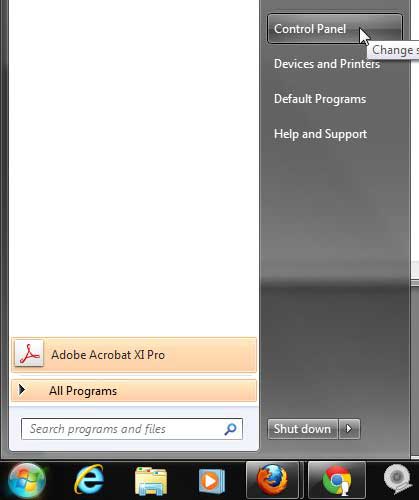
- Click Start, then Control Panel.
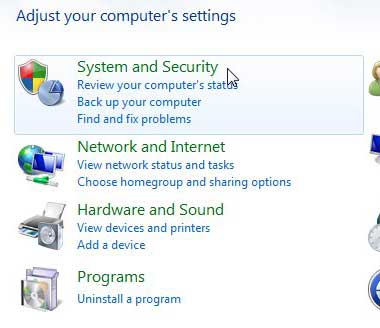
- Choose System and Security.
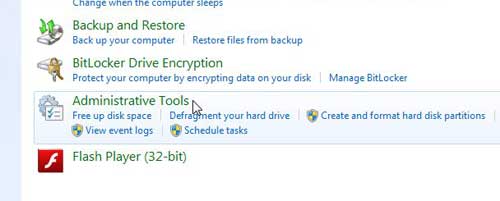
- Select Administrative Tools.
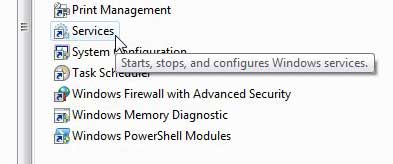
- Double-click Services.
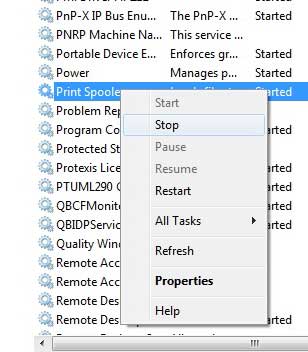
- Right-click Print Spooler and choose Stop.
Our guide continues below with additional information on stopping the print spooler in Windows, including pictures of these steps.
Printing on a Windows 7 computer should be a simple task but, as anyone who has ever experienced a printing problem knows, this is far from true.
Whether you run into an issue that is a result of a document, operating system, or hardware problem, resolving a print issue can be problematic.
As you start to troubleshoot your printer problem, you will encounter the term “print spooler.” This is the utility on your Windows 7 computer that handles the process of sending documents to the printer, as well as managing the queues for the printers that are installed on your computer.
If you have a document that is stuck in your print queue and is preventing you from printing, for example, then stopping and restarting the print spooler in Windows 7 could resolve your issue.
Are you looking for a good all-in-one printer for your home or office? The HP Officejet 6700 is a great choice. You can even use the AirPrint option to print to it from your iPhone 5.
You can read our how to change printer to online tutorial if you aren’t able to print a document because your computer thinks your printer is offline.
Working with the Print Spooler in Windows 7 (Guide with Pictures)
While there are many other troubleshooting methods that can and should be attempted before you start working with the print spooler service, it can often help you when you are having a problem that the normal troubleshooting methods cannot resolve.
So once you have checked the connection between your printer and computer, restarted both devices, and attempted to manually delete items from your print queue, then it may be time to follow the steps below to stop and restart your print spooler in Windows 7.
Step 1: Click the Start button at the bottom-left corner of the screen, then click the Control Panel option in the column at the right side of the Start menu.
Step 2: Click the System and Security option at the center of the screen.
Step 3: Click the Administrative Tools link at the bottom of the window.
Step 4: Double-click the Services option.
Step 5: Scroll down to the Print Spooler option, right-click it, then click the Stop option.
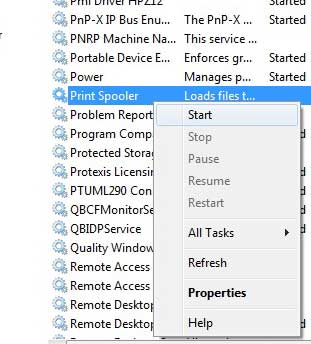
Step 6: Wait a few seconds for the print spooler to stop, then right-click it again and choose the Start option.
Now that you know how to stop the print spooler in Windows 7, you will be able to use this option to troubleshoot problems that you are experiencing while printing documents on the computer.
This solution will not work for every print problem that you are having issues resolving, but it can be helpful when the first tier of printer troubleshooting is unsuccessful.

Matthew Burleigh has been writing tech tutorials since 2008. His writing has appeared on dozens of different websites and been read over 50 million times.
After receiving his Bachelor’s and Master’s degrees in Computer Science he spent several years working in IT management for small businesses. However, he now works full time writing content online and creating websites.
His main writing topics include iPhones, Microsoft Office, Google Apps, Android, and Photoshop, but he has also written about many other tech topics as well.
