Excel has a lot of helpful features for managing data, and many of them can save you a lot of manual work. For example, you can find out how to split full names into two different cells in Excel 2013 if you need separate cells for first and last names.
Properly formatted data can make it much easier to complete tasks in Excel 2013, but it is rare that the data we have is ideally suited for the work that we need to do. This is common when working with names in Excel, as many companies and individuals will store full names in one cell in their spreadsheets, either naturally, or with the aid of the concatenate Excel formula.
Unfortunately, this can be problematic when you need a separate cell for the first name and a separate cell for the last name, and the prospect of manually splitting those names is not something that many people would look forward to. Fortunately, there is a tool that you can use which will allow you to split first and last names into separate cells in Excel 2013.
How to Split a Cell in Excel 2013
- Open your spreadsheet.
- Choose the cells to split.
- Click Data.
- Select Text to Columns.
- Choose Delimited, then click Next.
- Select Space and click Next.
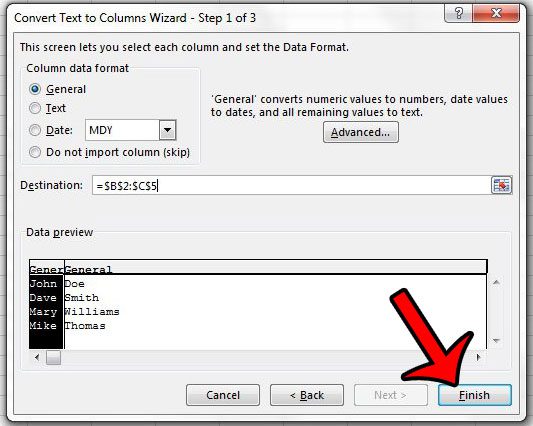
- Click inside Destination and choose the cells for the split names.
- Select Finish.
Our article continues below with additional information on splitting cells into first and last name in Excel 2013 including some pictures for this process.
Split a Full Name into a First Name and Last Name Cell in Excel 2013 (Guide with Pictures)
The steps in this article will assume that you currently have a column in Excel 2013 that is storing full names, and that you want to convert that data so that you have a column of first names and a column of last names.
Tip: You will need to have blank cells where you want the split data to go. So it is a good idea to insert the columns before you follow the steps below.
- Open the Excel spreadsheet containing the data that you want to split.
- Highlight the cells containing the data that you wish to split.
- Click the Data tab at the top of the window.
- Click the Text to Columns button in the Data Tools section of the ribbon.
- Click the Delimited option at the top of the window, then click the Next button.
- Check the box to the left of Space, then click the Next button. This assumes that your data is split the same way as it is in this example. If not, then use the appropriate delimiter. For example, if your name was split as LastName, FirstName, then you would check the box next to Comma and the box next to Space. Note that the preview window will adjust as you choose different delimiters.
- Click the button at the right side of the Destination field.
- Highlight the cells in which you would like the split data to appear, then press Enter on your keyboard.
- Click the Finish button at the bottom of the window to complete the process.

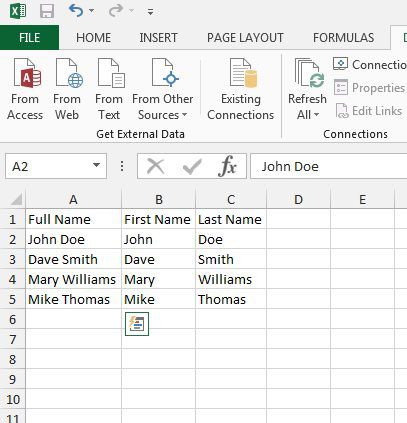
Your data should now look like it does in the image below.

Excel also has a helpful function called Concatenate that can do the reverse of this. Learn how to combine data from multiple cells into cell in Excel 2013 and save yourself a lot of manual data entry.

Matthew Burleigh has been writing tech tutorials since 2008. His writing has appeared on dozens of different websites and been read over 50 million times.
After receiving his Bachelor’s and Master’s degrees in Computer Science he spent several years working in IT management for small businesses. However, he now works full time writing content online and creating websites.
His main writing topics include iPhones, Microsoft Office, Google Apps, Android, and Photoshop, but he has also written about many other tech topics as well.