Do you want to print some of the data in your Excel spreadsheet, but you don’t want to waste ink or paper printing a lot of things that you don’t need?
While you may have experimented with hiding rows or columns, that can be tedious, and you may need to undo it each time you print the desired data.
Luckily there is a feature in Microsoft Excel called a print area where you can select some of the cells in the worksheet and have Excel just print those cells.
Our tutorial below will show you how to set an Excel print area on a Mac so that you can reduce the amount you print.
As an Amazon affiliate, I earn from qualifying purchases.
How Do You Set an Excel Mac Print Area?
- Open your Excel spreadsheet.
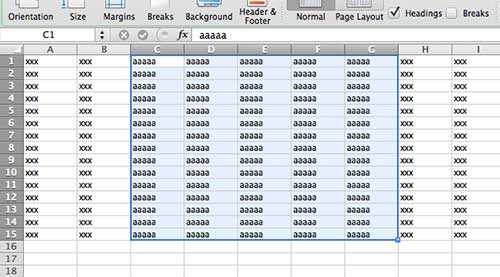
- Select the cells to include in the print area.
- Click the File tab.
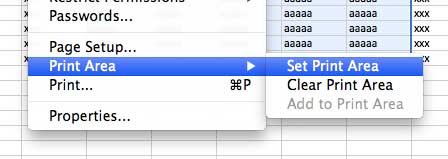
- Choose Print Area, then Set Print Area.
Our guide continues below with additional information on how to set a print area in the Excel Mac application, including pictures of these steps.
Occasionally you may find yourself working with a very large spreadsheet that you need to print.
We have previously written about how to fit that sheet to one page in Excel 2011, but that isn’t always practical when you are dealing with a lot of data.
But you can take advantage of a feature that allows you to set a print area in Excel 2011 so that only part of a spreadsheet is printed, as opposed to the entire thing.
How to Define the Print Area in Excel for Mac (Guide with Pictures)
Note that this is something that you will need to set and clear if you decide that you want to print the entire spreadsheet, or a different part of the spreadsheet later.
Step 1: Open the spreadsheet in Excel 2011.
Step 2: Use your mouse or trackpad to highlight the section of the spreadsheet that you want to set as the print area.

Step 3: Click the File tab at the top of the window.

Step 4: Scroll down to the Print Area option, then select the Set Print Area option.

Now when you go to print your spreadsheet, you will see that only the area that you just selected is displayed on the Quick Preview area of the Print menu.
Note that there are also options on this drop down menu for “Clear Print Area” and “Add to Print Area.”
If you don’t need to restrict your printing to just some selected cells, then you can choose the cells and click the Clear Print Area option to go back to the default print setting or printing everything.
If you decide that you would like to include some more cells in your print area, then you could select those cells and choose the Add to Print Area button to include those cells in the print area too.
Did you know that you can purchase magazine subscriptions from Amazon? They have many popular options, including Time, Entertainment Weekly and Cosmopolitan, all of which are available at a low price. Click here to learn more.

Matthew Burleigh has been writing tech tutorials since 2008. His writing has appeared on dozens of different websites and been read over 50 million times.
After receiving his Bachelor’s and Master’s degrees in Computer Science he spent several years working in IT management for small businesses. However, he now works full time writing content online and creating websites.
His main writing topics include iPhones, Microsoft Office, Google Apps, Android, and Photoshop, but he has also written about many other tech topics as well.