To print a large Excel spreadsheet readably, set Width to 1 page and Height to Automatic in the Page Layout tab’s Scale to Fit group, switch to landscape, and check File > Print first. Every column fits across, and rows run onto as many pages as needed.
Your spreadsheet looks fine on screen, but the printout splits columns across extra pages or shrinks everything to an unreadable size. Steps cover Excel for Microsoft 365 and 2016 to 2024 on Windows, plus Mac and the web.
See How Many Pages You Are About to Print
Before changing anything, find out what Excel plans to send to the printer. The preview tells you which problem you have.
- Open the workbook and click the sheet you want to print.
- Press Ctrl + P, or choose File > Print. Ctrl + F2 opens the same screen.
- Look at the page counter under the preview (for example, “1 of 24”) and use the arrows to step through the pages.
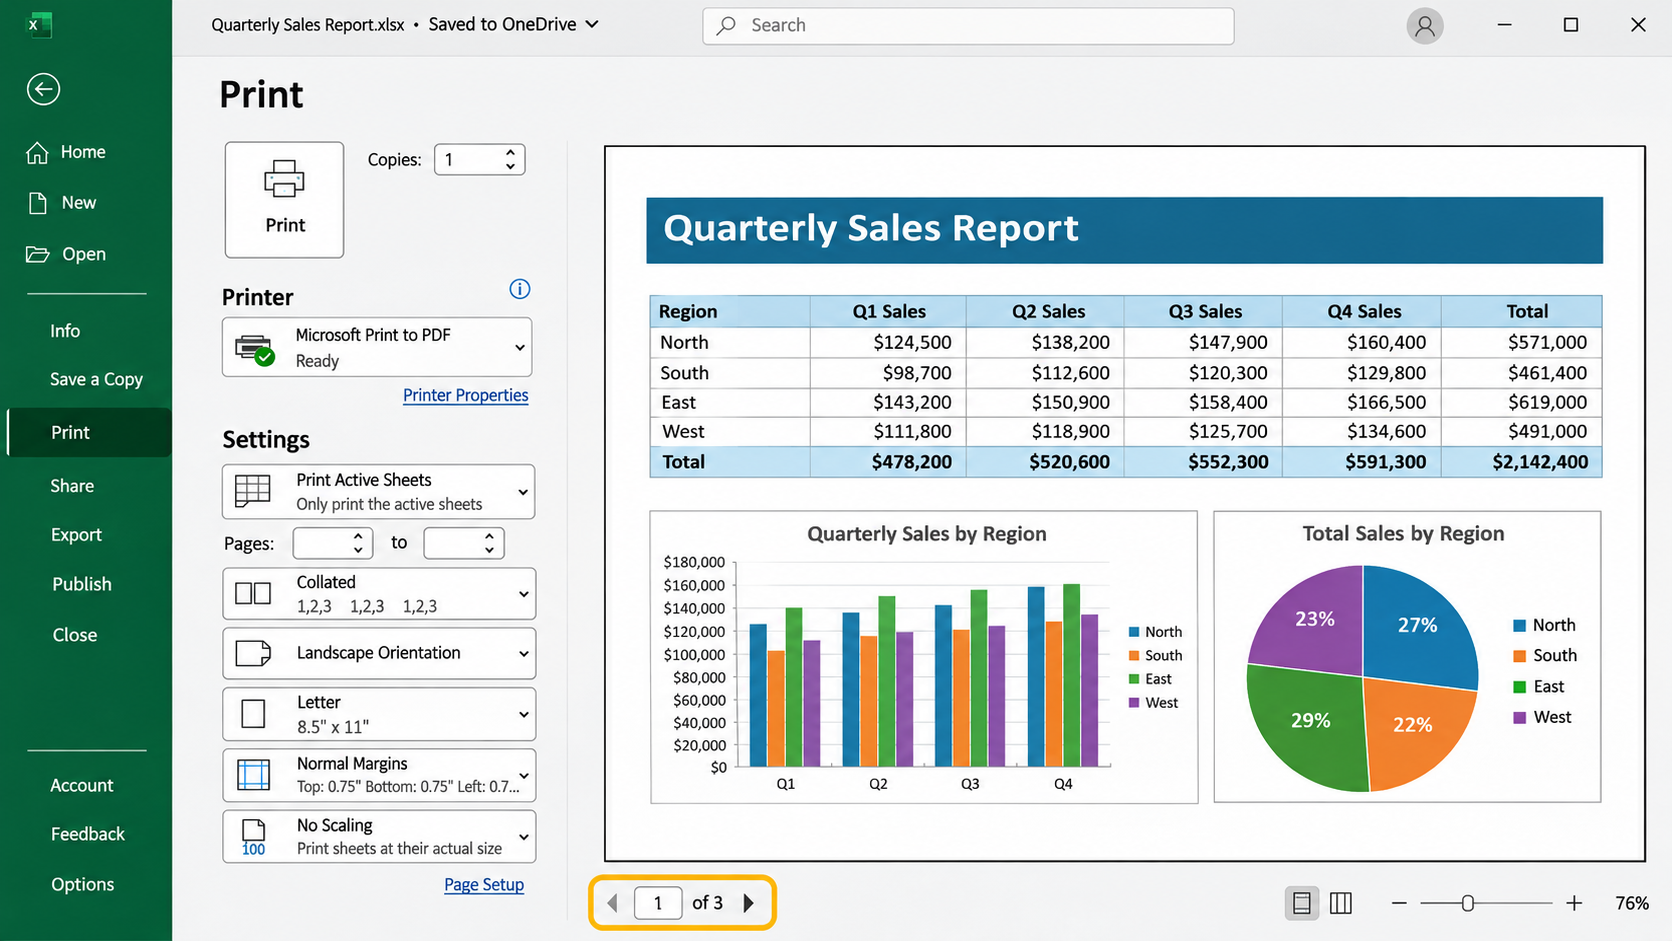
- Note whether the extra pages hold whole rows (a long sheet, which is normal) or slivers of columns (a wide sheet, which you will fix next).
For a fuller picture, choose View > Page Break Preview. Excel shades the printed area and draws blue lines where each page ends, so you can see at a glance that column T sits alone on page 2. View > Page Layout shows the pages as they will print while you keep editing, but Microsoft notes it does not work together with Freeze Panes. If you rely on frozen rows or columns while you work, stay in Page Break Preview instead.
Fit All Columns on the Page Width
This is the fix that solves most large-sheet printouts. Instead of forcing the whole sheet onto one sheet of paper, you tell Excel to shrink only enough for the columns to fit across, and let the rows continue down onto page 2, page 3 and so on.
- Go to the Page Layout tab.
- In the Scale to Fit group, open the Width list and pick 1 page.
- Leave Height set to Automatic.
- Read the Scale box in the same group. It now shows the percentage Excel chose.
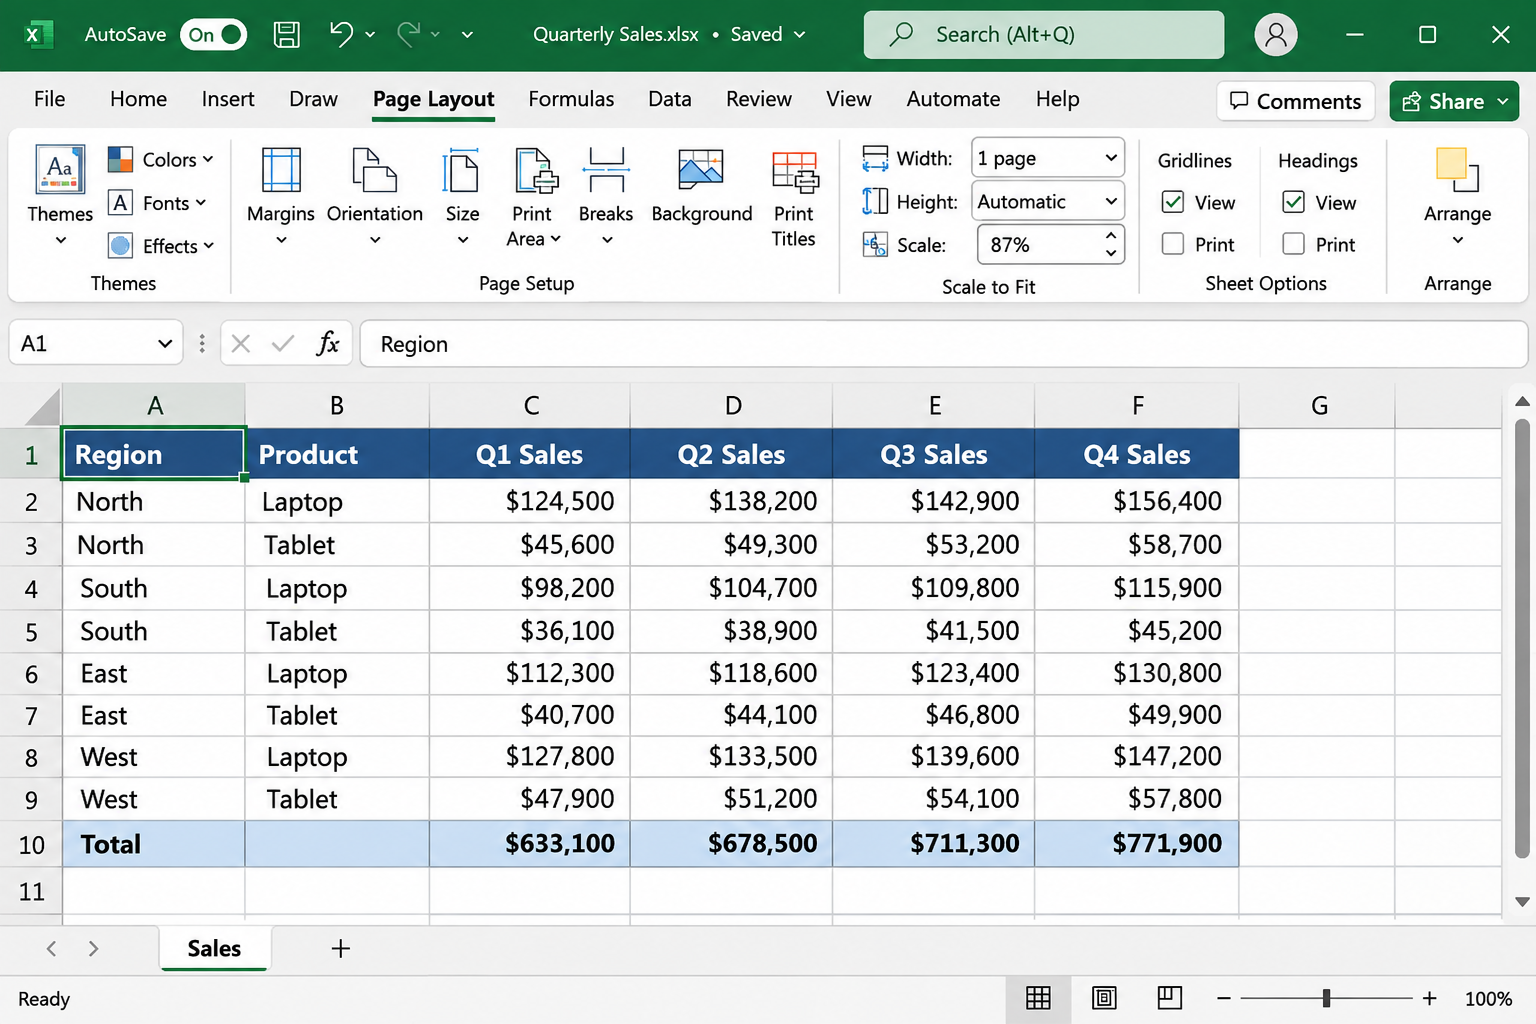
- Press Ctrl + P and check the preview again.
The Scale number is your readability check. As a worked example, picture an inventory sheet for a fictional store, Pinecrest Hardware, with 26 columns (A to Z) and 1,400 rows. Fitting it to one page wide in portrait might drop the scale into the 40s, which is hard to read. Switching to landscape (next section) could bring it back up considerably, because the page is wider. If the number is still low after landscape and narrow margins, try a bigger paper size or print fewer columns.
Setting Height to 1 page as well forces the entire sheet onto a single page. That suits a summary table but not a 1,400-row log. If a single page really is your goal, the separate walkthrough on fitting a spreadsheet on one page covers that case in detail.
You can reach similar options from the print screen. Under File > Print > Settings, the last list (it usually shows No Scaling) offers ready-made choices such as Fit Sheet on One Page and Custom Scaling Options. Some versions also list choices that fit only the columns or only the rows; check the preview after picking one. Choosing No Scaling puts the sheet back at its normal size.
Switch to Landscape and Tighten the Margins
A wide sheet almost always prints better sideways. Landscape gives each page more horizontal room, so Excel needs to shrink less.
- On the Page Layout tab, click Orientation and choose Landscape. (You can also change it from the orientation list on the File > Print screen.)
- Click Margins and choose Narrow.
- For finer control, pick Custom Margins and type smaller Left and Right values. On the same tab, the Center on page boxes (Horizontally and Vertically) place the printed block in the middle of the paper.
- Go back to File > Print and click Show Margins at the lower right of the preview. You can drag the margin handles directly and watch the page update.
Margins are saved with each worksheet, not as a program default, so a new workbook starts with Excel’s usual margins again. If Orientation is grayed out, press Esc to leave cell edit mode, and make sure a printer is installed. For more on centering a printed range, see centering a worksheet horizontally and vertically.
Pick a Bigger Paper Size or Set an Exact Percentage
When one page wide still means tiny text, larger paper is the honest fix. On the Page Layout tab, click Size and choose a larger sheet such as Legal, 11 x 17 (often listed as Tabloid or Ledger) or A3. Only pick a size your printer can really feed. Microsoft warns that if the paper in the printer differs from the size set in Excel, Excel adjusts the printout to the printer’s paper, and the result may not match the preview.
You can also set the shrink amount yourself in the Page Setup dialog:
- Click the small arrow (dialog launcher) at the lower right of the Page Setup group on the Page Layout tab, or press Alt, P, S, P one key after another.
- On the Page tab, under Scaling, choose Adjust to and type a percentage of normal size, such as 75.
- Or choose Fit to and enter how many pages wide and how many tall you allow, for example 2 pages wide by 10 tall.
- Click Print Preview or OK.
Fit to only ever shrinks: Excel does not stretch a small range to fill extra pages. “Adjust to” works both ways, so a value above 100 enlarges the print, which can help with a narrow but very long list that you want in bigger type.
Print Only the Part You Need
Large sheets often carry helper columns, notes and old calculations nobody needs on paper. Cutting them is the quickest way to bigger, clearer text.
- Select the cells you want on paper. Hold Ctrl to add separate ranges.
- On the Page Layout tab, click Print Area > Set Print Area.
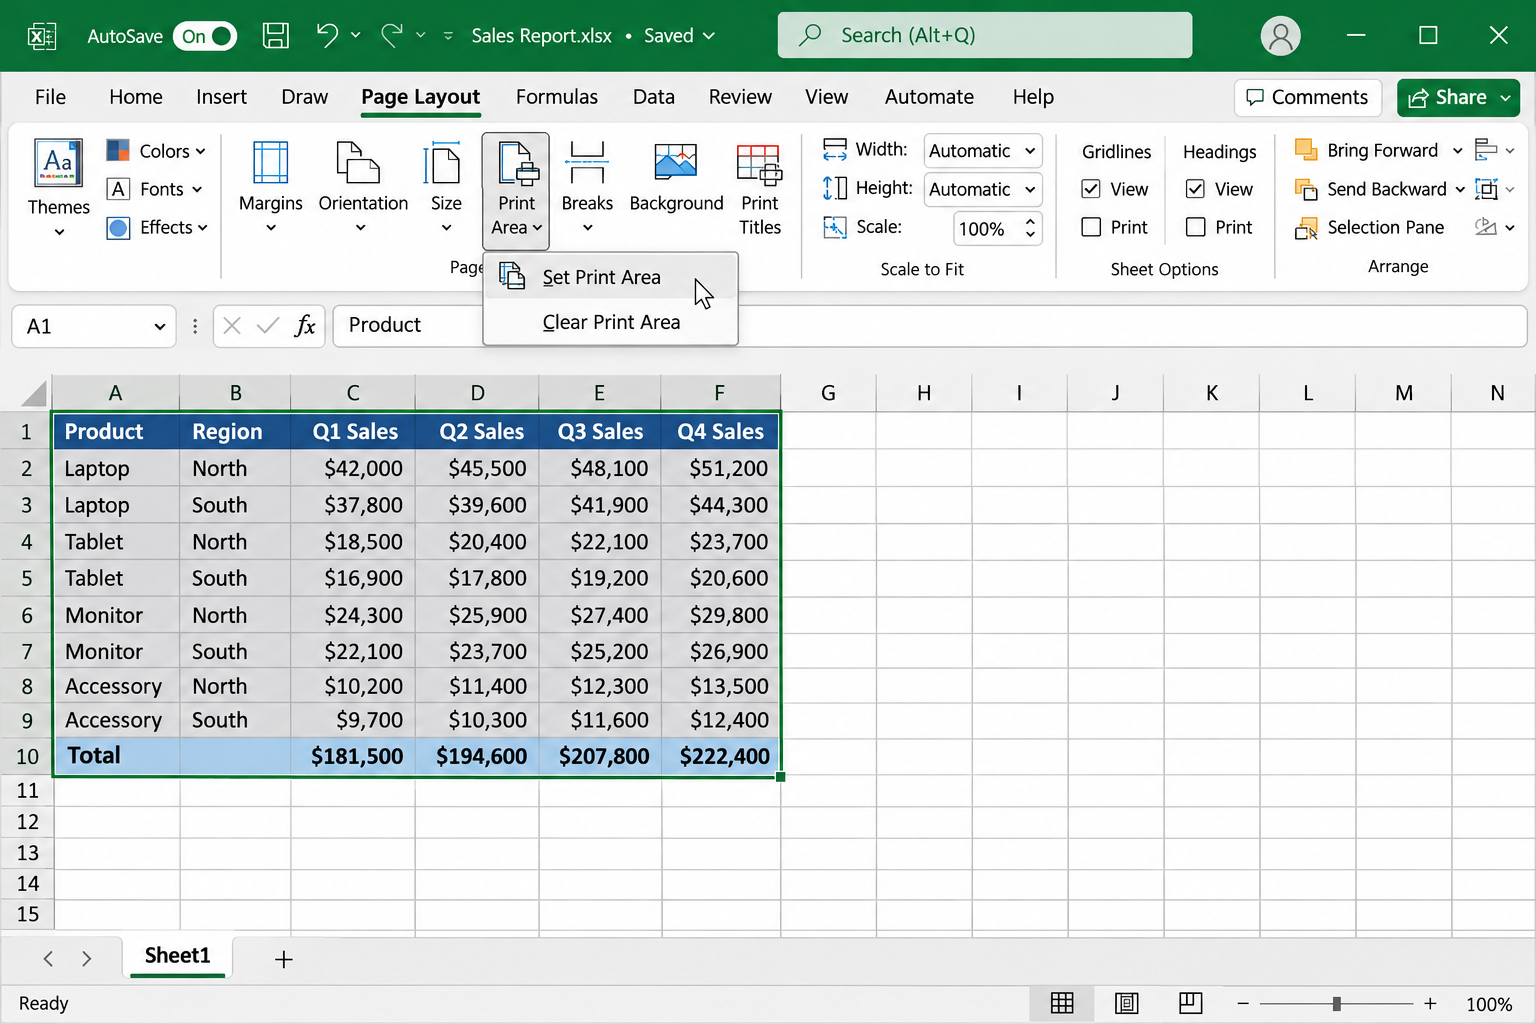
- To include more cells later, select them and choose Print Area > Add to Print Area. Cells next to the existing area join it; cells elsewhere become a separate area that prints on its own page.
- To start over, choose Print Area > Clear Print Area, which removes every print area on that sheet.
For a one-time printout, skip the print area and use File > Print > Settings instead: open the first list (Print Active Sheets) and choose Print Selection. The same list holds Print Entire Workbook, Print Selected Table (when you have clicked inside an Excel table) and Ignore Print Area, which prints the whole sheet even though an area is set. Another option is to hide columns you do not need before printing, then unhide the rows and columns afterward.
Repeat the Header Row on Every Page
On page 9 of a long printout, nobody remembers which column is “Qty on hand” and which is “Qty on order.” Print Titles repeats your header row at the top of each page. In short: Page Layout > Print Titles, then on the Sheet tab type $1:$1 (or click the row) in Rows to repeat at top. For a wide sheet that runs onto several pages across, also set Columns to repeat at left (for example $A:$A) so the item names appear on every page. The full walkthrough on repeating rows when you print covers mouse selection and multi-row headers.
If Print Titles is dimmed, you are probably editing a cell, have a chart selected, or have several sheets grouped. Press Esc, click a cell, or right-click a sheet tab and choose Ungroup Sheets.
Choose Where the Pages Break
Automatic breaks fall wherever the paper runs out, which can split a region’s totals from its rows. Manual breaks let you decide.
- Choose View > Page Break Preview. Dashed blue lines are automatic breaks; solid lines are manual ones.
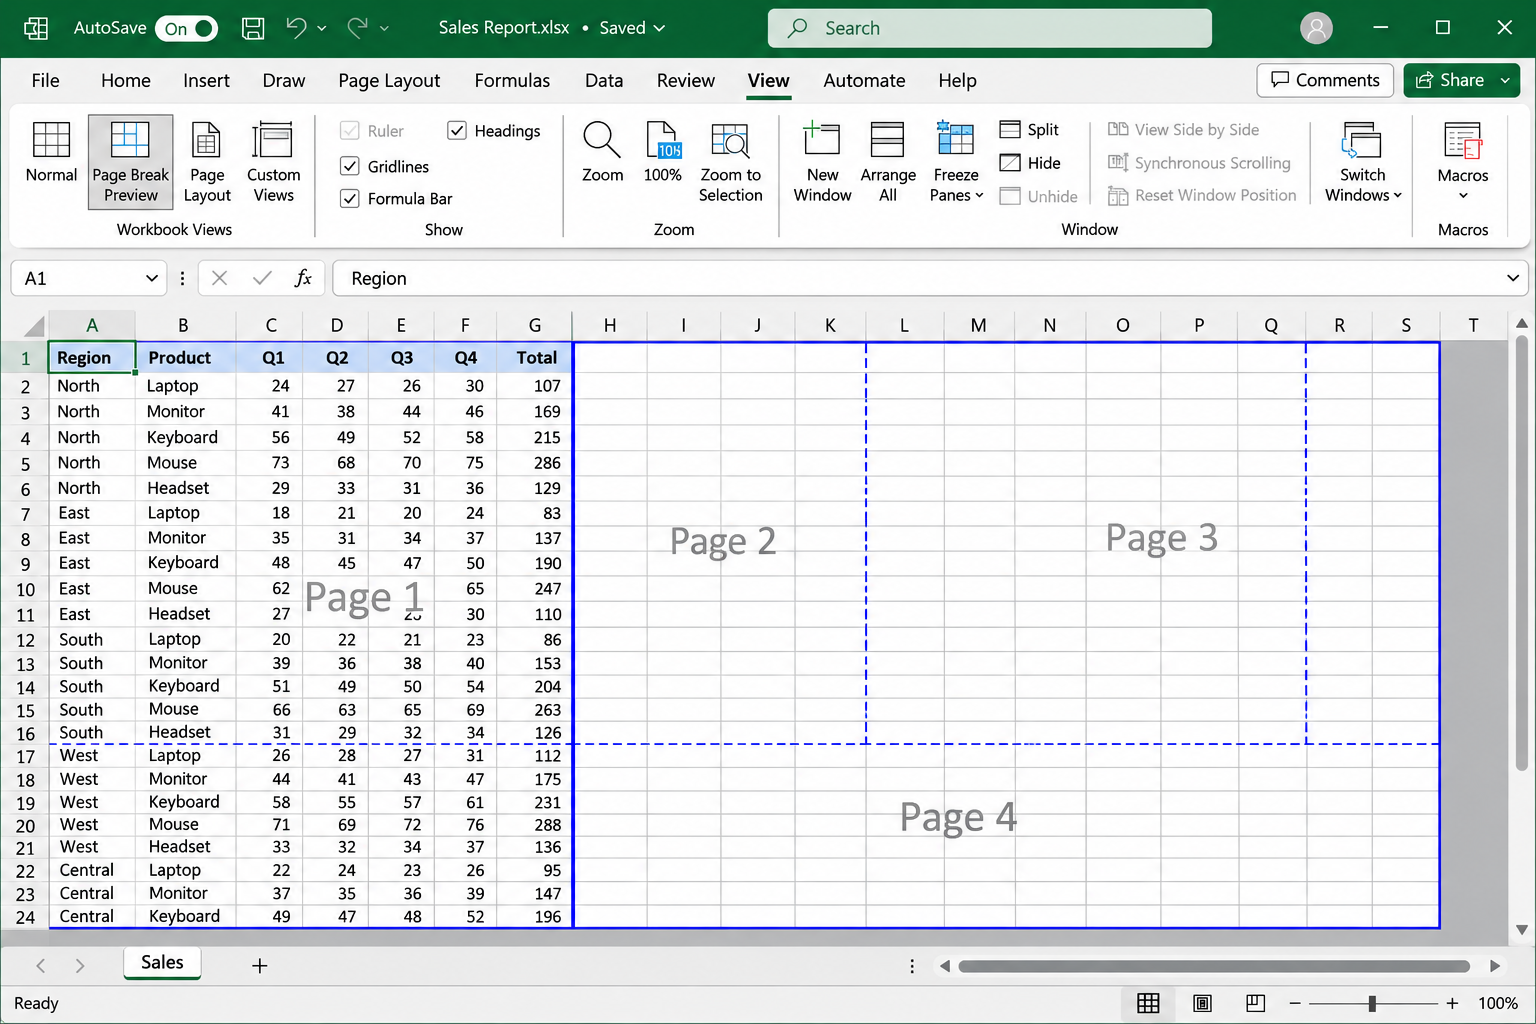
- Drag a line to move it. Moving an automatic break turns it into a manual one.
- To add a break, select the row below where you want it (or the column to the right), then choose Page Layout > Breaks > Insert Page Break.
- To remove one, select the row or column next to it and choose Breaks > Remove Page Break. Breaks > Reset All Page Breaks clears every manual break at once.
- Choose View > Normal when you are done.
Two settings commonly block this. First, Excel ignores manual page breaks while Fit to scaling is on, so if your breaks seem to do nothing, switch Page Setup to Adjust to and set a percentage instead. Second, dragging breaks needs cell drag-and-drop turned on, under File > Options > Advanced > Editing options. If dotted break lines stay visible in Normal view and bother you, you can turn them off under File > Options > Advanced, in the display options for the worksheet (Show page breaks), or follow the steps for returning worksheets to Normal view.
When a sheet is both wide and long, the page order matters. In Page Setup, on the Sheet tab, Down, then over prints all the rows of the left columns first, while Over, then down prints across before moving down. Pick the one that keeps related pages together when you staple them.
Add Gridlines, Headings and Page Numbers
Excel does not print its gray gridlines by default, which makes a dense printout hard to follow across a row. Tick Print under Gridlines in the Sheet Options group of the Page Layout tab; gridlines appear only around cells that hold data. The guide to printing gridlines covers borders, Mac and the Draft quality setting that can hide them. The Headings Print box in the same group adds the row numbers and column letters, which helps when people will discuss “cell M214” in a meeting.
For a printout of 20 or more pages, add page numbers. Open Page Setup, go to the Header/Footer tab, and pick a footer such as “Page 1 of ?” from the list, or click Custom Footer. The Sheet tab of the same dialog also has Black and white and Draft quality options that save ink on long jobs.
Test the Layout With a PDF First
Printing 30 pages to find a mistake on page 4 wastes paper. Save a PDF first and page through it. On Windows, choose a PDF printer such as Microsoft Print to PDF in the Printer list on the File > Print screen, then click Print and pick a file name. On a Mac, use File > Print, click Show Details, and choose PDF. The PDF also works if you want a print shop to handle large paper your own printer cannot take.
Excel for Mac and Excel for the Web
Excel for Mac
- Go to Page Layout > Page Setup.
- On the Page tab, choose Fit To. To fit the columns on one page width, enter 1 in the pages wide box and 9999 in the tall box, so the rows can run onto as many pages as they need.
- Use the Sheet tab (labeled Sheets in some versions) for print titles, and File > Print Area to set or clear a print area.
- Choose File > Print, click Show Details to see scaling, paper size and the PDF option, and check the page count before printing.
Excel for the Web
Use Excel’s own File > Print > Print, not your browser’s print command, then choose Current Selection or Entire Workbook in the print options. The web version has fewer controls: Microsoft says you cannot set margins or add page numbers there, hidden rows and columns are left out of the printout, and row and column labels do not show in the preview. For a big, carefully laid-out printout, use the Open in Excel option to switch to the desktop app and print from the desktop program.
When the Printout Still Comes Out Wrong
| What you see | Likely cause | What to try |
|---|---|---|
| One or two columns print on their own pages | The sheet is slightly wider than the page | Width = 1 page, landscape, Narrow margins |
| Text is too small to read | Height was also set to 1 page, or the sheet is very wide | Set Height back to Automatic, use larger paper, or print fewer columns |
| Hundreds of mostly blank pages | Formatting or a stray value in cells beyond your data | Press Ctrl + End to find the last used cell, then set a print area or delete the unused rows and columns |
If you would rather fix the sheet than the print settings, narrower columns, a smaller font or wrapped header text all let more fit at a given scale. These change the workbook itself, so consider making a copy of the sheet for printing.
Printing Questions for Big Sheets
Do Scaling Settings Change My Data?
No. Scale to Fit, orientation, margins and print areas affect only how the sheet prints. They are saved with that worksheet, so the next person who prints the file gets the same layout.
How Do I Print Several Sheets With the Same Settings?
Select the sheets by holding Ctrl and clicking their tabs, then change Page Layout settings such as orientation or margins; they apply to every grouped sheet. Ungroup before editing cells, and note that Print Titles needs sheets ungrouped.
Can I Save These Print Settings for New Workbooks?
Microsoft suggests saving a workbook with your layout as an Excel Template (.xltx) and starting new files from it under File > New > Personal.
Once the preview looks right, print a single page first (set Pages to 1 to 1 on the print screen) to check the text size on real paper, then print the rest. Microsoft’s help page on scaling a worksheet and its page break instructions list the same options if you want to compare.

Matthew Burleigh is the founder, head writer, and editor of Solve Your Tech, which he launched in 2012. He has written technology tutorials since 2008 and worked in IT since 2003, including small-business support, IT management, and consulting. He holds Bachelor’s and Master’s degrees in Computer Science from Arizona State University.
Matthew writes practical guides for Windows, iPhone and iPad, Microsoft Office, Outlook, Google apps, and Android. Solve Your Tech’s guides are checked step by step against the device or app maker’s own documentation and tested on his own devices whenever he has the hardware or software, with clear steps, sources, and update dates.
Read more about Matthew and how Solve Your Tech writes and updates its guides, or report a correction.