To make a tri-fold brochure (or pamphlet) in Word, set the page to Landscape, use 0.5 in margins, add three columns, and build two pages: page 1 is the outside, page 2 the inside. Print both sides on one sheet and fold it in thirds.
You need a flyer that folds into three neat panels, and Word’s blank page gives no hint where each panel goes. These steps cover Word for Microsoft 365 and recent versions on Windows and Mac.
Template or Blank Page: Which Route to Take
“Tri-fold,” “brochure” and “pamphlet” usually describe the same thing here: one sheet printed on both sides and folded into three panels. You can get there two ways.
- Start from a template if you want a finished design quickly and are happy to swap in your own words and pictures.
- Build from a blank page if you want full control over the layout or a template keeps fighting you. It takes about ten minutes of setup, and you will understand exactly where each panel sits.
Start From a Brochure Template
- In Word, go to File > New.
- Type brochure in the search box and press Enter.
- Click a design to see its preview. Look for two landscape pages that are each split into three panels. Many brochure designs fold differently, and Microsoft’s gallery does not label any of them as tri-fold, so the preview is your only reliable check.
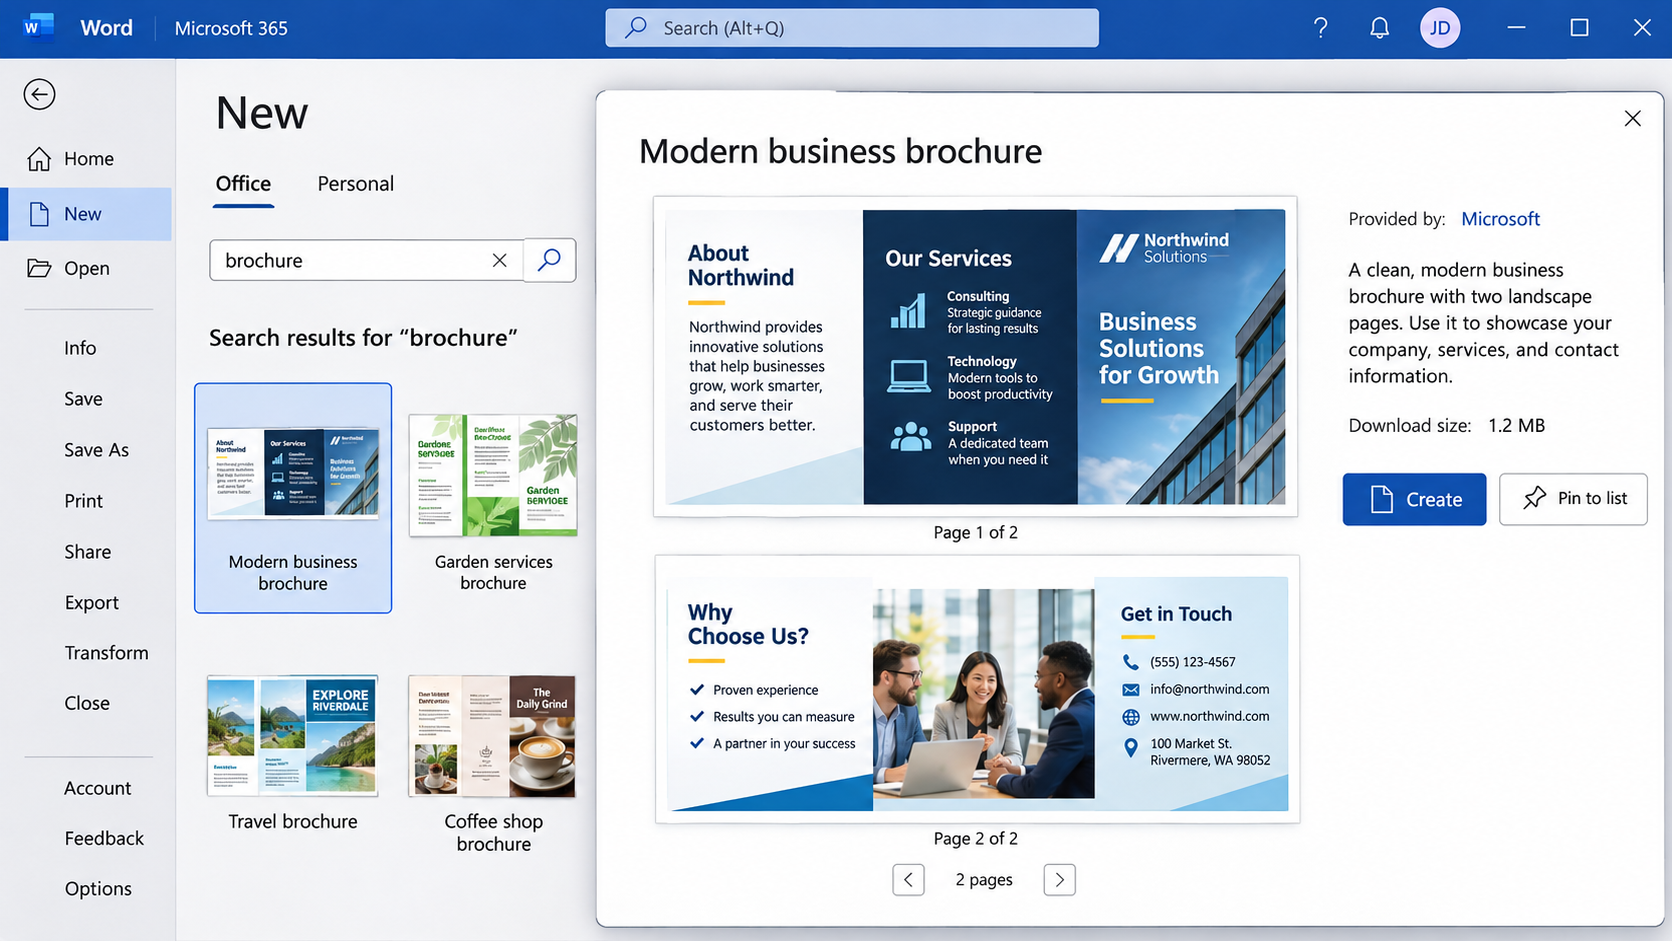
- Click Create, then replace the sample text and pictures with your own.
In Word for the web, the route is File > New, then Browse templates. If you start from a template on Microsoft’s online gallery instead, select Edit a copy to open it in Word for the web. To print from the browser, press Ctrl+P; if no Print dialog appears, open the PDF version Word offers and print that. Microsoft’s page on making a brochure in Word for the web covers sharing it with others.
Set Up the Page and Three Columns
Do this in a new blank document before you type anything, so text does not have to reflow later.
- Go to Layout > Orientation and choose Landscape. (Older versions call the tab Page Layout.)
- Go to Layout > Size and pick Letter (8.5 x 11 in, the US standard) or A4 (most other countries). Match the paper in your printer.
- Go to Layout > Margins > Custom Margins, type 0.5 in the Top, Bottom, Left and Right boxes, and click OK. Microsoft explains the dialog on its custom margins page.
- Go to Layout > Columns and click More Columns at the bottom of the list.
- Choose Three, leave Equal column width checked, and set the spacing box under Width and spacing to 1 in. Click OK.
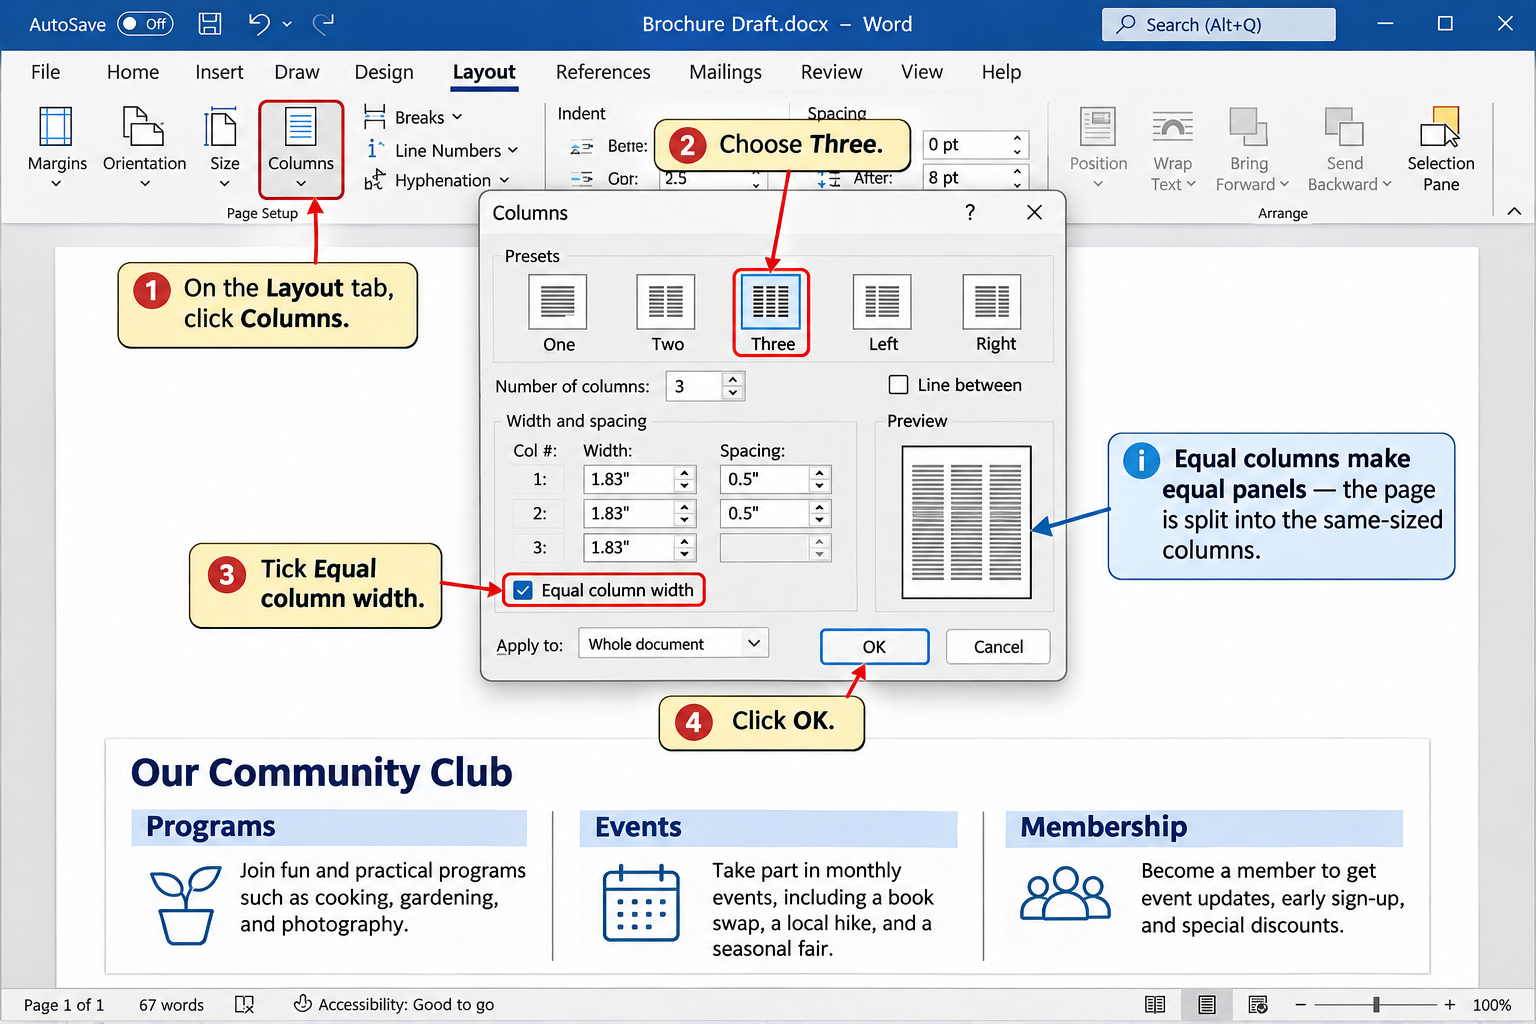
Why a 1 in gap? This is arithmetic, not a Word rule. A letter sheet in landscape is 11 in wide, so the folds fall at about 3.67 in and 7.33 in from the left edge. With 0.5 in side margins and a 1 in gap, each column is about 2.67 in wide. Column 1 ends at about 3.17 in and the gap runs to 4.17 in, so the middle of the gap sits right on the first fold, and the second gap lands on the second fold the same way. The general rule: make the gap twice the side margin and the folds fall in the gaps on any paper size. A smaller gap still works but moves each fold away from the middle of the gap; with 0.5 in margins, a gap under about 0.25 in puts the folds in your text. Printers vary, so confirm with a test print.
Only want one landscape page inside a longer document? That takes section breaks instead; see making only one page landscape in Word.
Know Which Panel Is Which
This is where most homemade brochures go wrong. Microsoft does not document a panel order for tri-folds, so the layout below comes from how a standard letter fold closes: the right third of the inside folds in first, then the left third folds over the top.
| Page | Left column | Middle column | Right column |
|---|---|---|---|
| Page 1 (outside) | Inside flap (the panel readers see first when they open the cover) | Back cover | Front cover |
| Page 2 (inside) | Inside left | Inside middle | Inside right |
The logic: when you print both sides and flip on the short edge, each panel on page 1 backs onto the panel on the opposite side of page 2. The front cover (page 1, right) sits behind the inside left panel, and the inside flap (page 1, left) sits behind the inside right panel, which is the third that folds in first. The back cover stays in the middle on both counts.
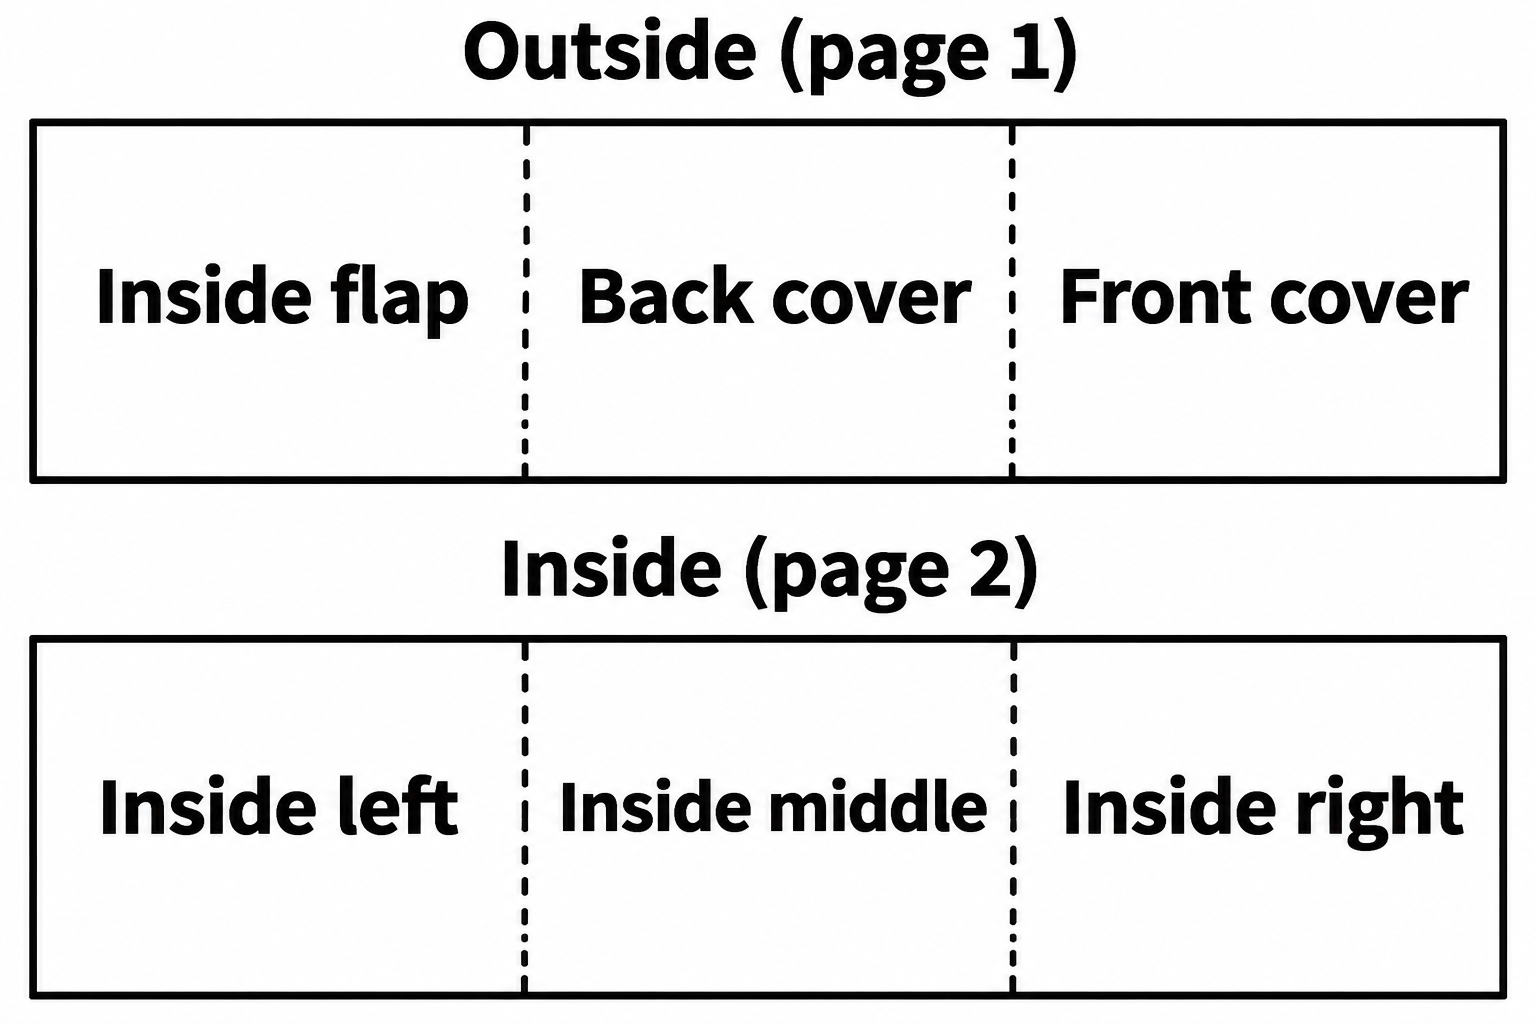
Before you design anything, fold a blank sheet in thirds the same way, write “front,” “back” and “flap” on it in pencil, unfold it, and compare it with your Word layout. That two-minute check beats reprinting a stack of brochures.
Move Between Panels With Column Breaks
Typing alone fills column 1 to the bottom before text spills into column 2. A column break lets you end a panel wherever you like.
- Click Home > Show/Hide (the paragraph mark button) so you can see breaks and empty paragraphs.
- Type the inside flap content in column 1. For a fictional Harbor Lane Dog Walking brochure, that might be a short “Why walkers love us” list.
- With the cursor at the end of that panel, go to Layout > Breaks > Column, or press Ctrl+Shift+Enter. The cursor jumps to the top of column 2.
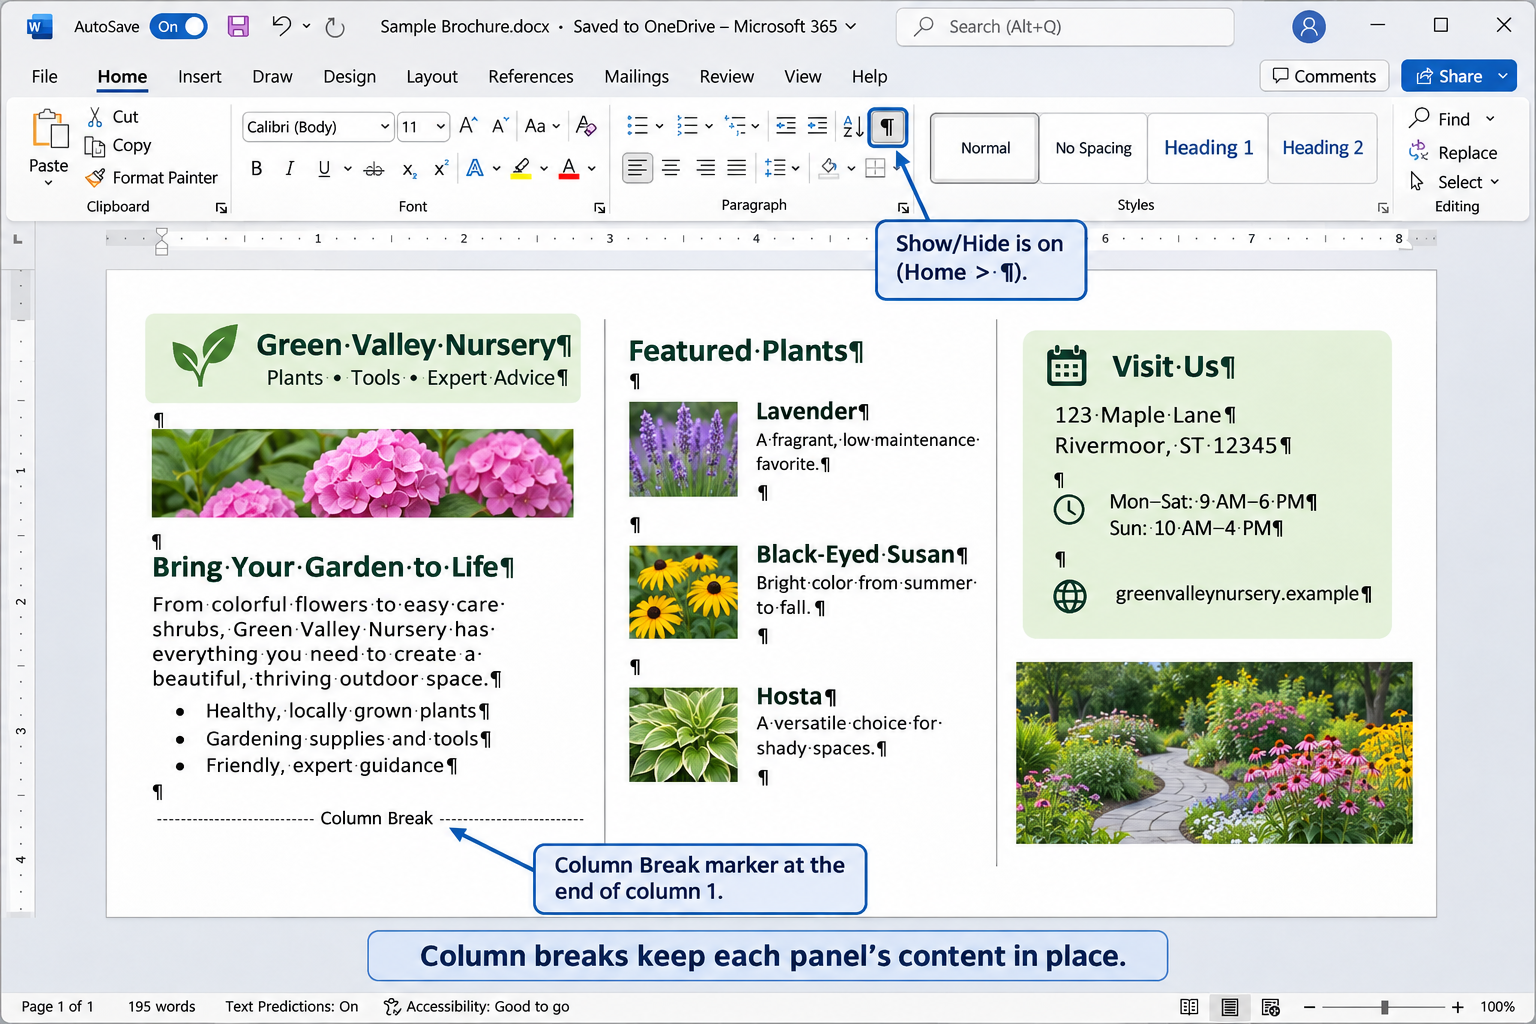
- Add the back cover (contact details, a map, a website), insert another column break, then build the front cover in column 3 (business name, a photo, a one-line promise).
- Insert one more column break at the end of column 3. Word moves to column 1 of a new page, which becomes page 2, the inside. Fill its three panels the same way.
Microsoft’s column break instructions confirm the menu path and shortcut. If you prefer rigid boxes, an alternative is a table with one row and three columns on each page (Insert > Table), with the borders removed. It keeps each panel from pushing content into the next, but resizing pictures inside table cells can be fiddly.
Fill the Panels With Text and Pictures
- Use Insert > Pictures, Shapes or Text Box for design elements. Set a picture’s layout so it stays put; the options are explained in wrapping text around a picture in Word.
- Pick a theme and font set on the Design tab so headings and colors match across all six panels.
- Keep text and key images inside the columns, away from the gaps. Anything that crosses a fold gets creased.
- For printing, a common guideline is photos at around 300 dpi at the size they appear. Small web images look soft on paper.
- Keep panels short: a heading, a few lines or bullets, and one picture each. Proofread on paper, or ask someone else to read it, before the final print.
Print Both Sides and Fold
Print one test copy on plain paper first. A wrong flip setting is the most common reason the inside comes out upside down.
- Go to File > Print and check the preview: two landscape pages, three panels each.
- Under Settings, open the sides menu (it starts at Print One Sided). If Print on Both Sides appears, your printer can print both sides automatically. Choose it, and if your printer offers a flip-on-short-edge option, pick that one.
- If only Manually Print on Both Sides appears, choose it. Word prints page 1, then asks you to turn the sheet over and feed it back in.
- Print, then hold the sheet up to a light. The gaps between columns on both sides should line up.
Another manual method from Microsoft’s duplex printing page: print with Only Print Odd Pages, put the sheets back in the tray, then print with Only Print Even Pages. If the sides come out in the wrong order, look under File > Options > Advanced, in the Print section, for the settings that print on the front or back of the sheet for duplex printing.
To fold: lay the sheet inside up. Fold the right third (backed by the inside flap) toward the center and crease it with a ruler edge, then fold the left third over it so the front cover ends up on top. Heavier paper looks better but cracks along a fold more easily; for large runs, a print shop can score and fold for you.
Save a PDF for a Print Shop
Go to File > Save a Copy (or Save As), choose a folder, set the file type to PDF and click Save. A PDF keeps the layout fixed on another computer. If the shop flags missing fonts, follow the steps for embedding fonts in a Word PDF, and if your brochure carries a web address you want clickable in a digital copy, check converting Word to PDF with working links.
Make a Bi-Fold Pamphlet or Booklet Instead
If your pamphlet only needs one fold, the build is simpler. For a single folded sheet, use the same landscape page and margins, but choose Two columns. Page 1 holds the back cover on the left and the front cover on the right; page 2 holds the two inside panels. With two equal columns, the gap always sits centered on the fold, so any spacing works; 0.5 in or more keeps text clear of the crease.
For a multi-page booklet that folds down the middle, use Word’s Book fold setting:
- Start with a new document, before writing your content.
- Go to Layout > Margins > Custom Margins.
- In the dropdown next to Multiple pages, choose Book fold. Word switches to Landscape on its own.
- Raise the Gutter value to leave room at the fold, choose your paper on the Paper tab, and click OK. Each finished page is half the width of the sheet.
Pictures and tables may need adjusting after the switch, and page numbers help when you assemble the pages. Microsoft’s booklet instructions cover printing, including flipping sheets on the short edge.
If you used to make pamphlets in Publisher, Microsoft retired it in October 2026: Microsoft 365 subscribers lost access to Publisher from about October 1, and support for the one-time-purchase versions ended October 13 (those still run, without support). Microsoft points people to Word or PowerPoint for brochures and flyers. Its Publisher retirement page explains how to keep older files as PDFs.
Fix Common Tri-Fold Problems
- Word warns that margins are outside the printable area. Some printers cannot print to within 0.5 in of the edge. If Word offers to fix the margins, accept it, or raise all margins yourself (and keep the gap at twice the new side margin).
- The inside prints upside down. Switch to the short-edge flip option, or turn the stack the other way when feeding it back by hand.
- Folds land in the text. Check the column gap and margins, and make sure the printer is not shrinking the page; the causes are listed in why a Word document prints too small.
- A blank third page appears. With Show/Hide on, delete the extra paragraph marks or column break after the last inside panel.
- A panel’s content jumps to the next column. The panel is too full. Trim text or shrink a picture until it fits above the column break.
Brochure and Pamphlet Questions
How big is each panel on letter paper?
Each folded panel is about 3.67 x 8.5 in. With 0.5 in margins and a 1 in gap, the usable text width per panel is about 2.67 in, so plan for short lines and small pictures.
Can I make the inside flap narrower so it folds flat?
Yes. Commercial tri-folds often trim the tuck-in panel by roughly 1/16 to 1/8 in so it does not buckle. That panel is column 1 on page 1 but column 3 on page 2, and both pages normally share one set of column widths, so end page 1 with Layout > Breaks > Next Page instead of a column break. Each section can have its own column settings, so with the cursor on each page in turn, open More Columns, clear Equal column width, and make the flap column slightly narrower (column 1 on page 1, column 3 on page 2). The folds move with the narrower panel, so fold a test copy. Microsoft documents the unequal-width option on its column widths page; the trim amount is a printing convention, not a Word setting.
Can I make a tri-fold on legal paper?
Yes, if your printer takes legal sheets. Choose Legal under Layout > Size. The panels become about 4.67 in wide, and the same twice-the-margin gap keeps the folds in the gaps.
Does this work in Word for Mac?
Microsoft lists Layout > Columns and More Columns for Word on a Mac too, so the page setup is the same. The print window looks different on a Mac, so find the two-sided option there and still fold a test copy first.
Once your test copy folds cleanly with the front cover on top, print the full batch on your final paper.

Matthew Burleigh is the founder, head writer, and editor of Solve Your Tech, which he launched in 2012. He has written technology tutorials since 2008 and worked in IT since 2003, including small-business support, IT management, and consulting. He holds Bachelor’s and Master’s degrees in Computer Science from Arizona State University.
Matthew writes practical guides for Windows, iPhone and iPad, Microsoft Office, Outlook, Google apps, and Android. Solve Your Tech’s guides are checked step by step against the device or app maker’s own documentation and tested on his own devices whenever he has the hardware or software, with clear steps, sources, and update dates.
Read more about Matthew and how Solve Your Tech writes and updates its guides, or report a correction.