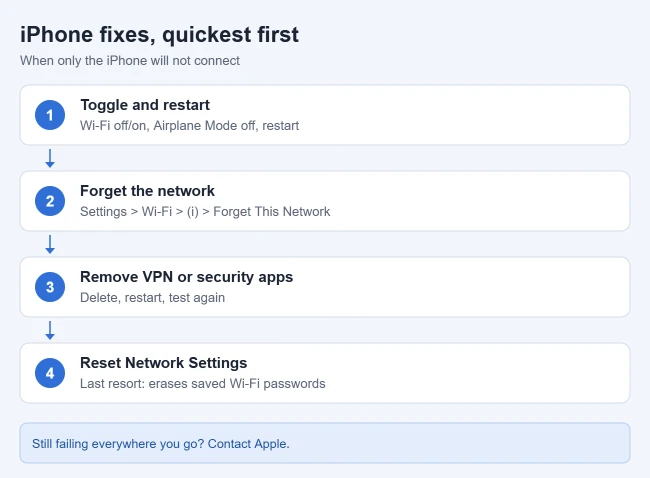
If Wi-Fi works on your other devices but not your iPhone, the problem is almost always a setting on the iPhone or a router rule that treats that one phone differently. Start by turning Wi-Fi off and on, restarting the iPhone, and forgetting the network and joining again. If that doesn’t fix it, remove any VPN or security app, check the network’s privacy settings, and then go to Settings > General > Transfer or Reset iPhone > Reset > Reset Network Settings.
These steps follow Apple’s support articles for iOS 27 and also work on iOS 26 and iOS 18, with one difference: on iOS 26 and earlier, the Connectivity Assist switch is called Wi-Fi Assist and sits at the bottom of Settings > Cellular. The same fixes apply to an iPad.
Match your symptom to a fix
What you see on the iPhone narrows down the cause. Find your symptom, then jump to that step.
| What you see | Most likely cause | Start with |
|---|---|---|
| Wi-Fi switch is dimmed (grayed out) | Software glitch, or rarely a hardware fault | Step 2 (restart), then Step 9 |
| “Incorrect password” even though it’s right | Old saved password or a router security mode mismatch | Step 3, then Step 7 |
| Your network isn’t in the list | Hidden network, out of range, or a band the iPhone can’t use | Step 7 |
| Connected, but “No Internet Connection” or pages won’t load | VPN, Private Relay, DNS, date and time, or a router block | Steps 4 to 6 |
| Connects, then drops | Weak signal or Connectivity Assist switching to cellular | Steps 1 and 7 |
| Works everywhere except at home | A router setting aimed at this iPhone | Step 7 |
| Fails on every Wi-Fi network, everywhere | iPhone software or Wi-Fi hardware | Steps 8 to 9, then contact Apple |
Step 1: Check the basics on the iPhone
These follow Apple’s If you can’t connect to Wi-Fi on your iPhone or iPad article, in the order that’s quickest to try.
- Open Settings > Wi-Fi. Make sure Wi-Fi is on, then tap your network name.
- Go back to Settings and make sure Airplane Mode is off.
- In Settings > Wi-Fi, make sure Connectivity Assist is off while you test, as Apple recommends. It can quietly use cellular data when Wi-Fi is weak, which makes it hard to tell whether Wi-Fi is actually working.
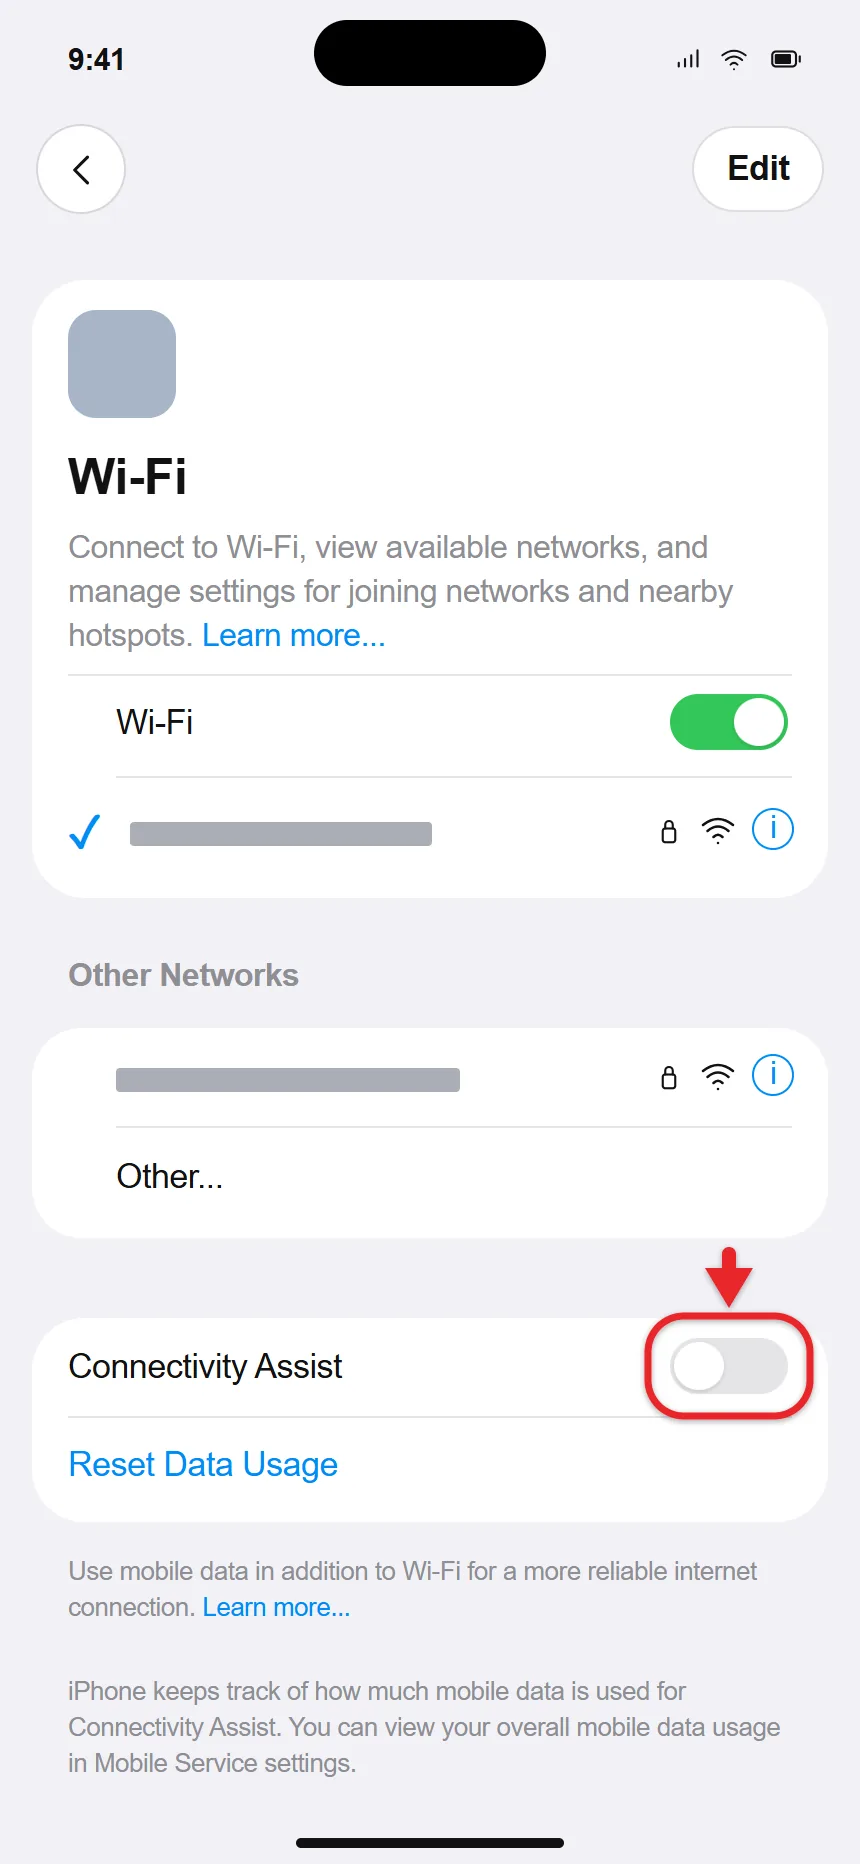
- If the Wi-Fi switch is dimmed, restart the iPhone (Step 2).
A blue check mark appears next to your network name when you’re connected. If it connects but says No Internet Connection under the network name, go to Step 4.
Use the switch in Settings, not Control Center. Turning Wi-Fi off in Control Center only disconnects you for a while, and the iPhone turns it back on by itself.
Step 2: Restart the iPhone
Press and hold the side button and either volume button until the power-off slider appears, drag the slider, wait about 30 seconds, then hold the side button until the Apple logo appears. On an iPhone with a Home button, hold the side (or top) button alone.
The iPhone reconnects to known networks on its own. A restart doesn’t erase saved networks or passwords.
If the iPhone is frozen and won’t show the slider, force restart it. On iPhone 8 and later, press and quickly release volume up, press and quickly release volume down, then press and hold the side button until the Apple logo appears.
Step 3: Forget the network and rejoin
- In Settings > Wi-Fi, tap the More Info button (the ⓘ) next to the network.
- Tap Forget This Network, then tap Forget to confirm.
- Tap the network name again and enter the password. Wi-Fi passwords are case-sensitive. If it is rejected, here’s how to fix an incorrect Wi-Fi password on iPhone.
- Tap ⓘ again and make sure Auto-Join is on.
The iPhone builds a fresh connection record. This often fixes problems after a router password change. On iOS 18 and later, forgetting a network also gives the iPhone a new private Wi-Fi address for it, unless you forgot it less than 24 hours earlier.
If you don’t know the password, ask someone whose iPhone, iPad or Mac is already on the network to share it. Keep both devices unlocked and near each other with Wi-Fi and Bluetooth on, choose the network on your iPhone, and they tap Share Password when the prompt appears. They need your Apple Account email in their Contacts.
If Forget This Network is missing, the network was installed by a work or school profile. Ask that organization’s IT team for help.
Step 4: Remove VPN or security apps
VPN and security software are a common cause. A VPN routes all your traffic through another server, so if that server or the app has a problem, the iPhone shows as connected but nothing loads.
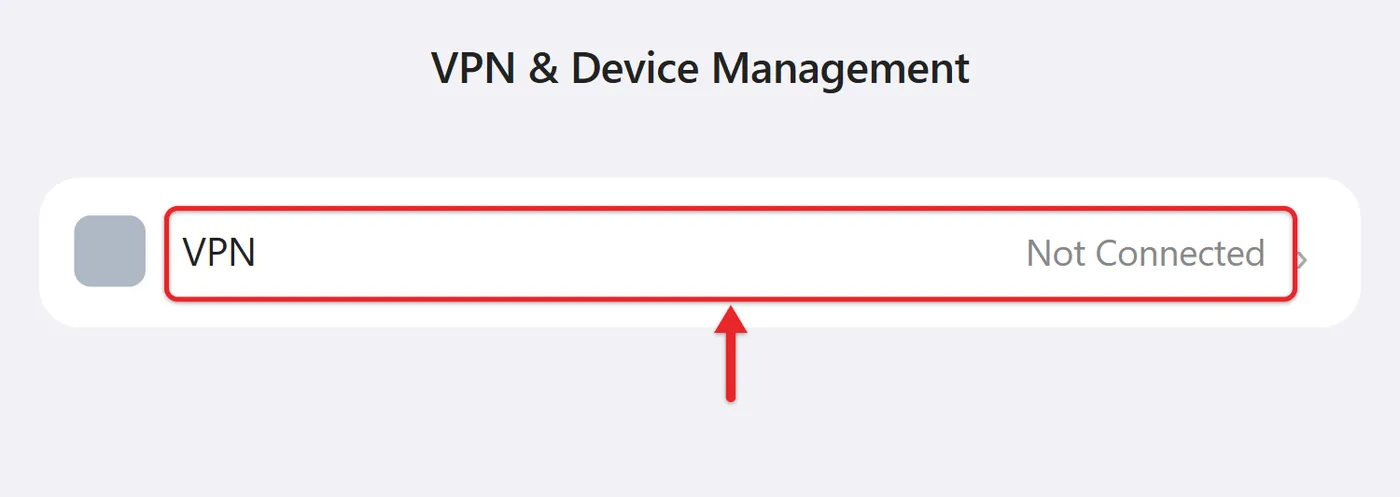
- Open the VPN or security app and turn off the connection, or check Settings > VPN.
- If that doesn’t help, delete the app.
- Restart the iPhone and test Wi-Fi again.
Also check Settings > General > VPN & Device Management for a profile you no longer need, such as an old content blocker or DNS profile. A work or school profile should only be removed with your IT team’s OK.
If you are not sure where a VPN on your phone came from, see what VPN means on an iPhone and how to turn it off.
If Wi-Fi works after removing the app, contact the app’s maker or your VPN administrator before reinstalling it. After a major iOS update, VPN and security apps often need their own update from the App Store before they work again.
Step 5: Check privacy settings for that network
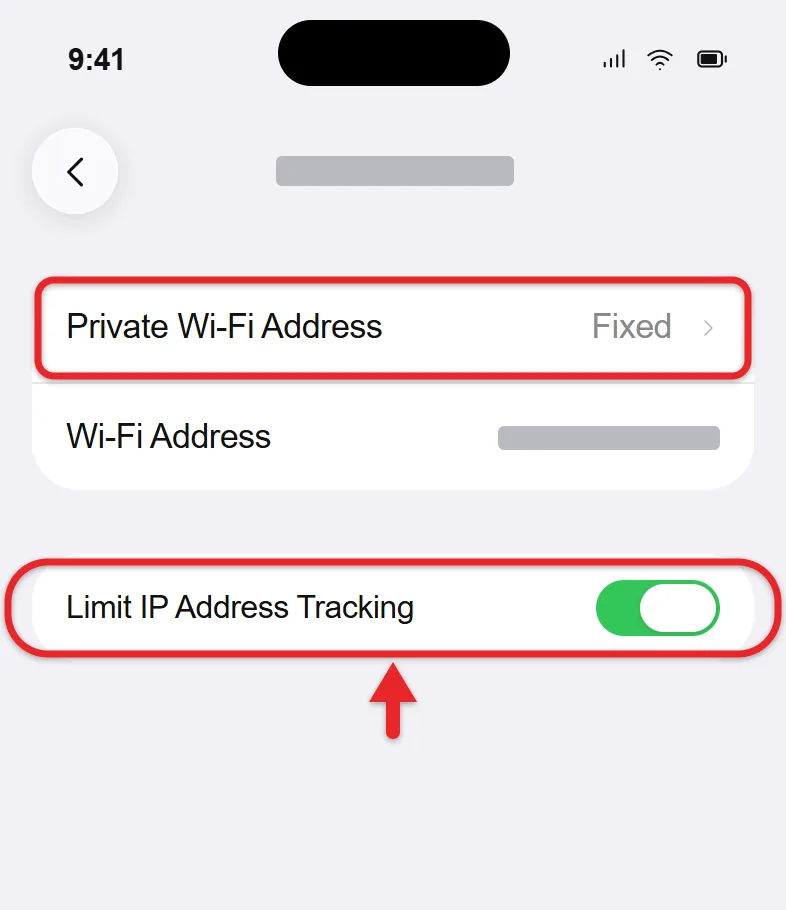
Tap ⓘ next to the network in Settings > Wi-Fi to find these. Each one only affects that network.
- Private Wi-Fi Address: Apple’s private Wi-Fi address article explains the three choices on iOS 18 and later: Off (the iPhone’s real hardware address), Fixed (a private address that stays the same) and Rotating (a private address that changes every two weeks). Fixed is the default on networks with WPA2 or stronger security. If your router only allows approved devices, a new or rotating address looks like a stranger. Set it to Fixed and add the address shown on that screen to the router’s allowed list. Find the iPhone Wi-Fi address if you need it. Older iOS versions have a simple on/off switch instead.
- Limit IP Address Tracking: this also controls iCloud Private Relay for that network. Some networks, especially at work, school and hotels, block Private Relay. Turn it off for that one network as a test if pages won’t load only on that Wi-Fi. Apple’s Private Relay article notes the change applies to all your devices that use Private Relay.
- Low Data Mode: with it on, apps pause background activity on that network, which can look like Wi-Fi isn’t working. Turn it off while you test.
- Configure DNS: this should say Automatic unless you set a custom DNS server on purpose. A typo or an unreachable server here makes the iPhone connect but load nothing. Tap it and choose Automatic.
Step 6: Check the date, time and sign-in pages
Two other things make the iPhone look connected while nothing works:
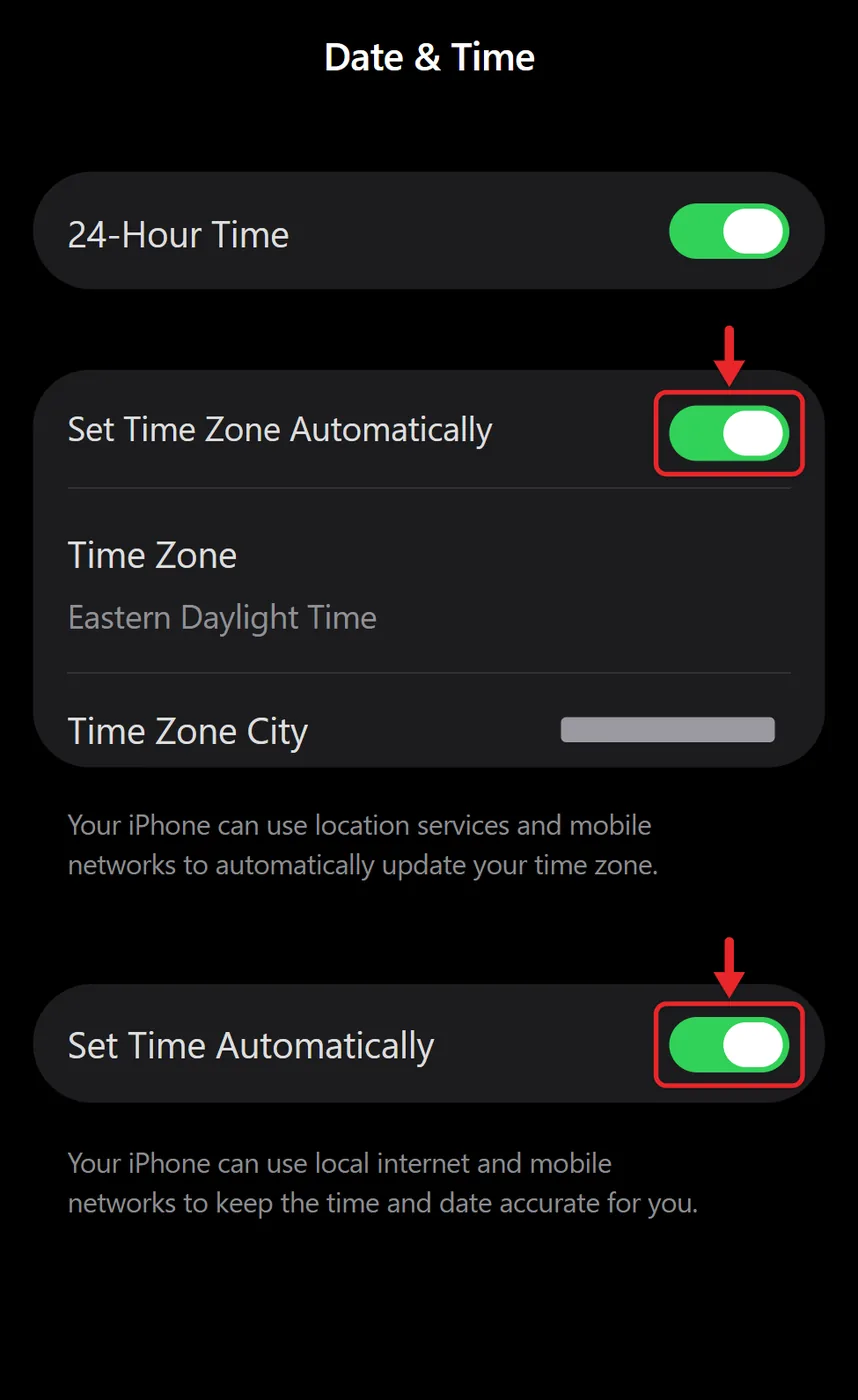
- Wrong date or time. Secure websites refuse connections when the clock is far off. Go to Settings > General > Date & Time and turn on Set Automatically.
- A sign-in page you didn’t see. Hotel, airport, cafe and school networks often show a page where you accept terms first. Open Safari and go to any website, such as apple.com, to make the page appear. The iPhone can also be set to stop joining public hotspots on its own.
Also make sure Location Services can help with Wi-Fi. Keep Settings > Privacy & Security > Location Services > System Services > Networking & Wireless on, because local rules on Wi-Fi channels and signal strength depend on where you are.
Step 7: Check the router
If other devices connect, the router and network are working, but the router can still treat one device differently.
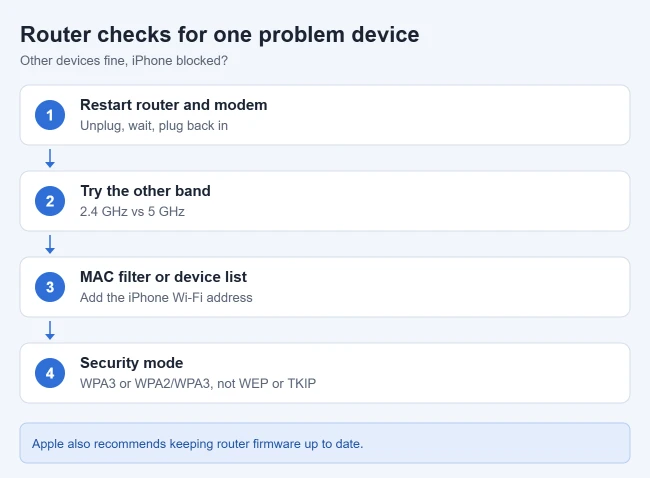
- Restart the router and modem by unplugging both, waiting about 30 seconds, and plugging them back in. Give them a few minutes to come back online.
- Move closer to the router. If your router has separate band names, try the other one (for example, 5 GHz instead of 2.4 GHz). 5 GHz is the better choice when it’s available. See How to Change Your Wi-Fi to 2.4 GHz on Your Router.
- Check the router or internet provider’s app. Many apps let you pause, block or schedule a single device for parental controls. Find your iPhone in the device list and make sure it isn’t paused or blocked.
- Look for MAC filtering or an allowed-devices list. Apple’s recommended setting is Disabled, because MAC addresses can be copied and filtering doesn’t stop intruders. If you keep it on, add the iPhone’s current Wi-Fi address.
- Check the security mode. Apple’s recommended router settings call for WPA3 Personal, or WPA2/WPA3 Transitional if older devices need to connect. Avoid WPA/WPA2 mixed modes, WPA Personal, WEP and TKIP. Weak settings trigger a security warning on the iPhone, and a WPA3-only network can turn away older devices. Never turn security off to get one device connected.
- Unhide the network and use one name. A hidden network won’t appear in the list (you can still join it by tapping Other and typing the exact name), and hiding it doesn’t make it more secure. One network name for all bands works best.
- Check for a 6 GHz-only network. Only iPhone models with Wi-Fi 6E or Wi-Fi 7 can see 6 GHz networks. Check your model’s tech specs on Apple’s site, and join the 2.4 GHz or 5 GHz network if yours doesn’t support it.
- Update the router firmware using the maker’s app or web page. Here’s how to update router firmware.
For more advanced settings, use channel set to Auto, 20 MHz channel width on 2.4 GHz, WMM enabled, and DHCP and NAT turned on only on the one device that runs your network. Two routers both handing out addresses can stop a device from connecting. If your internet provider supplied the router, some of these settings may be locked; the provider’s app or support line can change them.
After you change router settings, you may need to forget the network on each device and rejoin.
Step 8: Update iOS
Connect to another Wi-Fi network or use cellular data, then go to Settings > General > Software Update and install any update. If you can’t get online at all, connect the iPhone to a computer and update with Finder on a Mac or the Apple Devices app on Windows. Back up the iPhone first.
The iPhone restarts on the latest iOS, which can include Wi-Fi fixes.
Step 9: Reset network settings
Save this for when the other fixes fail. Before you start, make sure you know your Wi-Fi password, because the iPhone forgets it. On a work- or school-managed iPhone, check with IT first, since the reset removes their network settings too.
Check what a network settings reset on iPhone clears so you know what to write down first and set up again afterward.
- Go to Settings > General.
- Tap Transfer or Reset iPhone > Reset.
- Tap Reset Network Settings, enter your passcode, and confirm.
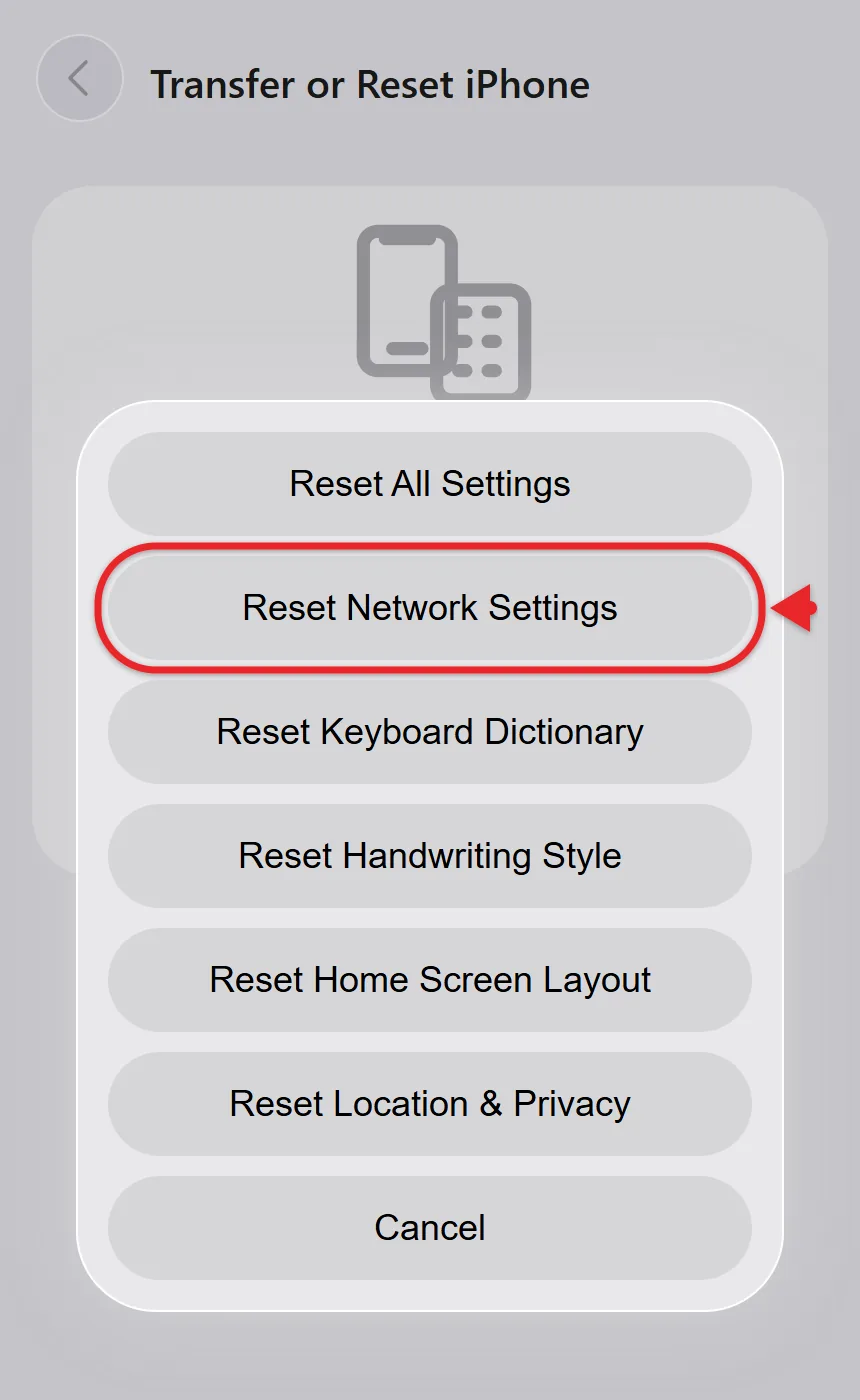
The iPhone restarts. This resets all Wi-Fi networks and passwords, cellular settings, and VPN and APN settings. Your photos, apps, messages and other data stay. Afterward, join your Wi-Fi again and set any VPN up again. If your router allows only approved devices, add the iPhone’s Wi-Fi address again, because the reset can change it.
An overview of the iPhone reset options explains how this differs from Reset All Settings, which also resets your keyboard, location, privacy and Home Screen settings.
How to tell it’s fixed
The network shows a blue check mark, the Wi-Fi icon appears in the status bar, and a website loads in Safari with Connectivity Assist still off. Once Wi-Fi works, you can turn Connectivity Assist back on if you want, and restore any VPN or security app you removed one at a time, testing after each.
When to contact Apple or your provider
- If the iPhone connects to Wi-Fi but nothing loads, and other devices on the same network work, recheck Steps 4 to 6, then contact your internet provider or whoever manages the network.
- Try a Wi-Fi network somewhere else, such as a friend’s house. If only your home network fails, the fix is on the router side (Step 7).
- If your iPhone can’t connect to any Wi-Fi network, contact Apple, since the Wi-Fi hardware may need service. A dimmed Wi-Fi switch that stays dimmed after an update and a reset, especially after a drop or water exposure, points the same way.
Frequently asked questions
Why does my iPhone connect but say “No Internet Connection”?
The iPhone joined the network, but traffic isn’t getting through. Restart the router, check for VPN or filtering apps, turn off Limit IP Address Tracking for that network as a test, and see whether other devices can browse.
Will resetting network settings delete anything else?
It removes saved Wi-Fi networks and passwords plus cellular, VPN and APN settings. It doesn’t delete photos, apps or messages.
Why does only my iPhone drop Wi-Fi in some rooms?
Signal strength varies by device. Try the other band, move closer to the router, or consider a mesh system for larger homes.
If only one room has the problem, you can set up a TP-Link Wi-Fi extender between it and the router.
Does Private Wi-Fi Address cause problems?
Usually not, but routers that only allow approved devices may block a new private address. Setting it to Fixed for that network and adding the address to the router fixes it. Install the latest updates before turning the feature off.
Why is my iPhone using cellular data when it’s on Wi-Fi?
Connectivity Assist (Wi-Fi Assist on iOS 26 and earlier) fills in with cellular data when Wi-Fi is weak. The tips to reduce cellular data usage on an iPhone show where to turn it off.
If your iPhone also shows SOS instead of signal bars, here’s how to get it out of SOS mode.
If one app won’t log in on Wi-Fi but works on mobile data, it may be a network block. One common case is Snapchat support code C14A.

Matthew Burleigh is the founder, head writer, and editor of Solve Your Tech, which he launched in 2012. He has written technology tutorials since 2008 and worked in IT since 2003, including small-business support, IT management, and consulting. He holds Bachelor’s and Master’s degrees in Computer Science from Arizona State University.
Matthew writes practical guides for Windows, iPhone and iPad, Microsoft Office, Outlook, Google apps, and Android. Solve Your Tech’s guides are checked step by step against the device or app maker’s own documentation and tested on his own devices whenever he has the hardware or software, with clear steps, sources, and update dates.
Read more about Matthew and how Solve Your Tech writes and updates its guides, or report a correction.