Many of the programs that you install on your computer include a couple of settings that you may not care about or realize you are activating.
These settings include the placement of a Desktop icon for that program and starting up the program anytime your computer starts.
While these options are meant to make it easier for you to use the program, having too many programs at startup can significantly increase the amount of time that it takes for your computer to fully boot.
If you are noticing that your computer is starting slow, then you may be wondering how to edit startup programs in Windows 7.
There is actually a system configuration menu that displays all of the programs that you could have startup with your computer, as well as all of the programs that you currently have set to startup with Windows 7.
Edit Windows 7 Startup Programs
The benefit to setting a program to startup with Windows 7 is that the program will launch faster when you want to use it.
Additionally, if the program has any pre-load options that you use frequently, having them start automatically could be beneficial.
But if you don’t use a program regularly, then the trade off for having the program at startup versus the amount of time that it adds to your system to fully load is probably not worthwhile.
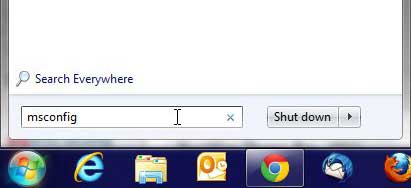
You can see all of your current startup settings by clicking the Start button at the bottom-left corner of your computer screen, typing msconfig into the search field at the bottom of the Start menu, then pressing the Enter key on your keyboard.
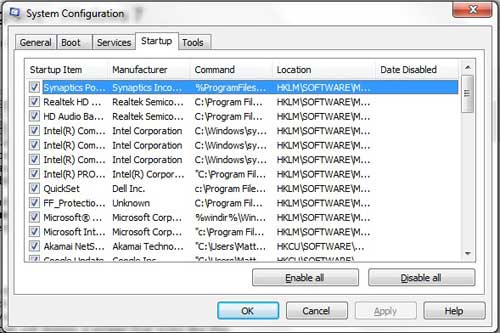
This is going to open a System Configuration menu at the center of your screen. At the top of the menu are a series of tabs on which you can configure a number of settings for how your computer operates. However, the tab that you want to click to edit your Windows 7 startup programs is the Startup tab. Clicking the Startup tab will display a screen that looks like this.
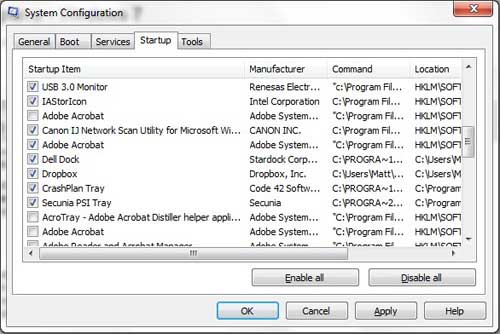
To improve readability of the startup programs, click the vertical dividing line between the Startup Item and Manufacturer column headings, then drag the line to the right so that you can read the information in the Startup Item column. You can now scroll through the list of startup programs and choose which programs you want to launch at startup by adding and removing checks from the boxes at the left side of the window. For example, in the window below, I do not need Adobe Acrobat to launch at startup, so I clicked the box to remove the check mark.
If you do not know what a particular program is, then take caution in removing it from startup, as it could be an important part of your computing environment.
If you are curious, you can always search for the startup item’s name in Google to see what it is and if it is important for you to leave on the startup menu. Once you have set the startup programs to your liking, click the Apply button at the bottom of the window, then click the OK button. You will then be prompted to restart your computer to apply the changes that you have just made.
Now that you know how to change the startup programs in Windows 7, you can better control which applications are being loaded and potentially make the startup process quite a bit faster.

Matthew Burleigh has been writing tech tutorials since 2008. His writing has appeared on dozens of different websites and been read over 50 million times.
After receiving his Bachelor’s and Master’s degrees in Computer Science he spent several years working in IT management for small businesses. However, he now works full time writing content online and creating websites.
His main writing topics include iPhones, Microsoft Office, Google Apps, Android, and Photoshop, but he has also written about many other tech topics as well.


