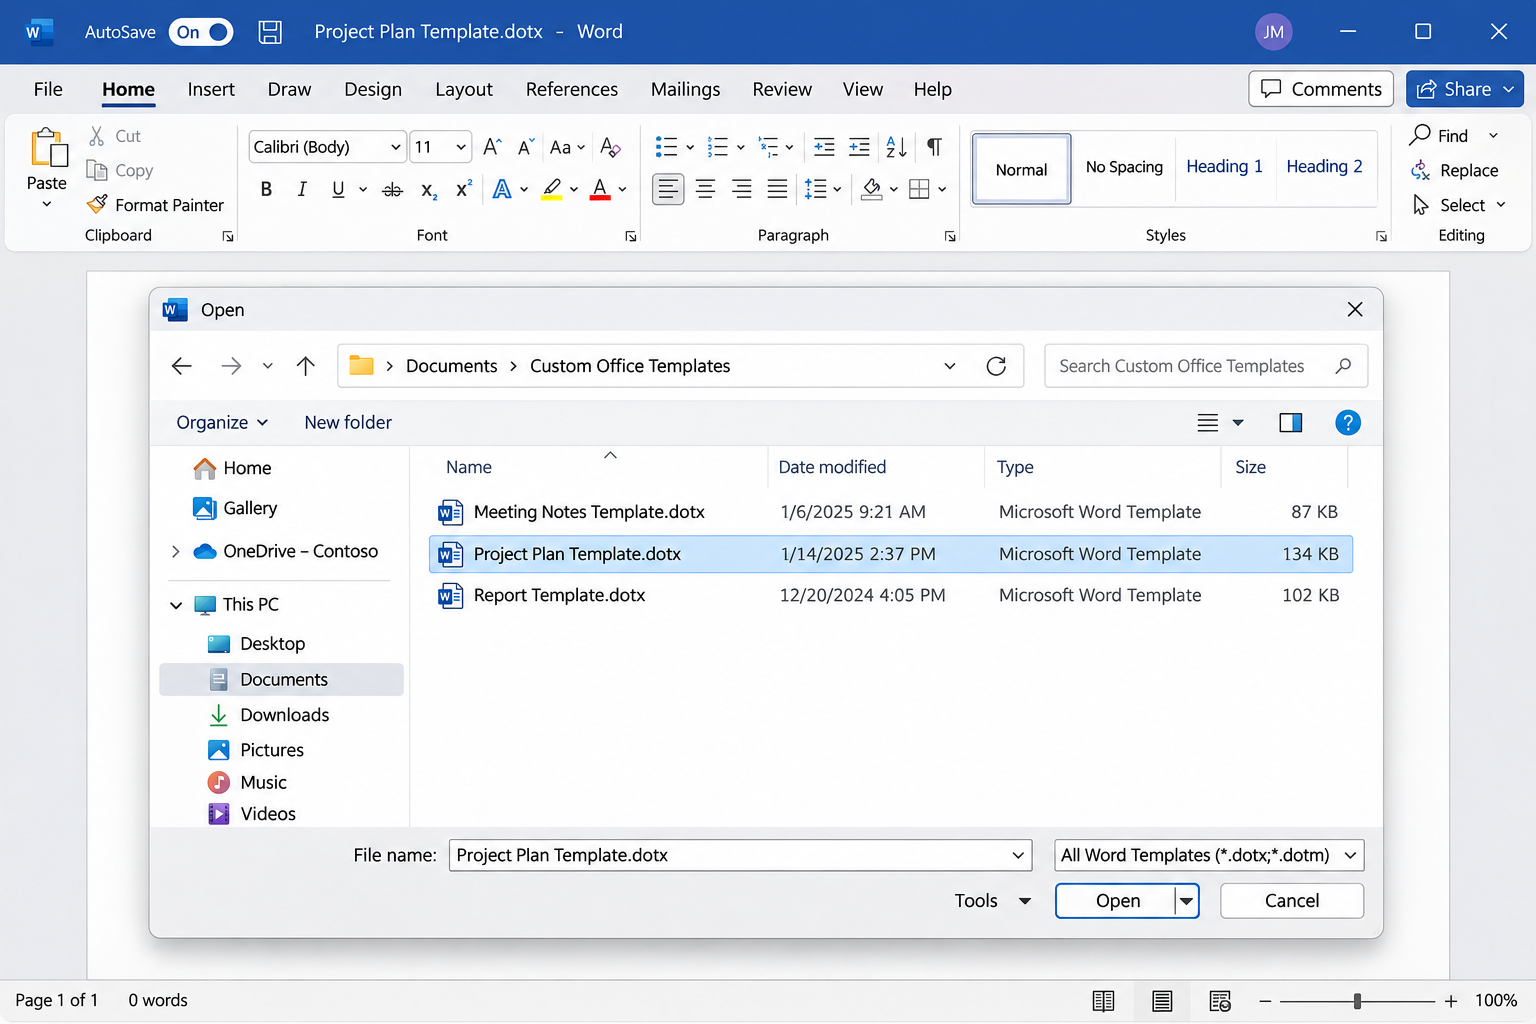
To edit a Word template itself, open Word, choose File > Open, and open the .dotx or .dotm file (usually in Documents > Custom Office Templates). Make your changes, confirm the title bar shows the template’s name, then press Ctrl + S. Double-clicking the file creates a new document instead.
You opened your company letterhead template, made changes, and found they only saved to a new document instead of the template. Steps cover Word for Microsoft 365 and 2016 to 2024 on Windows, plus Mac and the web.
Why Your Template Keeps Opening as a New Document
A Word template is a file with the extension .dotx (or .dotm if it contains macros, or .dot for very old templates). Its job is to be a starting point, so Word treats it differently from a normal .docx file. When you double-click a template in File Explorer, or pick it from File > New, Word does not open the template. It makes a fresh, untitled document (Document1, Document2 and so on) that copies the template’s text, styles and layout. Anything you change goes into that new document, and the template stays exactly as it was.
That behavior is useful when you want a new letter, but it is the reason edits seem to vanish. “Editing the template” means opening the .dotx file itself, so that the next document anyone creates from it picks up your changes.
Open the Template File for Editing
If other people use the template (a shared letterhead or a team report layout), copy the file somewhere safe first. A backup lets you roll back if a change goes wrong.
- Start Word and open any document or a blank one.
- Choose File > Open (or press Ctrl + O).
- Double-click This PC or click Browse to get the standard Open window.
- Go to Documents > Custom Office Templates, or to wherever the template is stored (a shared drive, OneDrive or a team folder).
- Select the template and click Open.
- Look at the title bar at the top of the window. It should show the template’s file name, such as “Ridgeway Letterhead.dotx”. If it says Document1, you have a new document, not the template; close it without saving and try again.
You can also start from File Explorer: right-click the template and choose Open, not New (New is the default, bold action that a double-click runs). If you do not see Open in the menu that appears, close it and use File > Open inside Word instead, which works the same way on every version.
Where Word Keeps Your Templates
When you save a file as a Word Template, Word on Windows suggests the Custom Office Templates folder inside Documents. Templates saved there appear when you choose File > New and click the Personal tab (some versions label it Custom). Picking one there creates a new document, which is the everyday way to use it.
If the Personal tab is missing or empty, Word may not know where your templates live. Set the folder in File > Options > Save, in the Default personal templates location box under Save documents. Type or paste the full path of the folder that holds your templates and click OK. One example path Microsoft gives is %appdata%\Microsoft\Templates. Older templates stored elsewhere can also be moved into Custom Office Templates so they show up.
With the template open, edit it the way you would edit any document. Take a fictional dental office, Ridgeway Dental, that has moved to a new street. Its letterhead template needs a new address in the footer, a new phone number and an updated logo.
- Text: click into the body text and type over anything that should be different for every future letter, such as standard closing lines or a disclaimer.
- Logo or picture: right-click the old picture (or use the Picture Format tab) and choose Change Picture, then pick where the new file comes from. The new picture goes into the old one’s place, so the layout usually holds.
- Header and footer: double-click the top or bottom margin of the page to open the header or footer, update the address and phone number, then double-click the body or press Esc to leave.
- Page layout: change margins, orientation or paper size on the Layout tab if the whole design needs it.
- Theme colors and fonts: the Design tab lets you swap the color set or font pair the template uses throughout.
Change Styles So Every New Document Inherits Them
Styles are where a template earns its keep. If Ridgeway Dental wants its headings in a new brand color, changing the Heading 1 style inside the template fixes every future letter at once, while changing text by hand only fixes the words you touched.
- On the Home tab, find the style in the Styles group (for example, Heading 1 or Normal).
- Right-click it and choose Modify.
- Change the font, size, color or spacing in the Formatting section. The Format button at the lower left opens more options, such as paragraph spacing and borders.
- Select New documents based on this template at the bottom of the dialog so the change is stored with the template.
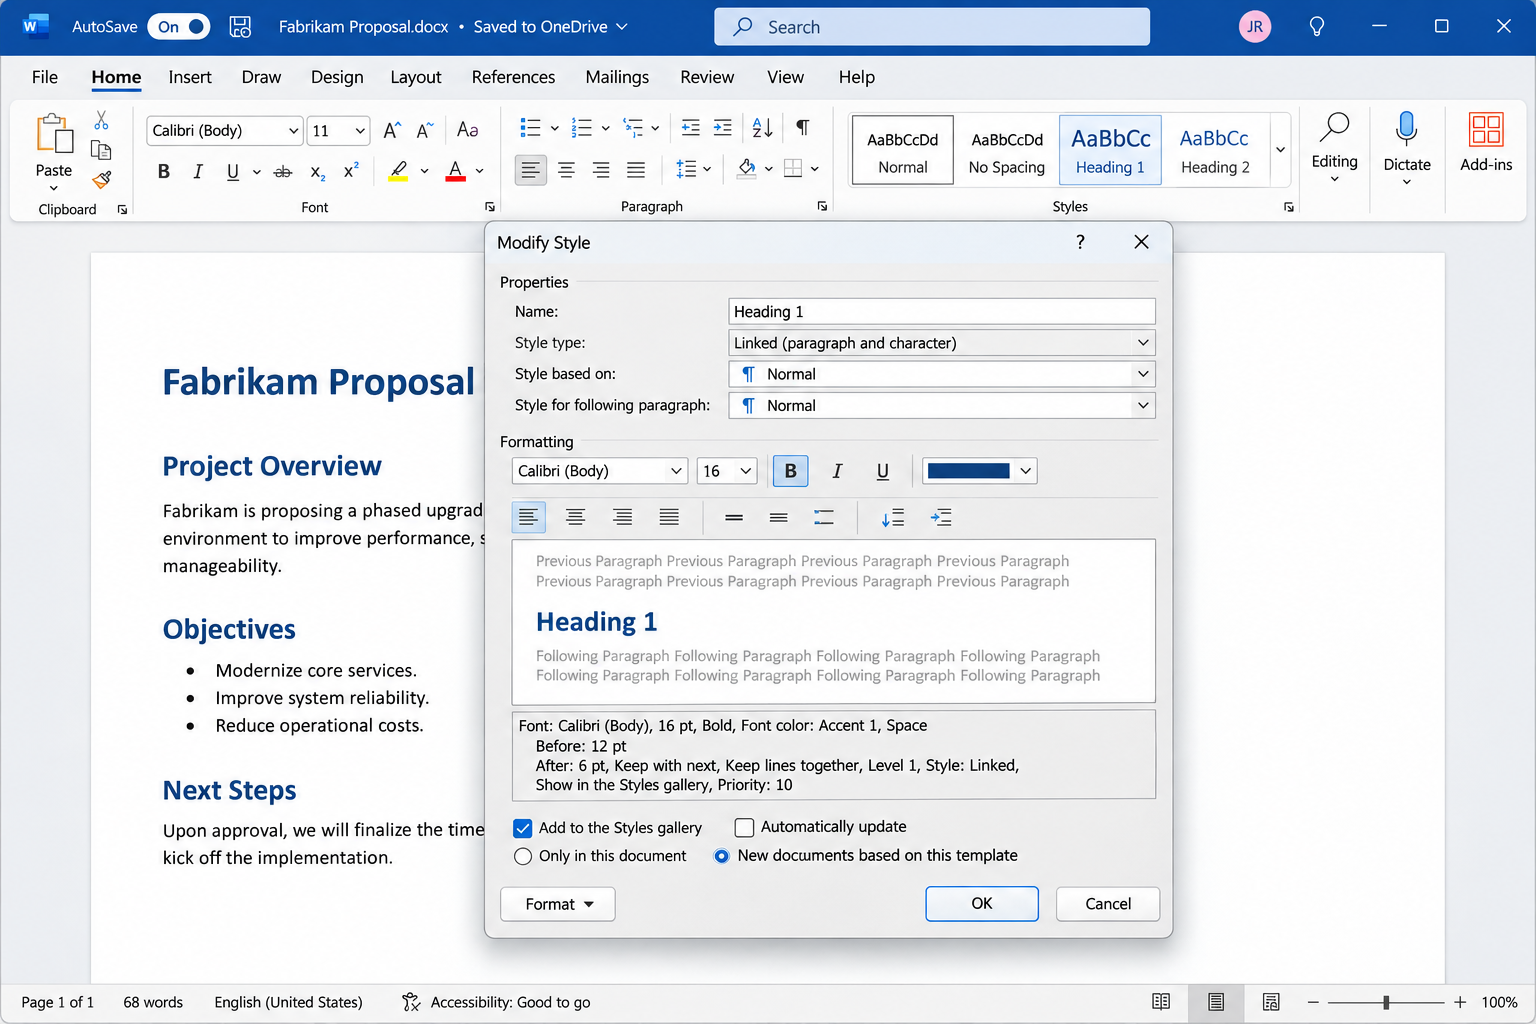
- Click OK.
A faster route works when you have already formatted some text the way you like: select it, right-click the style in the Styles group, and choose Update [style name] to Match Selection. Because you are editing the template file, saving it keeps the updated style for new documents.
Edit Placeholders and Content Controls
Many templates use content controls: boxes with gray instruction text such as “Click or tap here to enter text” or “Choose an item.” People filling in the template replace that text, so changing it, or adding new controls, is done in the template. You need the Developer tab for this.
- If you do not see the Developer tab, choose File > Options > Customize Ribbon, tick Developer under Main Tabs, and click OK.
- On the Developer tab, in the Controls group, click Design Mode.
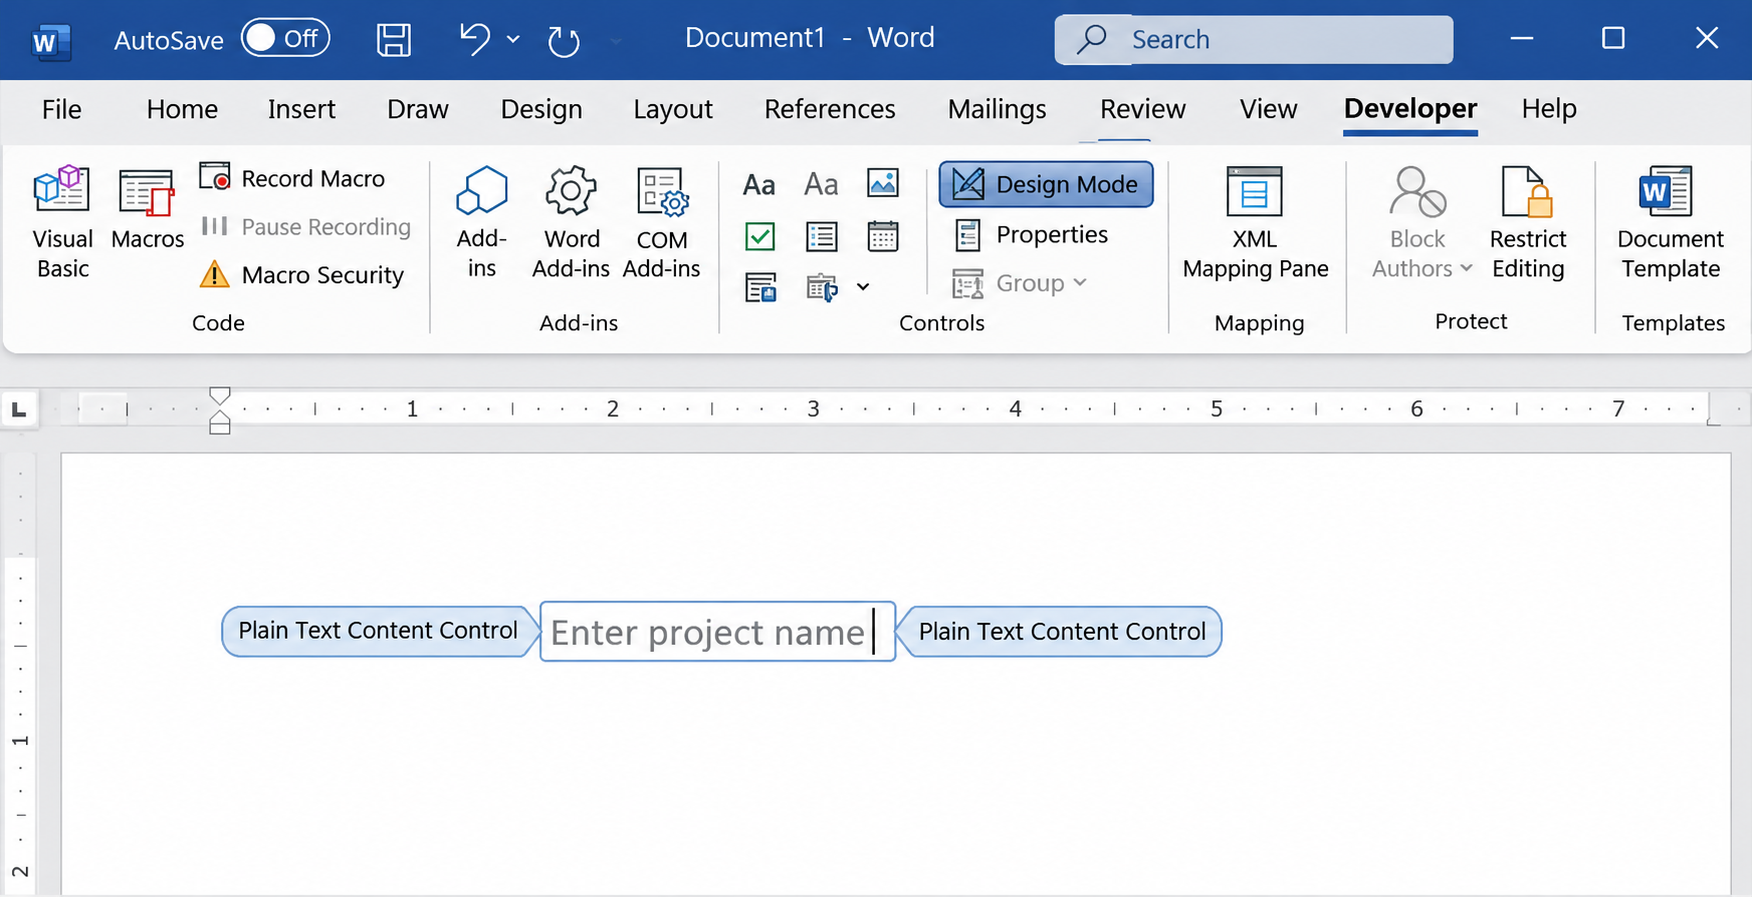
- Click the control whose instruction text you want to change and type new wording, such as “Patient name.”
- To change how a control behaves (for example, the choices in a drop-down list), select it and click Properties. Use Add to create new choices.
- To insert a new control, click where it should go and pick one from the Controls group: rich text, plain text, picture, combo box, drop-down list, date picker, check box or building block gallery.
- Click Design Mode again to turn it off.
In the Properties dialog you can also tick Content control cannot be deleted or Contents cannot be edited to stop people from removing a field or changing fixed text. For more on building forms, see the guides on making a Word document fillable, adding a drop-down list in Word and inserting a check box.
Save the Edited Template
Because you opened the template file itself, a plain save writes your changes back into it.
- Check the title bar one more time: it should still show the .dotx or .dotm file name.
- Press Ctrl + S or choose File > Save.
- Close the template.
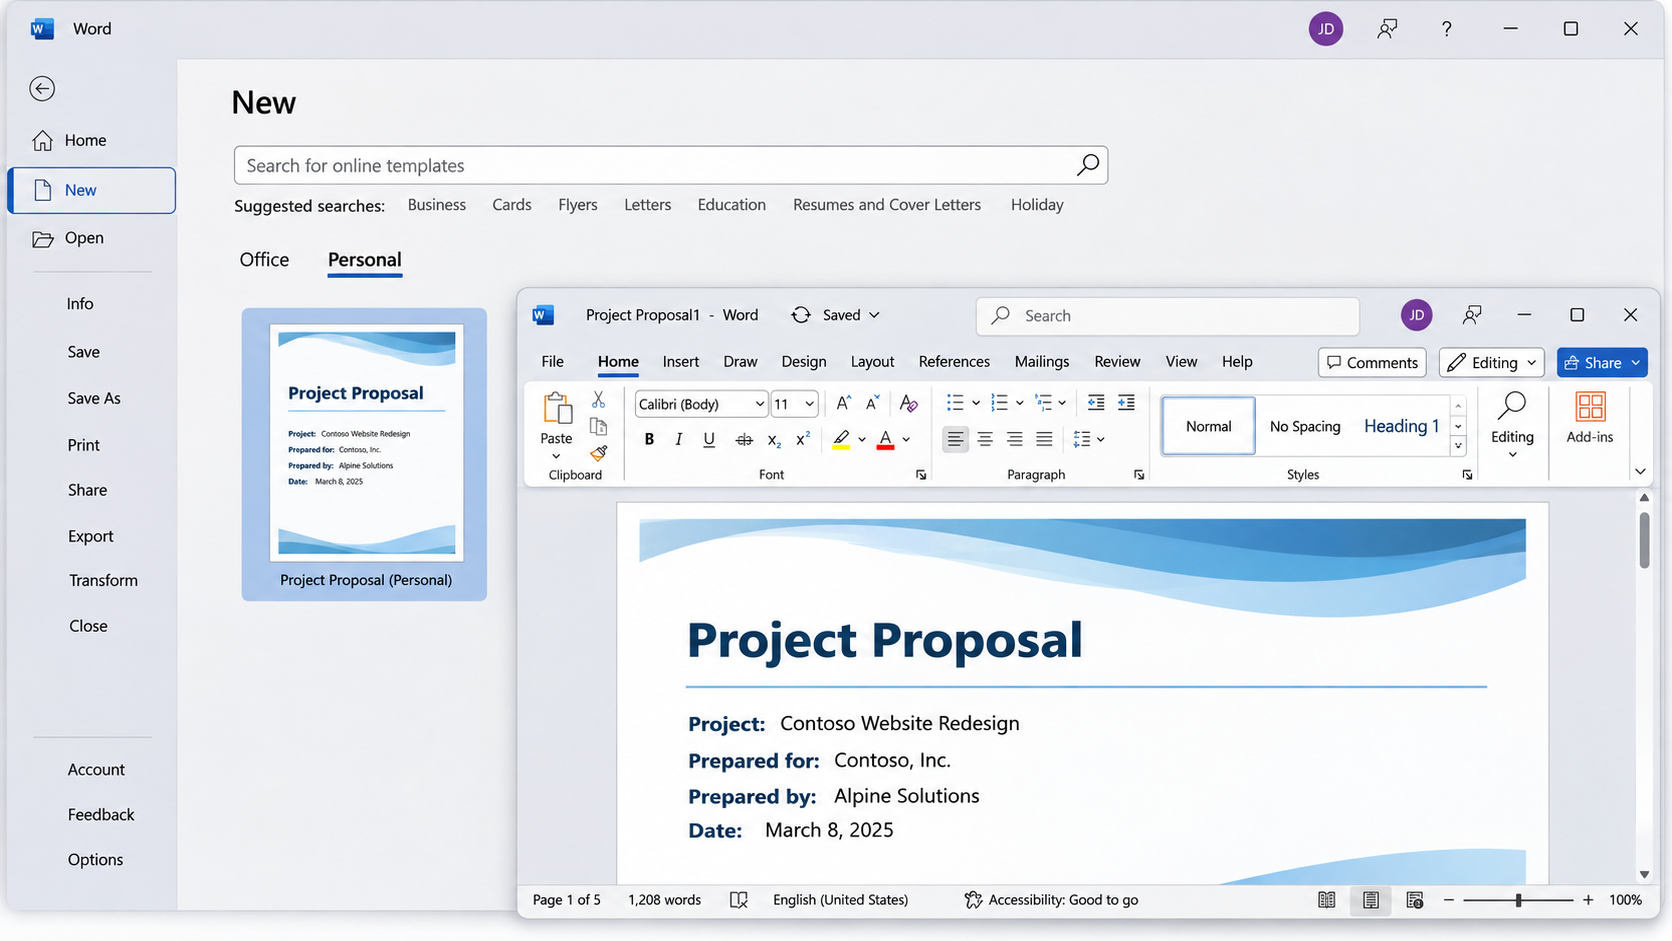
- Test it: choose File > New > Personal (or double-click the template in File Explorer) and confirm the new document shows your changes.
If you made your changes in a new document by mistake, you can still turn it into the template. Choose File > Save As, double-click This PC, set Save as type to Word Template (*.dotx), or Word Macro-Enabled Template (*.dotm) if the file contains macros, and give it the old template’s name to replace it. Word switches to the Custom Office Templates folder when you pick a template type; browse to the original folder if the template lives somewhere else.
To stop others from changing a shared template, use Review > Restrict Editing, choose your restrictions, and click Yes, Start Enforcing Protection. A password is optional, but without one anyone can turn the restrictions off. The guide to editing permissions on a Word document explains the restriction choices.
Edit Normal.dotm, the Default Template
Every blank document in Word comes from a template called Normal.dotm. Editing it changes the starting font, margins and spacing for all new blank documents. On Windows:
- Close other documents, then choose File > Open and browse.
- Go to
C:\Users\<your user name>\AppData\Roaming\Microsoft\Templates. (AppData is hidden by default; you can paste the path into the address bar of the Open window.) - Open Normal.dotm, change fonts, margins or spacing, and choose File > Save.
The new settings apply to documents you create afterward. Copy Normal.dotm before you start: if the file is renamed, moved or damaged, Word builds a fresh one with the original defaults the next time it starts. If all you want is a different default font, the default font steps for Word are simpler and change Normal.dotm for you.
Edit a Template in Word for Mac
The same rule holds on a Mac: open a template from inside Word, not from Finder. Opening Normal.dotm from Finder creates a new blank document based on it rather than opening the template itself.
- In Word, choose File > Open.
- For Normal.dotm, browse to
/Users/<username>/Library/Group Containers/UBF8T346G9.Office/User Content/Templates. The Library folder is hidden; in Finder or the Open window, press Command + Shift + G and type~/Libraryto get there. - Open the file, make your changes, and save.
For fonts and margins alone, Word for Mac has a shortcut: Format > Font or Format > Document, set what you want, and click Default. For your own templates, use the same File > Open route: browse to wherever the .dotx file is saved and check that the window title shows the template name before you save.
What About Word for the Web?
Word for the web works with templates differently. Microsoft’s instructions have you save a regular .docx with your layout in OneDrive and then use Create a Copy each time you need a new document. Microsoft does not describe a way to edit a .dotx template file in the browser, so to change a real template, open it in the desktop app.
When the Template Still Will Not Behave
- Changes still go to Document1. You opened it with a double-click or from File > New. Close without saving and use File > Open.
- The template is missing from File > New > Personal. Check the Default personal templates location in File > Options > Save, and that the file is in that folder with a .dotx, .dotm or .dot extension.
- A template in the STARTUP folder keeps coming back. Word loads templates stored in its Startup folder automatically every time it starts (the folder is listed under File > Options > Advanced > General > File Locations). To change one, close Word, move the file out of that folder, open and save it with File > Open, then move it back.
- Word asks to save Normal.dotm every time you quit. An add-in or macro is usually changing it. Clearing Prompt before saving Normal template in File > Options > Advanced only hides the question; it does not stop the change.
- Old documents did not update. That is expected. Documents already made from the template keep the formatting they were created with.
Template Editing Questions
What Is the Difference Between .dotx and .dotm?
Both are Word templates. A .dotm file can store macros (VBA code), while a .dotx cannot. Save as .dotm only when the template really needs macros, and keep .dotx for everything else.
How Do I Turn a Normal Document Into a Template?
Open the document, choose File > Save As, pick Word Template as the file type, and save it in Custom Office Templates. It then appears under File > New > Personal.
Can I Edit a Template Someone Emailed Me?
Yes. Save the attachment to a folder first, then open the saved file with File > Open in Word and check the title bar, the same as for any template. You are editing your own copy; the sender’s original does not change.
Will Other People See My Changes?
Only if they use the same file. Editing your own copy in Custom Office Templates affects only you. For a team template on a shared drive, edit the shared copy, and tell people to close any document they have open from it first.
Once your template saves correctly, create one test document from it and print or export it to make sure the header, footer and styles look right. Microsoft’s help page on editing templates and its style customization instructions cover the same controls if you want a second reference.

Matthew Burleigh is the founder, head writer, and editor of Solve Your Tech, which he launched in 2012. He has written technology tutorials since 2008 and worked in IT since 2003, including small-business support, IT management, and consulting. He holds Bachelor’s and Master’s degrees in Computer Science from Arizona State University.
Matthew writes practical guides for Windows, iPhone and iPad, Microsoft Office, Outlook, Google apps, and Android. Solve Your Tech’s guides are checked step by step against the device or app maker’s own documentation and tested on his own devices whenever he has the hardware or software, with clear steps, sources, and update dates.
Read more about Matthew and how Solve Your Tech writes and updates its guides, or report a correction.