Windows 11 doesn’t have a working built-in Guest account, but you can create a standard local account for visitors. Open Settings > Accounts > Other users, select Add account, choose to add a user without a Microsoft account, and name it something like Visitor. A standard account can’t change system settings or see other people’s files.
This guide covers creating the visitor account in Settings, an optional Command Prompt method, what the account can and can’t do, keeping it locked down, switching to it, and removing it when you’re done. The same approach works on Windows 10, with slightly different menu names.
Why there’s no real Guest account anymore
Older versions of Windows had a Guest account that let anyone sign in without a password and erased their changes afterward. Starting with Windows 10, that account is disabled for home use. Windows still reserves the name “Guest,” so you can’t create a new account with that exact name. The practical replacement is a separate standard account that only visitors use.
Create a visitor account in Settings
These steps follow Microsoft’s Manage user accounts in Windows. You need to be signed in with an administrator account.
Step 1: Open Other users
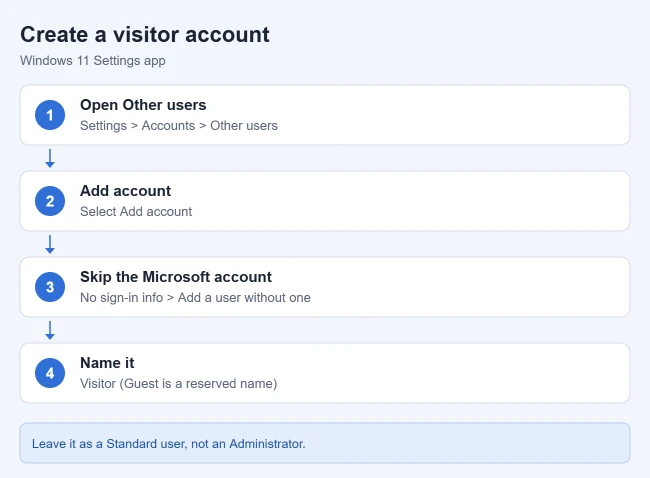
Open Settings (Windows key + I) and select Accounts > Other users.
Result: you see any other accounts on the PC and an Add account button.
Step 2: Start adding an account
Next to Add other user, select Add account.
Result: a Microsoft account sign-in window opens.
Step 3: Skip the Microsoft account
Select I don’t have this person’s sign-in information, then Add a user without a Microsoft account.
Result: a form for a local account appears. Microsoft generally recommends Microsoft accounts, but a local account is the right choice for a shared visitor login.
Step 4: Name the account and set a password
Type a name such as Visitor. Add a simple password and answer the security questions, or leave the password blank if you’re comfortable with anyone at the PC signing in to it. Select Next.
Result: the account appears under Other users as a Local account. Windows creates it as a standard user, which is what you want. For more options, see how to create a local account on Windows 11.
Check that it’s a standard account
- In Settings > Accounts > Other users, select the Visitor account.
- Next to Account options, select Change account type.
- Make sure Standard User is selected, then select OK.
Result: the visitor can’t change system settings or install most desktop apps without your administrator password. Microsoft recommends keeping the number of administrators small for exactly this reason.
Alternative: create it with Command Prompt
If you prefer typing commands, open Terminal or Command Prompt as administrator and run:
net user Visitor /addResult: Windows creates a standard local account named Visitor with no password. To add a password, run net user Visitor * and type it twice. Some guides also add the account to the built-in Guests group, but that group doesn’t restore the old disappearing-changes behavior, and the Local Users and Groups tool isn’t available on Windows 11 Home.
What a visitor account can and can’t do
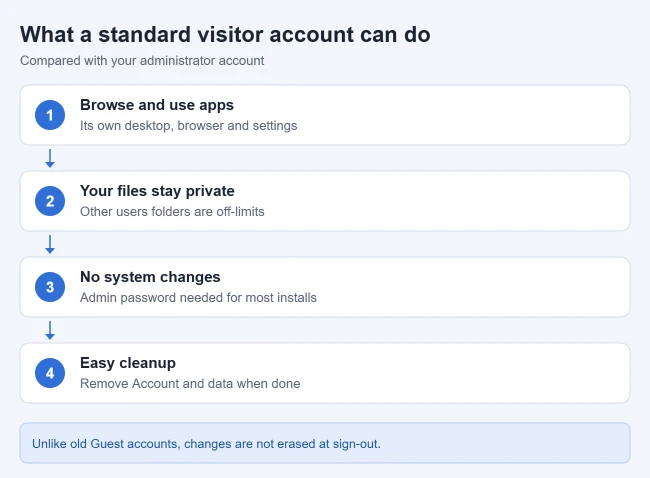
- Can: browse the web, use installed apps, and save files to its own folders.
- Can’t: open other accounts’ folders in C:\Users, change system settings, or install most desktop apps without an administrator password.
- Keeps changes: unlike the old Guest account, Windows doesn’t wipe the account at sign-out. Browser history and saved files stay until you clear them or remove the account.
Switch to the visitor account
- Select Start, select your profile picture, and choose Visitor.
- Or press Windows key + L to lock your account, then select Visitor on the sign-in screen. Your apps stay open in your own account.
Remove the account when you’re done
- Sign out of the visitor account.
- Go to Settings > Accounts > Other users and select the account.
- Next to Account and data, select Remove, then confirm.
Result: Microsoft says this removes the account’s sign-in information and data from the device. See also how to delete a user profile in Windows 11.
Frequently Asked Questions
Can I name the account “Guest”?
No. Windows reserves that name for the disabled built-in account. Use Visitor, Guest User or similar.
Can a visitor install apps?
A standard user can install some Microsoft Store apps for their own account, but can’t install most desktop apps without an administrator password.
How do I create a guest account in Windows 10?
The steps are almost the same. Go to Settings > Accounts > Family & other users, select Add someone else to this PC, then choose I don’t have this person’s sign-in information and Add a user without a Microsoft account.
Is a password-free visitor account safe?
It can’t reach your files, but anyone at the PC can use it. If the PC is in a shared space, add a simple password and share it only with visitors.
Will the visitor see my browser passwords?
No. Each account has its own browser profile, history and saved passwords.

Matthew Burleigh is the founder, head writer, and editor of Solve Your Tech, which he launched in 2012. He has written technology tutorials since 2008 and worked in IT since 2003, including small-business support, IT management, and consulting. He holds Bachelor’s and Master’s degrees in Computer Science from Arizona State University.
Matthew writes practical guides for Windows, iPhone and iPad, Microsoft Office, Outlook, Google apps, and Android. Solve Your Tech’s guides are tested on current devices or checked against official product documentation, with clear steps, sources, and update dates.
Read more about Matthew and how Solve Your Tech writes and updates its guides, or report a correction.