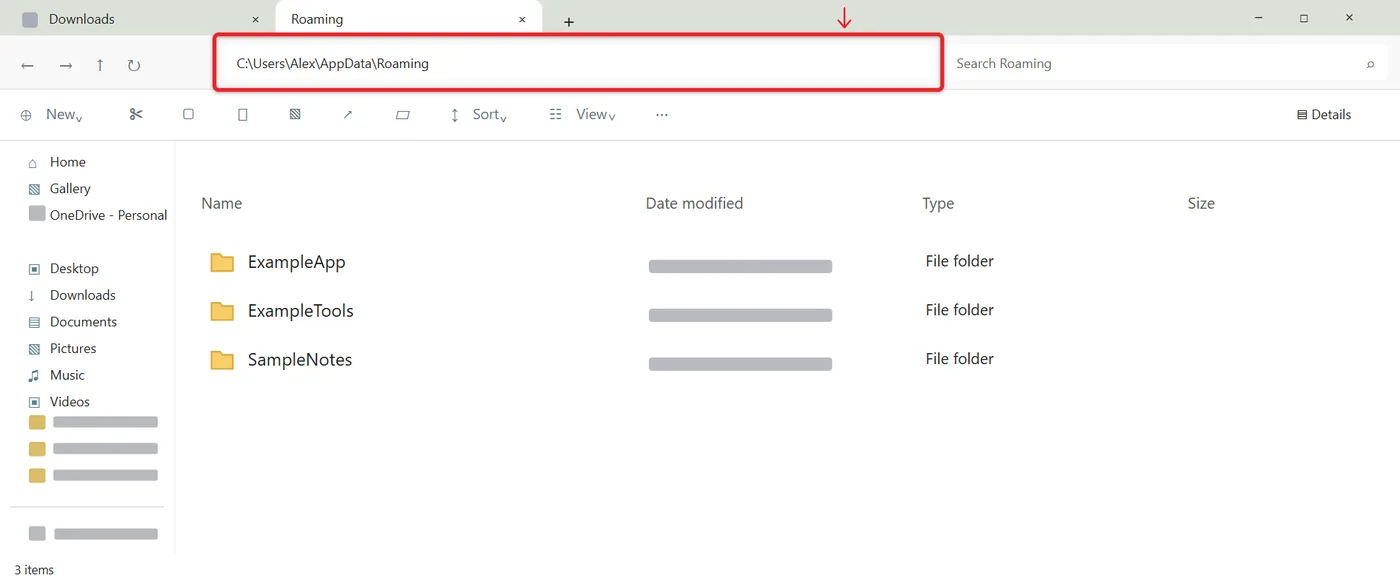
The fastest way to open the AppData folder in Windows 11 is to press Windows + R, type %appdata%, and press Enter. That opens the Roaming folder inside AppData; select AppData in the address bar to see all of it. The folder lives at C:\Users\YourName\AppData and is hidden by default, so File Explorer won’t show it until you turn on hidden items.
These steps match Windows 11 versions 24H2, 25H2, and 26H2. The Run shortcuts also work on Windows 10, which reached end of support on October 14, 2025. You don’t need an administrator account to open your own AppData folder.
How to Open AppData With the Run Box
- Press Windows + R to open Run.
- Type
%appdata%and press Enter. File Explorer opens AppData\Roaming.
- To open the Local folder instead, type
%localappdata%. Chrome keeps its profile data there, as explained in where Chrome bookmarks are stored. - To see the whole AppData folder, select AppData in the File Explorer address bar, or type
%userprofile%\AppDatain Run.

These shortcuts work even when hidden items are turned off. You can also type them into the File Explorer address bar or the Start menu search box and press Enter. Typing %temp% opens the Temp folder inside Local. Keep both percent signs; without them, Windows looks for a program named appdata and shows a “Windows cannot find” error.
How to Find AppData in File Explorer
- Open File Explorer with Windows + E.
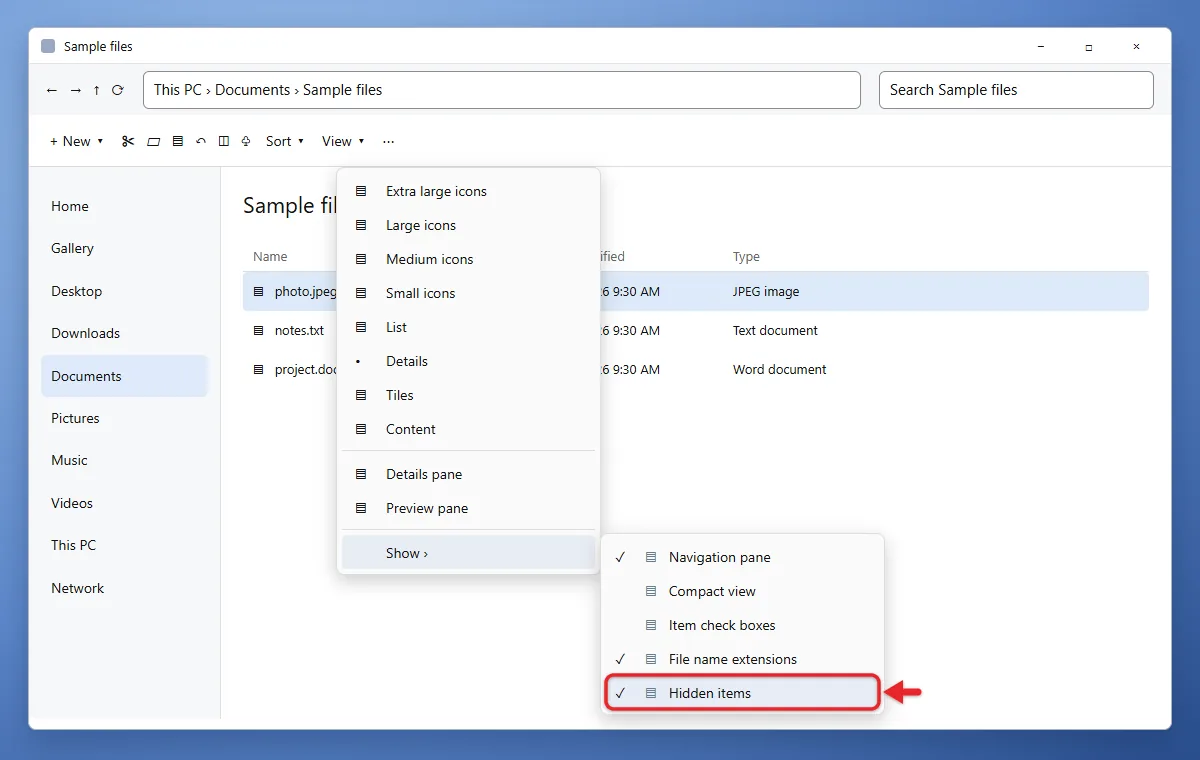
- Select View > Show > Hidden items so a check mark appears. Hidden folders now show with slightly faded icons.
- Go to This PC > C: > Users > your user name.
- Open AppData. You see the Local, LocalLow, and Roaming folders.
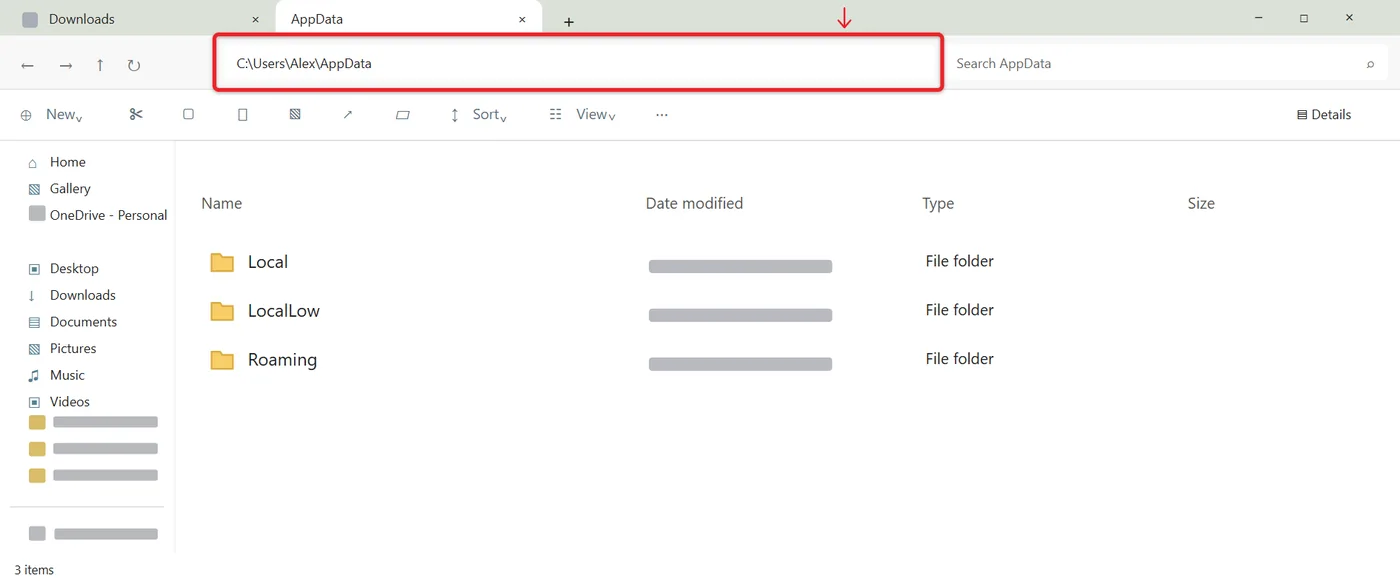
Microsoft lists the Hidden items setting in its File Explorer guide. You can also paste C:\Users\YourName\AppData into the address bar, replacing YourName with your profile folder name. If you open AppData often, right-click it and select Pin to Quick access. Hidden items also shows any folder you hid yourself with the Hidden attribute, one of the methods in the steps for an invisible folder.
Pinned folders show at the top of File Explorer’s left pane. The steps for using Quick access in Windows 11 cover pinning, reordering, and resetting them. To hide AppData again, go back to View > Show and clear Hidden items. That only changes the view; nothing in the folder is touched.
Show hidden folders from Control Panel
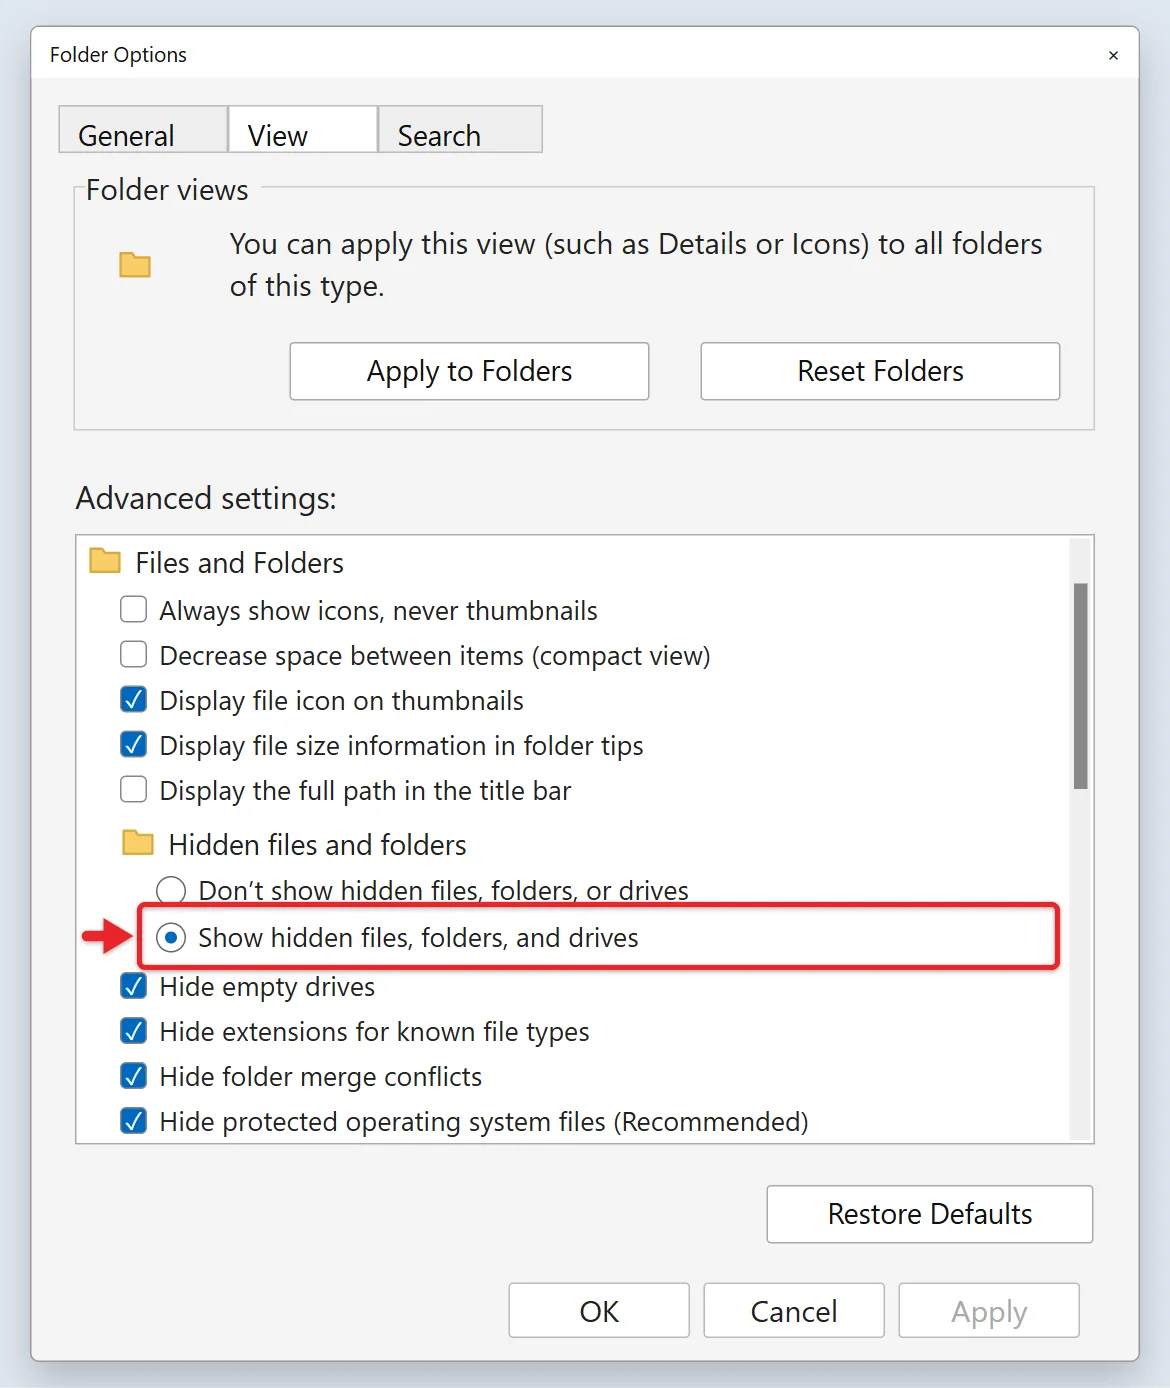
An older route does the same thing: open Control Panel, select File Explorer Options, open the View tab, choose Show hidden files, folders, and drives, and select OK. On Windows 10, the same setting is a Hidden items check box on File Explorer’s View tab.
What’s Inside the AppData Folder

- Roaming: settings that apps want to follow you. On work networks with roaming profiles, this folder syncs to other PCs you sign in to. Game files such as Minecraft’s
.minecraftfolder (Java Edition) live here. For Bedrock Edition, follow the steps for updating Minecraft Bedrock on Windows 11. - Local: data that stays on this PC, like browser caches, logs, and larger app files. It’s usually the biggest of the three. Some apps, such as Discord, install themselves here for just your account.
- LocalLow: data for apps that run with limited permissions, such as some browser modes and games. It’s often small or nearly empty.
Programs installed for all users go in C:\Program Files, while per-user settings and installs go in AppData, which is why each account on the PC has its own AppData folder.
To learn about the other top-level folders on that drive, read about finding the C drive in Windows 11.
Common Folders People Look For in AppData
- Startup folder: Roaming\Microsoft\Windows\Start Menu\Programs\Startup (or type
shell:startupin Run) - Start menu shortcuts: Roaming\Microsoft\Windows\Start Menu\Programs
- Outlook signatures: Roaming\Microsoft\Signatures
- Chrome profile and cache: Local\Google\Chrome\User Data
- Minecraft files: Roaming\.minecraft
- Temporary files: Local\Temp (or type
%temp%)
Paths can differ with app versions, especially for Microsoft Store apps, which keep their data under Local\Packages.
The Recent Items folder is also here, under Roaming\Microsoft\Windows\Recent. The steps for seeing recent files in Windows 11 show a quicker way to open it.
If You Still Can’t Find AppData
- You’re in the wrong user folder. C:\Users also holds Public and other accounts’ folders. Open the folder with your own account name, or use
%userprofile%\AppDatato go straight there. - Your profile folder name isn’t your full name. If you signed in with a Microsoft account, the folder may use a shortened name, such as the first few letters of your email address. The
%appdata%shortcut finds it for you. - You need another account’s AppData. Each account has its own. Opening someone else’s requires an administrator account, and Windows may ask for permission before it opens.
- You don’t need to show protected operating system files. AppData is a hidden folder, not a system file, so Hidden items is enough. Leave Hide protected operating system files turned on.
Be Careful Before Deleting Anything
AppData holds settings, saved data, and sometimes game saves for your apps. Deleting a folder here can reset an app, sign you out, or remove data you can’t get back. Never delete or move the whole AppData folder. Before you change an app’s folder, copy it somewhere safe, such as an external drive. The same copy is a handy backup before you reinstall the app or move to a new PC.
Safely reset a misbehaving app
- Close the app completely.
- Open AppData with
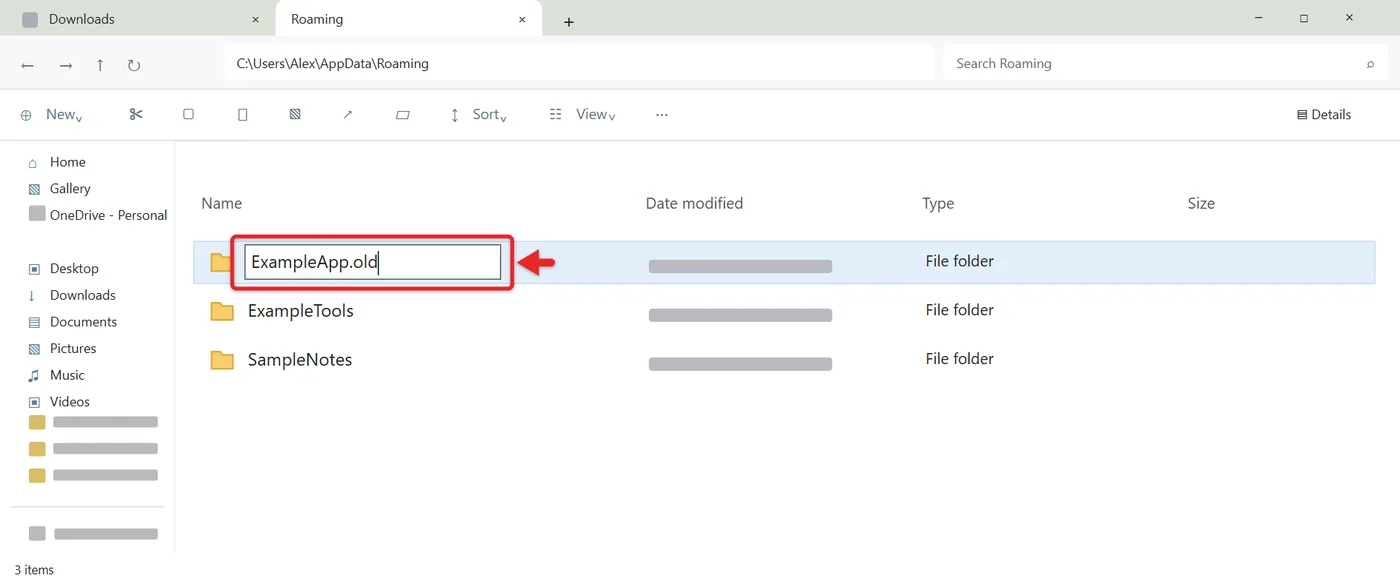
%appdata%or%localappdata%and find the app’s folder, usually named after the app or its publisher. - Rename the folder, for example by adding
.oldto the end, instead of deleting it.
- Open the app. It creates a fresh folder with default settings.
- If the problem is fixed, copy back only what you need (such as saves) from the .old folder. If not, delete the new folder and rename the old one back.
This rename-first approach is safer because you can roll back if the app needed the original files.
Free Up Space in AppData
Don’t bulk-delete the Local, LocalLow or Roaming folders, since they hold app settings and saved data, not just cache. The Temp folder is the safest place to clean, and you can delete temp files in Windows 11. You can also go to Settings > System > Storage > Cleanup recommendations, review Temporary files, and select Clean up, as Microsoft’s drive-space guide describes.
For one app’s cache, use the app’s own clear-cache option first, the way you would clear the cache in Microsoft Edge.
AppData Questions
Why can’t I see the AppData folder?
It’s a hidden folder. Turn on View > Show > Hidden items in File Explorer, or use %appdata% in the Run box, which works without changing any settings.
Is it safe to delete the AppData folder?
No. Don’t delete the whole folder. It holds data many apps need. Only remove a specific app’s folder if you know what it does, and rename it first.
What’s the difference between %appdata% and %localappdata%?
%appdata% opens AppData\Roaming, and %localappdata% opens AppData\Local. Check an app’s documentation to see which one it uses. One Roaming folder people often hunt for holds older Office templates, and where PowerPoint templates are stored explains how to point PowerPoint at it.
Does every user have an AppData folder?
Yes. Each account on the PC has its own AppData inside its user folder, so one person’s app settings don’t affect another’s.
Can I move AppData to another drive?
It isn’t a good idea. Many apps expect AppData in its default location, and moving it can break them. Free up space with the cleanup tools above instead.

Matthew Burleigh is the founder, head writer, and editor of Solve Your Tech, which he launched in 2012. He has written technology tutorials since 2008 and worked in IT since 2003, including small-business support, IT management, and consulting. He holds Bachelor’s and Master’s degrees in Computer Science from Arizona State University.
Matthew writes practical guides for Windows, iPhone and iPad, Microsoft Office, Outlook, Google apps, and Android. Solve Your Tech’s guides are checked step by step against the device or app maker’s own documentation and tested on his own devices whenever he has the hardware or software, with clear steps, sources, and update dates.
Read more about Matthew and how Solve Your Tech writes and updates its guides, or report a correction.